
Search Knowledge Base by Keyword
New Connector
From the Connector Library page, you can create new connectors. To create:
- Click the New Connector button to bring up the New Connector wizard
- Enter the properties of the new connector on the Connector Properties tab
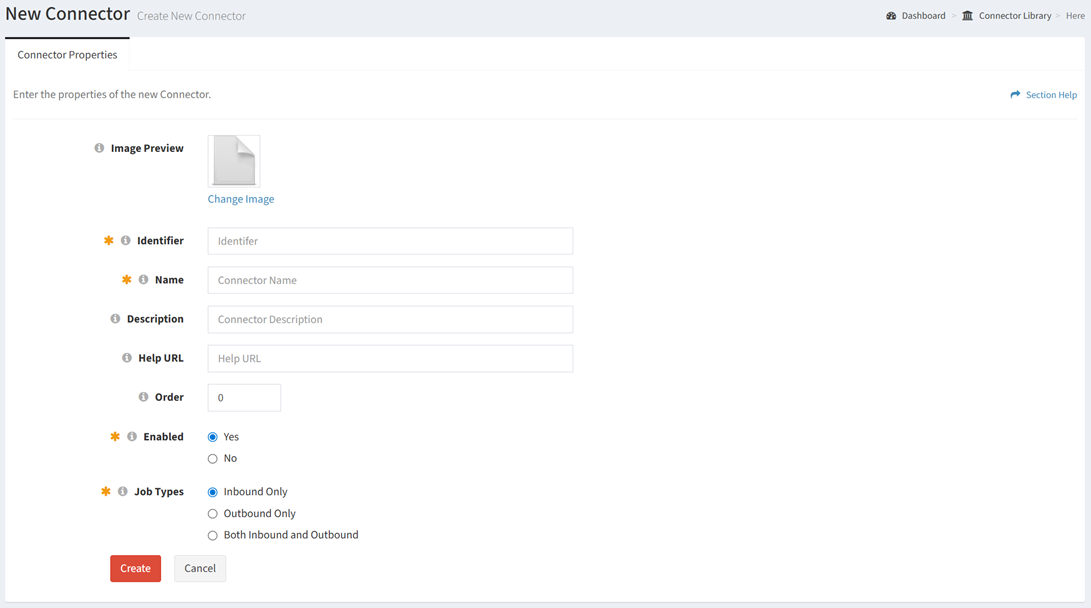
- Image Preview – Upload image to display on the Connection page (optional)
- Click the Change Image hyperlink and browse for an image to upload


- Click the Update button to upload the image. Click the Clear Selected File hyperlink to clear the file and browse for a new image. Click the Cancel Changes hyperlink to cancel the operation.

- Click the Change Image hyperlink and browse for an image to upload
- Identifier – Enter identifier of the connector (required)
- Name – Enter name of the connector (required)
- Description – Enter description of the connector (optional)
- Help URL – Enter help URL of the connector (optional)
- Order – Choose the order the connector is displayed on the Connections page (optional)
- Enabled – Choose if the connector is enabled (required)
- Job Types – Choose the type of jobs available for the connector (required)
- Inbound Only
- Outbound Only
- Both Inbound and Outbound
- Image Preview – Upload image to display on the Connection page (optional)
- Click the Create button when finished to create the connector. You will be redirected to the Connector Properties tab to continue creating the connector. Click the Cancel button to cancel the operation.
- Create authentication methods for the new connector on the Authentication Methods tab

- Click the New Authentication Method button to bring up the New Authentication Method dialog
- Enter the properties of the new authentication method
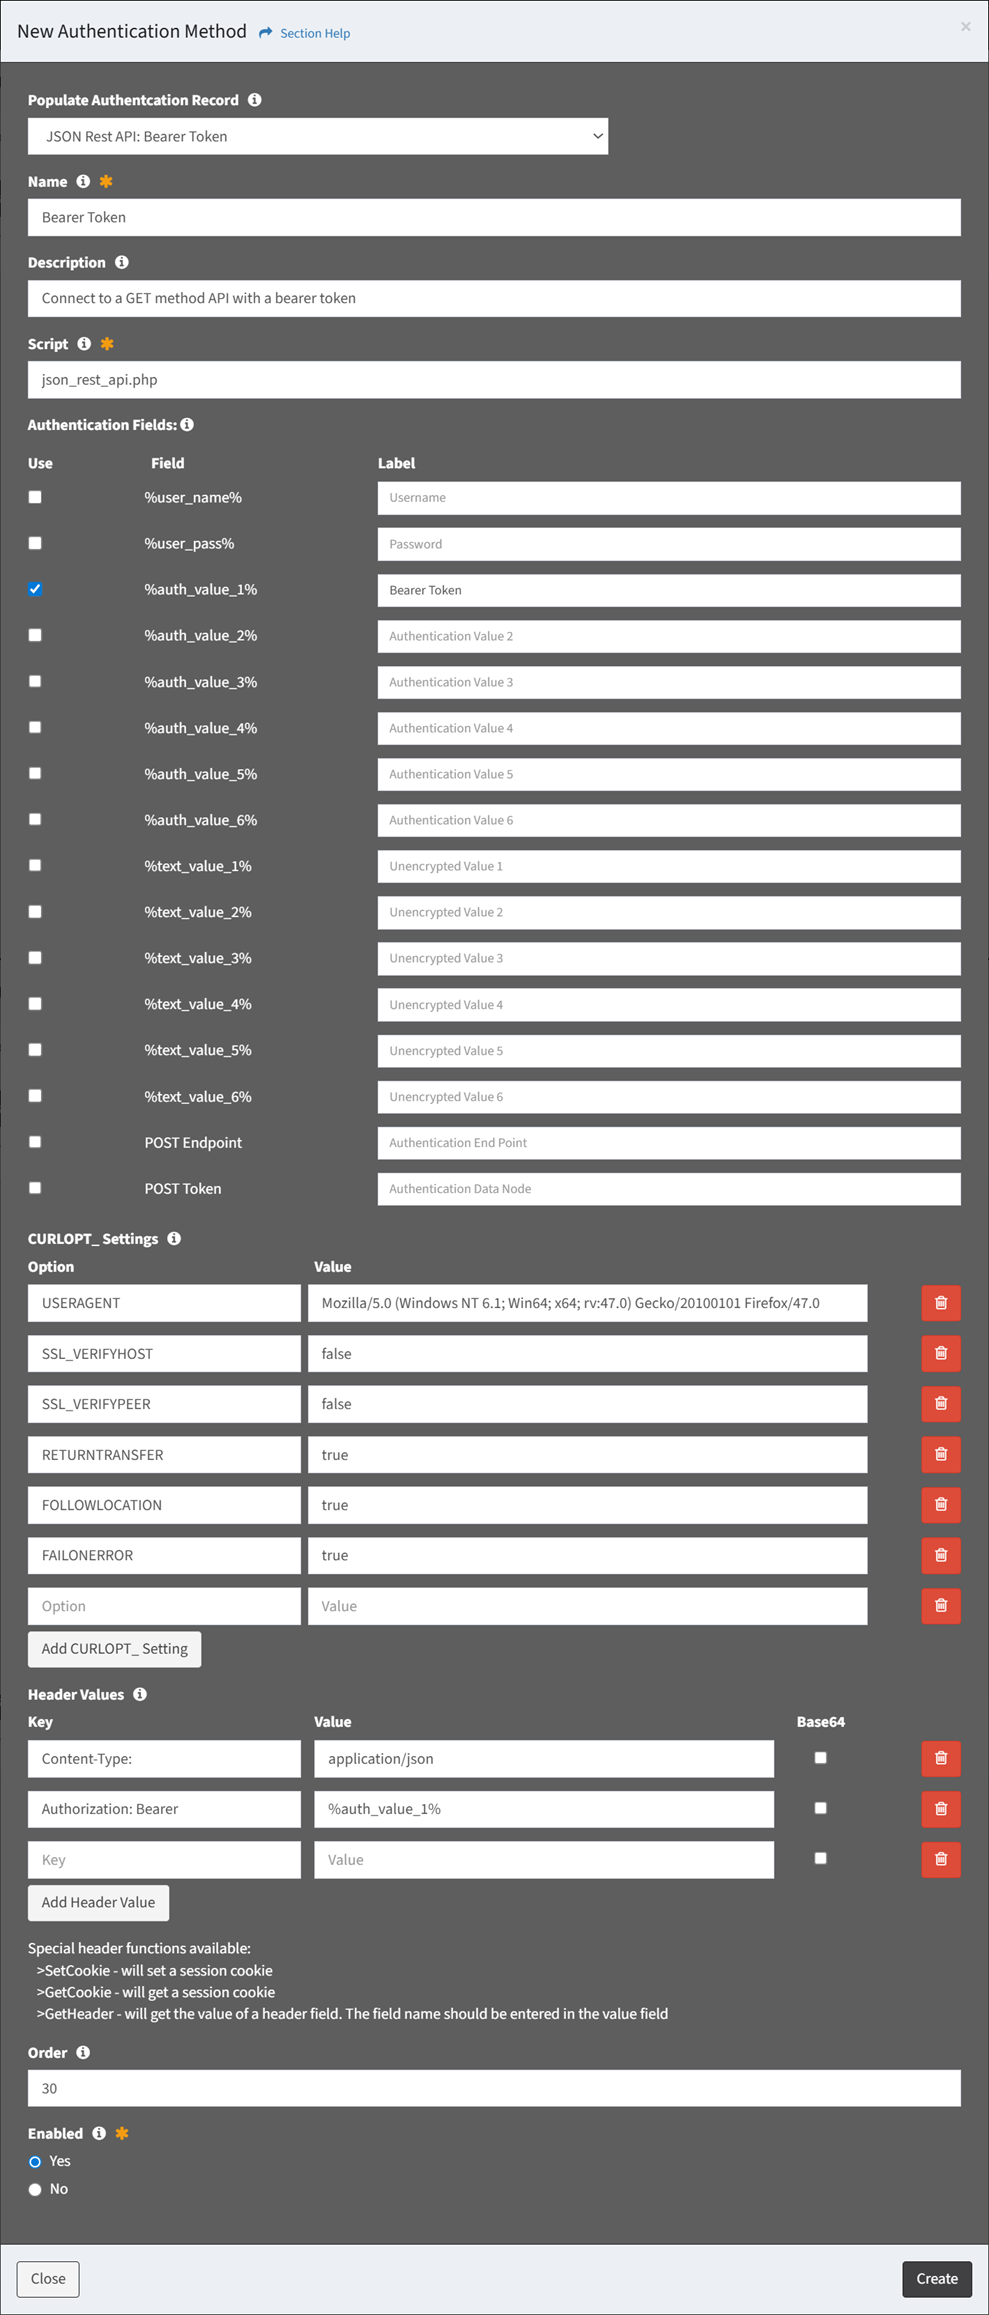
- Populate Authentication Record – Choose how to populate the authentication method (required)
- Clear Data – Start with an empty record
- Clone Authentication Method – Start with a clone from an existing authentication method
- Name – Name of the authentication method (required)
- Description – Description of the authentication method (optional)
- Script – Name of the authentication script (required)
- json_rest_api.php
- Authentication Fields – Authentication fields of the authentication method (optional)
- CURLOPT Settings – CURLOPT settings of the authentication method (optional)
- Header Values – API header values of the authentication method (optional)
- Data Values – API data values of the authentication method (optional)
NOTE: These settings are only visible when POST Endpoint has been checked. - Post Authorization CURLOPT Settings – Post authorization PHP CURLOPT settings of the authentication method (optional)
NOTE: These settings are only visible when POST Endpoint has been checked. - Post Authorization Header Values – API post authorization header values of the authentication method (optional)
NOTE: These settings are only visible when POST Endpoint has been checked.
- json_rest_api.php
- Order – Order of the authentication method in the menu (optional)
- Enabled – Choose if the authentication method is enabled (required)
- Populate Authentication Record – Choose how to populate the authentication method (required)
- Click the Create button when finished to create the authentication method. You will be redirected back to the Authentication Methods tab. Click the Close button to cancel the operation.
- The new authentication method function is only available to users in the Administrator security group
- Override ETL error settings by selecting an authentication method (row) and clicking the Authentication Method Error Settings button on the toolbar
- Associate fields with the authentication method for the new connector on the Fields tab
- Select a field (row) to edit

- Click the Edit Field button on the toolbar to bring up the Edit Field dialog

- The edit button is grayed out unless a field (row) is selected


- The edit function is only available to users in the Administrator security group
- The edit button is grayed out unless a field (row) is selected
- Update the properties of the field
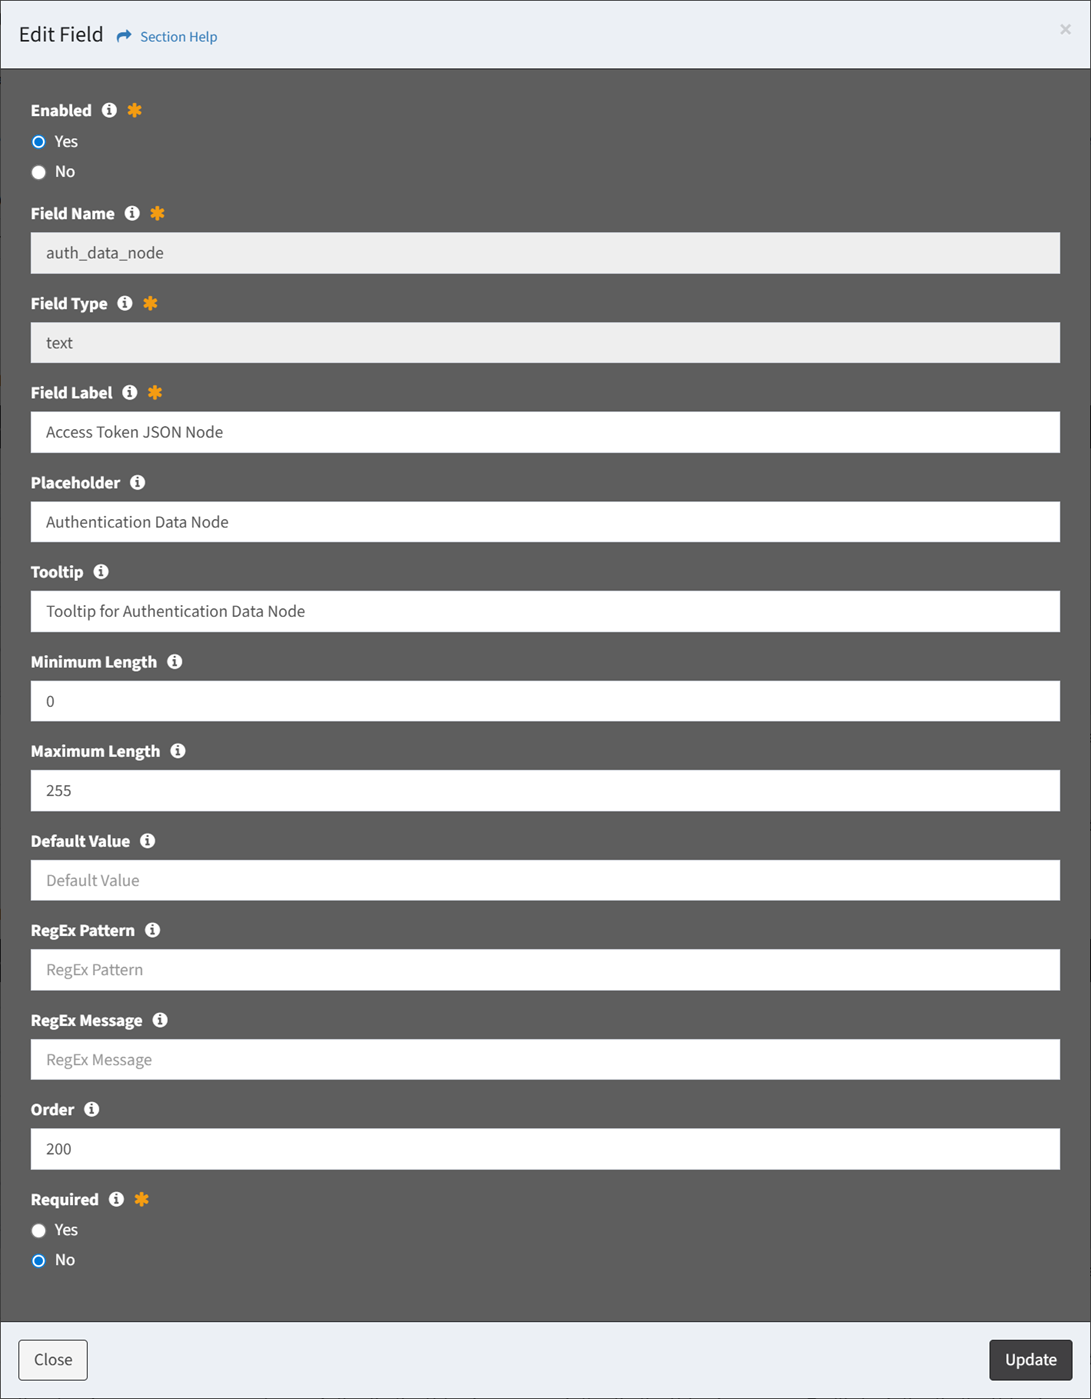
- Enabled – Choose if the field is enabled (required)
- Field Name – Name of the field (required)
- Field Type – Type of the field (required)
- Field Label – Label of the field (required)
- Placeholder – Placeholder of the field (optional)
- Tooltip – Tooltip of the field (optional)
- Input Data – JSON input data of the field (optional)
- Minimum Length – Minimum length (number of characters) of the field (optional)
- Maximum Length – Maximum length (number of characters) of the field (optional)
- Default Value – Default value of the field (optional)
- RegEx Pattern – Regular expression pattern to validate input values of the field (optional)
- RegEx Message – Message to display for input values that do not match the regular expression pattern (optional)
- Order – Order of the field in the Activate New Connection dialog (optional)
- Required – Choose if the field is required (required)
- Click the Update button when finished to update the field. You will be redirected back to the Fields tab. Click the Close button to cancel the operation.
- Select a field (row) to edit
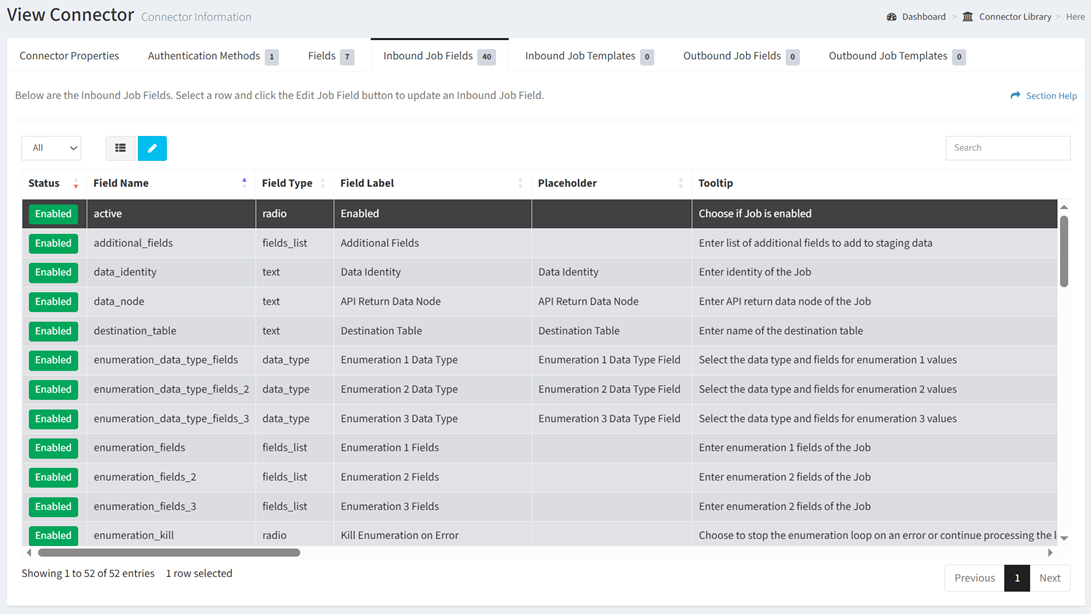
- Define the inbound job fields for the new connector on the Inbound Job Fields tab
- Select a job field (row) to edit
- Click the Edit Job Field button on the toolbar to bring up the Edit Job Field dialog
- The edit button is grayed out unless a job field (row) is selected
- The edit function is only available to users in the Administrator security group
- The edit button is grayed out unless a job field (row) is selected
- Update the properties of the job field
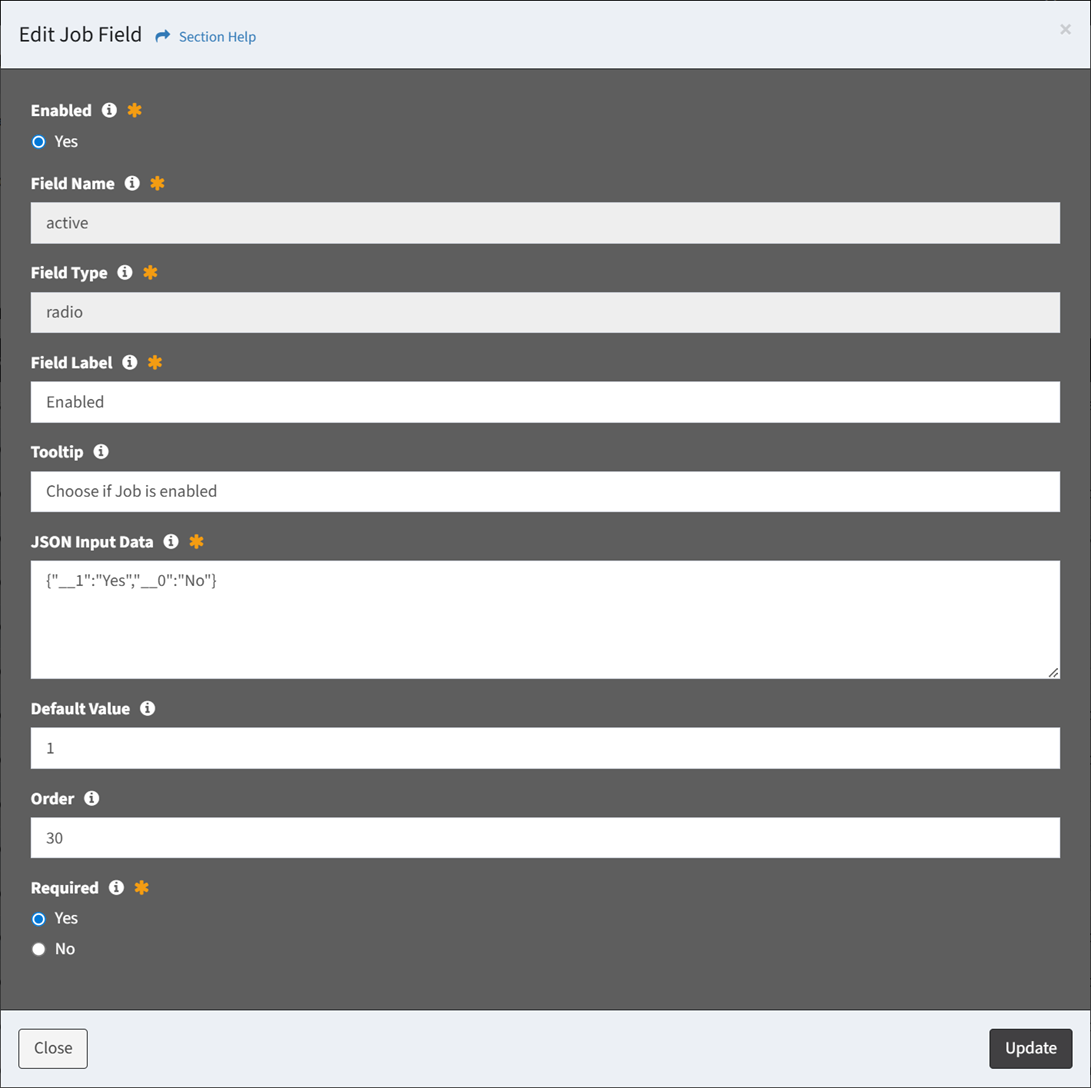
- Enabled – Choose if the field is enabled (required)
- The following inbound job fields are enabled by default and cannot be disabled: Order, Fields to Index, Data Identify, Destination Table, Enabled, Job Schedule, Job Description.
- Field Name – Name of the field (required)
- Field Type – Type of the field (required)
- Field Label – Label of the field (required)
- Placeholder – Placeholder of the field (optional)
- Tooltip – Tooltip of the field (optional)
- JSON Input Data – JSON input data of the field (optional)
- Minimum Length – Minimum length (number of characters) of the field (optional)
- Maximum Length – Maximum length (number of characters) of the field (optional)
- Default Value – Default value of the field (optional)
- RegEx Pattern – Regular expression pattern to validate input values of the field (optional)
- RegEx Message – Message to display for input values that do not match the regular expression pattern (optional)
- Order – Order of the field in the New Inbound Job and Edit Inbound Job dialogs (optional)
- Required – Choose if the field is required (required)
- Enabled – Choose if the field is enabled (required)
- Click the Update button when finished to update the inbound job field. You will be redirected back to the Inbound Job Fields tab. Click the Close button to cancel the operation.
- Select a job field (row) to edit
- Create inbound job templates for the new connector on the Inbound Job Templates tab

- Click the New Inbound Job Template button to bring up the New Job Template dialog
- Enter the properties of the new job template (available job template fields differ by connector)
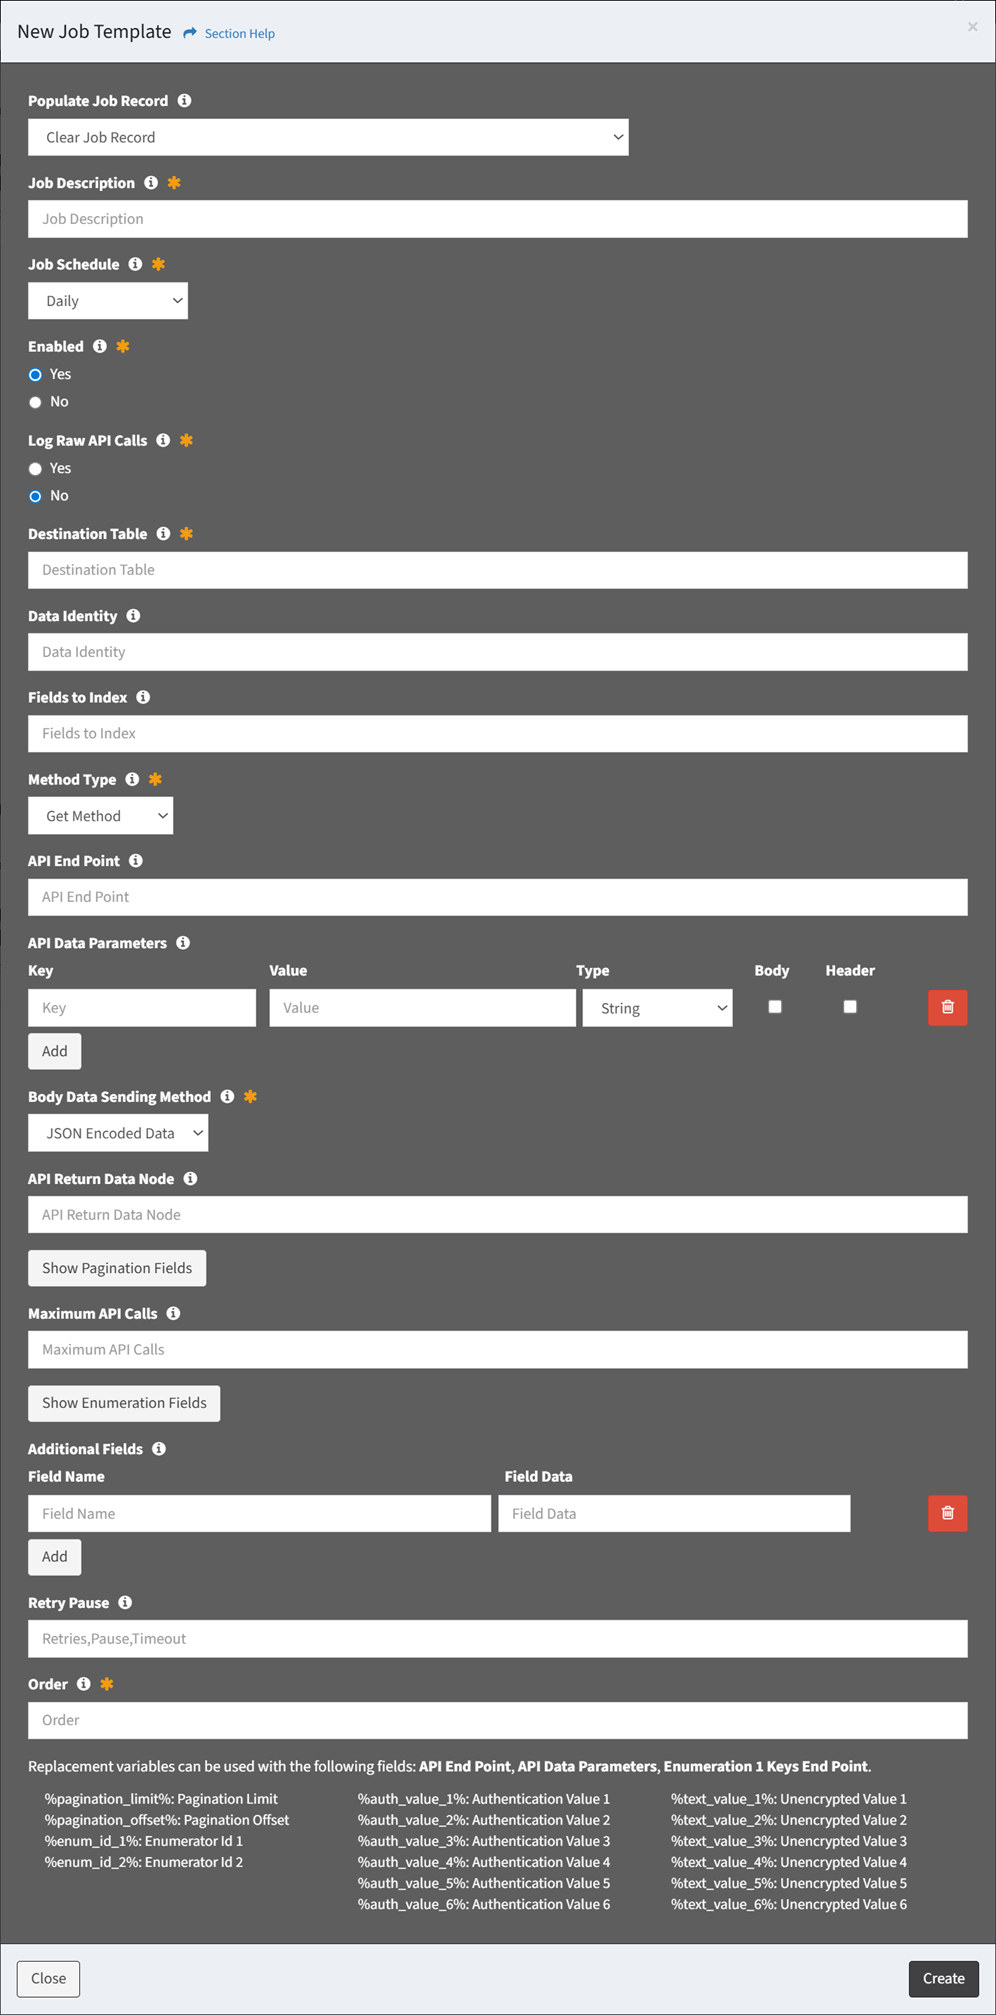
- Populate Job Record – Choose how to populate the job template (required)
- Clear Job Record – Start with an empty record
- Use Template – Start with a template job
- Job Description – Description of the job template (required)
- Job Schedule – Choose the frequency the job template will run (required)
- Hourly
- Daily
- Weekly
- Every 5 Minutes
- Every 15 Minutes
- Every 30 Minutes
- Custom
- Enabled – Choose if the job template is enabled (required)
- Use Unparsed Data – Choose if incoming data is parsed or left in its raw format (optional)
- Log Raw API Calls – Choose if raw API calls are logged (required)
- Allow Empty Table – Choose if an empty table is allowed (required)
- Destination Table – Name of the destination table (e.g., my_table_cm_computer) (required)
- Data Identity – Identity of the data for dashboards (e.g., cm_computer) (optional)
- XML Envelope Payload – XML envelope payload of the SOAP call (optional)
- Data Selection – Connector specific data selection command of the job template (optional)
- CSV/JSON/XML File or Path – CSV/JSON/XML file or path (optional)
- Append Files to Same Destination Table – Choose if multiple files in the same path will append to the same destination table, or will create a new destination table for each file (optional)
- Append New Data to Existing Tables – Choose if new data will append to the same destination table, or will create a new destination table (optional)
- Fields to Index – Fields to index (optional)
- Request Unique Key Field – Request unique key field of the job template (databases only) (optional)
- Request Sort By Field – Field to sort the job template by (optional)
- Request Limit – Request limit of the job template (optional)
- Method Type – Method type of the job template (GET, POST, PUT, PATCH, DELETE) (required)
- API End Point – API end point of the job template (optional)
- API Data Parameters – API data parameters of the job template (optional)
- Enter Key and Value and select Type (String, Numeric, Boolean) for each API data parameter
- Check Body if the API data parameter is passed through the body rather than the URI (Uniform Resource Identifier)
- Check Header if the API data parameter is passed through the header rather than the URI (Uniform Resource Identifier)
- Click the Add button to add API data parameters
- Click the Delete button to delete API data parameters
- Body Data Sending Method – Method for sending the body data of the job template (JSON Encoded Data, Form Data) (required)
- Raw JSON Body Data – Raw JSON body to send. Do not use body selections in the API Parameters if this is used. (optional)
- API Return Data Node – API return data node of the job template (optional)
- Ignore XML Attributes – Choose if field attributes are ignored and not included in the data when parsing XML (optional)
- Click Show Pagination Fields to enter pagination properties of the job template. Click Hide Pagination Fields to hide pagination fields.
- Pagination Type – Paging type of the job template (Records, Pages, Next Record Node, Next Page Node) (optional)
- API Pagination Node – API pagination node of the job template (Next Page, Next Node) (optional)
- Pagination Offset Start – Request paging offset start or data node of the job template (optional)
- Pagination Limit – Request pagination limit of the job template (optional)
- Pagination Termination Node – Pagination termination node of the job template (optional)
- Maximum API Calls – Limit of API calls that can be made by the job template to avoid an endless loop (optional)
- Click Show Enumeration Fields to enter enumeration properties of the job template. Click Hide Enumeration Fields to hide enumeration fields.
NOTE: Triple enumeration is supported.- Enumeration 1 Type – Enumeration type of the job template (API End Point, Other ETL Job, Data Type, External Data) (optional)
- API End Point
- Enumeration 1 Keys End Point – Enumeration keys end point of the job template (optional)
- Enumeration 1 Node – Enumeration node of the job template (optional)
- Enumeration 1 Fields – Enumeration fields of the job template (optional)
- Other ETL Job
- Enumeration 1 ETL Job – ETL job for the enumeration values of the job template (optional)
- Enumeration 1 Fields – Enumeration fields of the job template (optional)
- Data Type
- Enumeration 1 Data Type – Data type and fields of the enumeration values (optional)
- External Data
- Enumeration Key – Enumeration key of the job template (optional)
- API End Point
- Enumeration 2 Type – Enumeration type of the job template (API End Point, Other ETL Job, Data Type) (optional)
- API End Point
- Enumeration 2 Keys End Point – Enumeration keys end point of the job template (optional)
- Enumeration 2 Node – Enumeration node of the job template (optional)
- Enumeration 2 Fields – Enumeration fields of the job template (optional)
- Other ETL Job
- Enumeration 2 ETL Job – ETL job for the enumeration values of the job template (optional)
- Enumeration 2 Fields – Enumeration fields of the job template (optional)
- Data Type
- Enumeration 2 Data Type – Data type and fields of the enumeration values (optional)
- API End Point
- Enumeration 3 Type – Enumeration type of the job template (API End Point, Other ETL Job, Data Type) (optional)
- API End Point
- Enumeration 3 Keys End Point – Enumeration keys end point of the job template (optional)
- Enumeration 3 Node – Enumeration node of the job template (optional)
- Enumeration 3 Fields – Enumeration fields of the job template (optional)
- Other ETL Job
- Enumeration 3 ETL Job – ETL job for the enumeration values of the job template (optional)
- Enumeration 3 Fields – Enumeration fields of the job template (optional)
- Data Type
- Enumeration 3 Data Type – Data type and fields of the enumeration values (optional)
- API End Point
- Pause Enumeration – Pause enumeration every X calls for Y seconds (optional)
- Kill Enumeration on Error – Choose if enumeration is stopped on an error (optional)
- Enumeration 1 Type – Enumeration type of the job template (API End Point, Other ETL Job, Data Type, External Data) (optional)
- Additional Fields – Additional fields to add to the staging data when the jobs run (optional)
- Enter Field Name and Field Data pair for each additional field
- Click the Add button to add additional fields
- Click the Delete button to delete additional fields
- Retry Pause – Retry API connection every X times, pausing Y seconds between each API try, with and API timeout of Z seconds (Retries,Pause,Timeout) (optional)
- Order – Order of the job template in the Activate New Connection dialog (required)
- Populate Job Record – Choose how to populate the job template (required)
- Click the Create button when finished to create the inbound job template. You will be redirected back to the Inbound Job Templates tab. Click the Close button to cancel the operation.
- The new inbound job template function is only available to users in the Administrator security group
- Override ETL error settings by selecting a job template (row) and clicking the Job Template Error Settings button on the toolbar
- Define the outbound job fields for the new connector on the Outbound Job Fields tab
- Select a job field (row) to edit
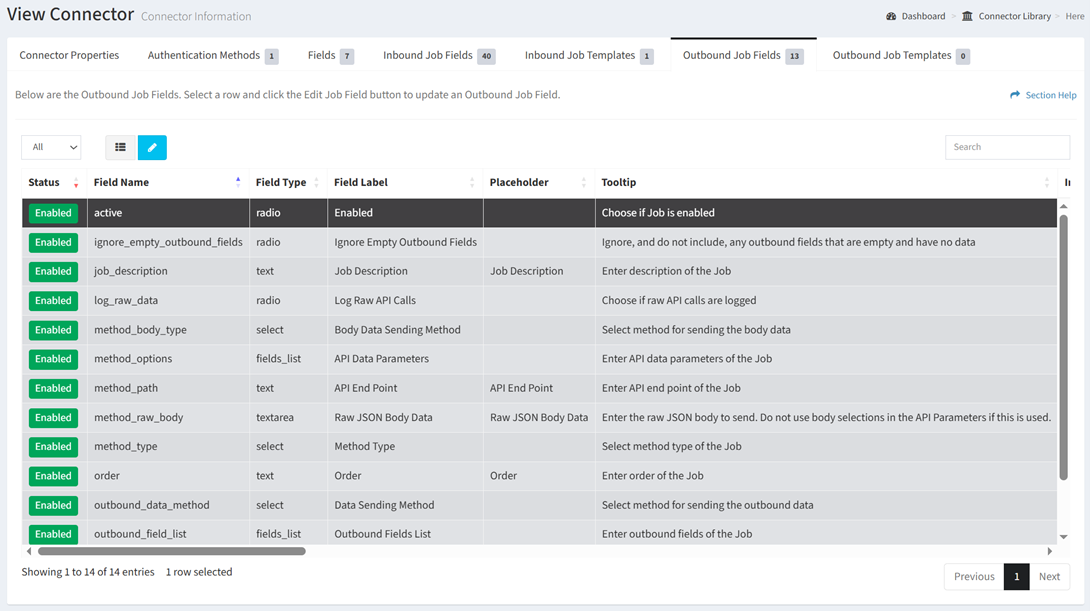
- Click the Edit Job Field button on the toolbar to bring up the Edit Job Field dialog
- The edit button is grayed out unless a job field (row) is selected
- The edit function is only available to users in the Administrator security group
- The edit button is grayed out unless a job field (row) is selected
- Update the properties of the job field
- Enabled – Choose if the field is enabled (required)
- The following outbound job fields are enabled by default and cannot be disabled: Order, Outbound Fields List, Return Data Fields List, Data Sending Method, Enabled, Job Description.
- Field Name – Name of the field (required)
- Field Type – Type of the field (required)
- Field Label – Label of the field (required)
- Placeholder – Placeholder of the field (optional)
- Tooltip – Tooltip of the field (optional)
- JSON Input Data – JSON input data of the field (optional)
- Minimum Length – Minimum length (number of characters) of the field (optional)
- Maximum Length – Maximum length (number of characters) of the field (optional)
- Default Value – Default value of the field (optional)
- RegEx Pattern – Regular expression pattern to validate input values of the field (optional)
- RegEx Message – Message to display for input values that do not match the regular expression pattern (optional)
- Order – Order of the field in the New Outbound Job and Edit Outbound Job dialogs (optional)
- Required – Choose if the field is required (required)
- Enabled – Choose if the field is enabled (required)
- Click the Update button when finished to update the outbound job field. You will be redirected back to the Outbound Job Fields tab. Click the Close button to cancel the operation.
- Select a job field (row) to edit
- Create outbound job templates for the new connector on the Outbound Job Templates tab

- Click the New Outbound Job Template button to bring up the New Job Template dialog
- Enter the properties of the new job template (available job template fields differ by connector)
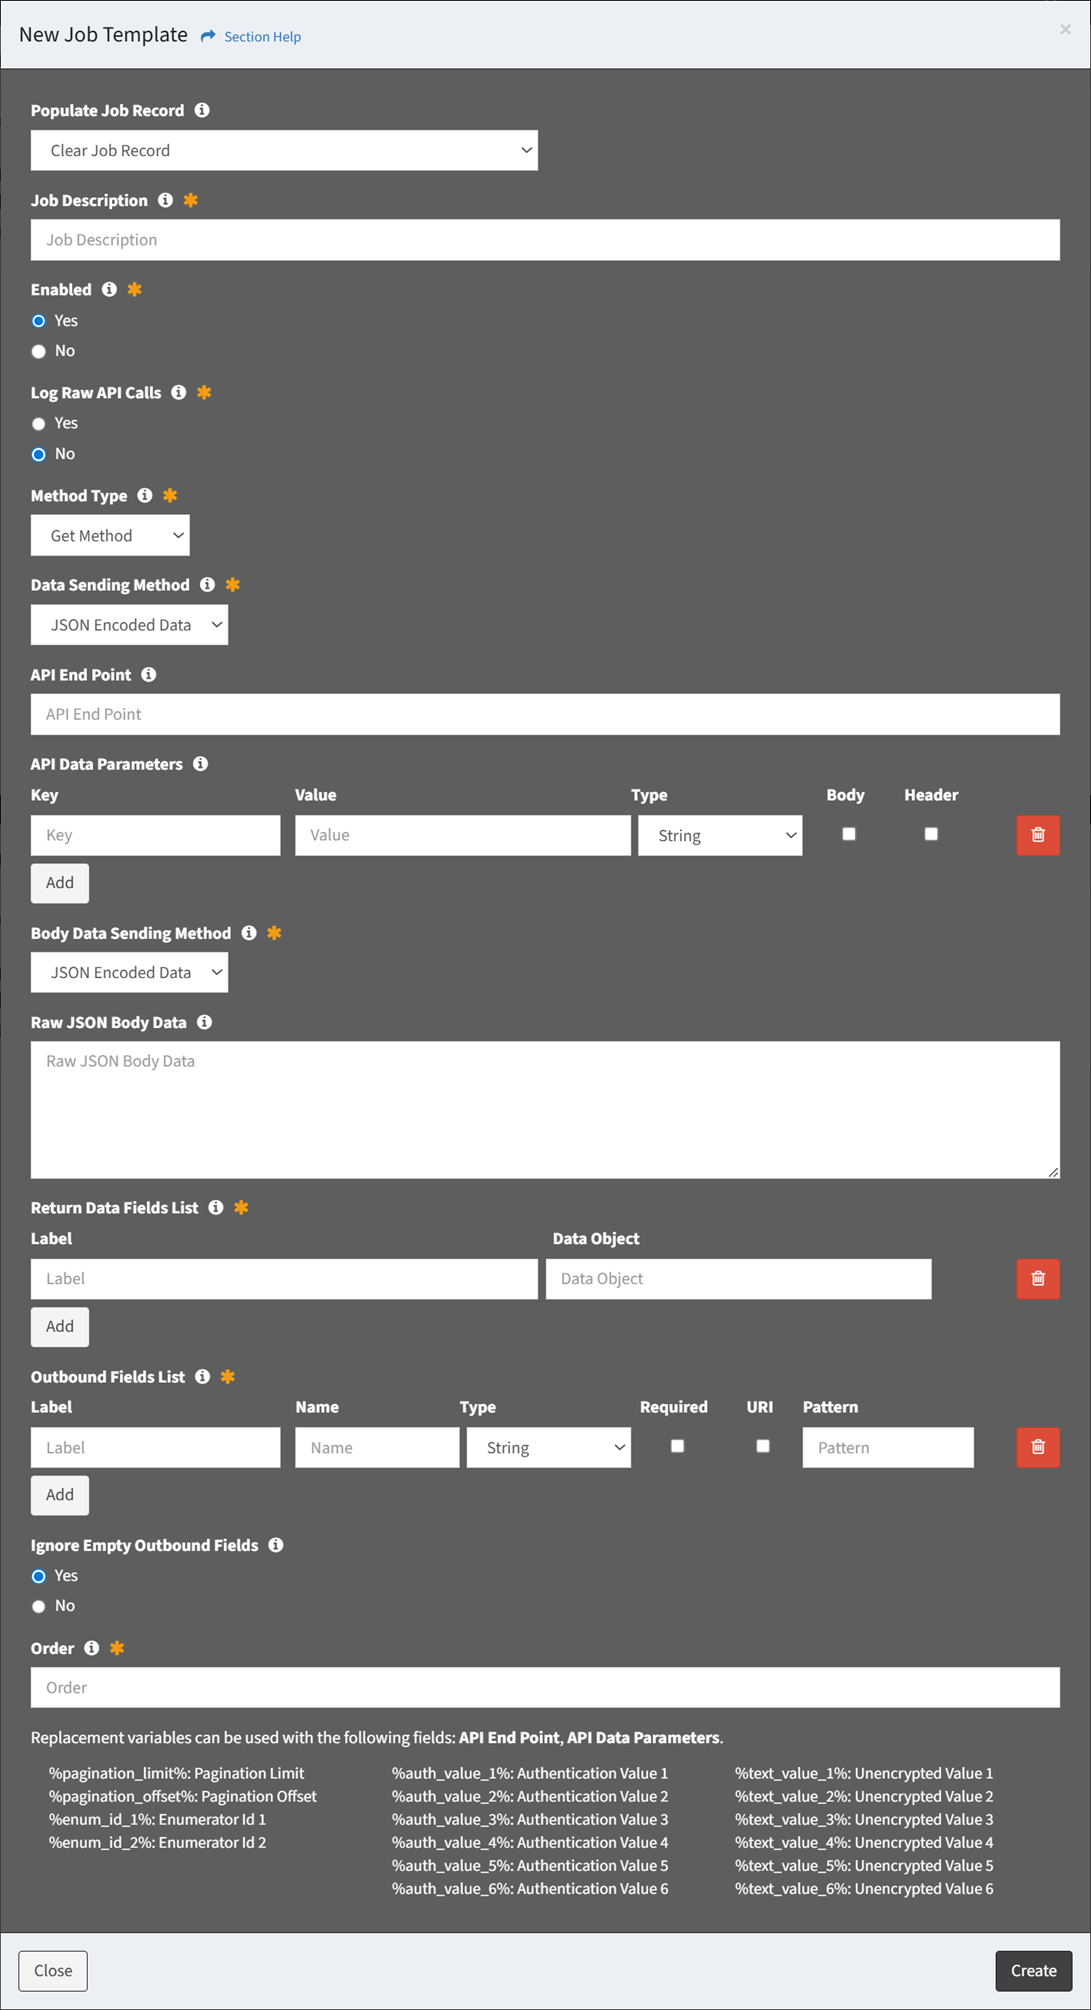
- Populate Job Record – Choose how to populate the job (required)
- Clear Job Record – Start with an empty record
- Use Template – Start with a template job
- Job Description – Description of the job template (required)
- Enabled – Choose if the job template is enabled (required)
- Log Raw API Calls – Choose if raw API calls are logged (required)
- Method Type – Method type of the job template (GET, POST, PUT, PATCH, DELETE) (optional)
- Data Sending Method – Data sending method of the job template (JSON Encoded Data, Form Data) (required)
- API End Point – API end point of the job template (optional)
- API Data Parameters – API data parameters of the job template (optional)
- Enter Key and Value and select Type (String, Numeric, Boolean) for each API data parameter
- Check Body if the API data parameter is passed through the body rather than the URI (Uniform Resource Identifier)
- Check Header if the API data parameter is passed through the header rather than the URI (Uniform Resource Identifier)
- Click the Add button to add API data parameters
- Click the Delete button to delete API data parameters
- Body Data Sending Method – Method for sending the body data of the job template (JSON Encoded Data, Form Data) (required)
- Return Data Fields List – Return data fields of the job template (required)
- Enter Label and Data Object pair for each return data field
- Click the Add button to add return data fields
- Click the Delete button to delete return data fields
- Outbound Fields List – Outbound fields of the job template (required)
- Enter Label and Name and select Type (String, Numeric, Boolean) for each outbound field (required)
- Check Required if the outbound field is required (required)
- Check URI if the outbound field is passed through the URI (Uniform Resource Identifier) rather than the data packet (optional)
- Enter Pattern for each outbound field (optional)
- Click the Add button to add outbound fields
- Click the Delete button to delete outbound fields
- Ignore Empty Outbound Fields – Choose if empty outbound fields are ignored (optional)
- Raw JSON Outbound Template – JSON outbound template to send. This replaces any automated structures defined in the outbound fields. (optional)
- Order – Order of the job template in the Activate New Connection dialog (required)
- Populate Job Record – Choose how to populate the job (required)
- Click the Create button when finished to create the outbound job template. You will be redirected back to the Outbound Job Templates tab. Click the Close button to cancel the operation.
- The new outbound job template function is only available to users in the Administrator security group
- Override ETL error settings by selecting a job template (row) and clicking the Job Template Error Settings button on the toolbar
- Click the Close button on the Connector Properties tab when finished to exit the wizard. You will be redirected back to the Connector Library page.