Search Knowledge Base by Keyword
-
Introduction
-
Fundamentals
-
My ReadyWorks
-
Analytics
-
-
-
- Available Reports
- All Data Types
- Application Certification Status
- Application Discovery
- Application Group Analysis
- App Group to SCCM Collection Analysis
- Application Install Count
- Application License Management
- Application Usage
- Data Type Column Mappings
- Record Count by Property
- Data Links Count by Data Type
- Build Sheet
- Computer User Assignment
- Delegate Relationships
- ETL5 Staging Data
- Migration Readiness (Basic)
- Migration Readiness (Complex)
- O365 License Management
- O365 Migration Readiness
- Patch Summary
- SCCM OSD Status
- Scheduled Computers by Wave
- Scheduled Users by Manager
- User Migration Readiness
- VIP Users
- Wave & Task Details
- Wave Group
- Windows 10 Applications
- Show all articles ( 14 ) Collapse Articles
-
-
-
-
Orchestration
-
Data
-
-
- View Primary Data
- Record Properties
- Images
- Notes
- Waves
- Tasks
- Attachments
- History
- Rationalization
- QR Code
- Linked Records
- SCCM Add/Remove Programs
- Altiris Add/Remove Programs
- Related Records
- Advanced Search
- Relationship Chart
- Primary Data Permissions
- Show all articles ( 2 ) Collapse Articles
-
Integration
-
-
-
- View Connection
- Connection Properties
- Make Into Connector
- Delete Connection
- Connection Error Settings
- Inbound Jobs
- Outbound Jobs
- New Inbound Job
- New Outbound Job
- Job Error Settings
- Enable Job
- Disable Job
- Edit Inbound Job
- Edit Outbound Job
- Upload File
- Run Inbound Job
- Run Outbound Job
- Set Runtime to Now
- Reset Job
- Delete Job
- Job Log
- Show all articles ( 6 ) Collapse Articles
-
-
- View Connector
- Connector Properties
- Authentication Methods
- New Authentication Method
- Authentication Method Error Settings
- Edit Authentication Method
- Delete Authentication Method
- Fields
- Edit Field
- Inbound Job Fields
- Edit Inbound Job Field
- Inbound Job Templates
- New Inbound Job Template
- Job Template Error Settings
- Edit Inbound Job Template
- Delete Inbound Job Template
- Outbound Job Fields
- Edit Outbound Job Field
- Outbound Job Templates
- New Outbound Job Template
- Edit Outbound Job Template
- Delete Outbound Job Template
- Show all articles ( 7 ) Collapse Articles
-
-
- ETL5 Connector Info
- Absolute
- Azure Active Directory
- Comma-Separated Values (CSV) File
- Generic Rest JSON API
- Generic Rest XML API
- Ivanti (Landesk)
- JAMF
- JSON Data (JSON) File
- MariaDB
- Microsoft Endpoint Manager: Configuration Manager
- Microsoft SQL
- Microsoft Intune
- Oracle MySQL
- PostgreSQL
- Pure Storage
- ServiceNow
- Tanium
- XML Data (XML) File
- JetPatch
- Lenovo XCLarity
- Nutanix Move
- Nutanix Prism
- Nutanix Prism - Legacy
- RVTools
- Simple Object Access Protocol (SOAP)
- VMware vCenter
- VMware vCenter SOAP
- Show all articles ( 13 ) Collapse Articles
-
-
Admin
-
-
-
- Modules
- Attachments
- Bulk Edit
- Data Generator
- Data Mapping
- Data Quality
- ETL
- Form Builder
- Images
- Multi-Factor Authentication
- Notifications
- Rationalization
- Relationship Chart
- Reports
- Rules
- Single Sign-On
- T-Comm
- User Experience
- Show all articles ( 4 ) Collapse Articles
-
-
API
-
Administration
-
FAQs
-
Solutions
New Mapping
< Back
From the Mappings tab, you can create mappings. To create:
- Click the New Mapping button to bring up the New Mapping dialog
- Enter the properties of the new mapping
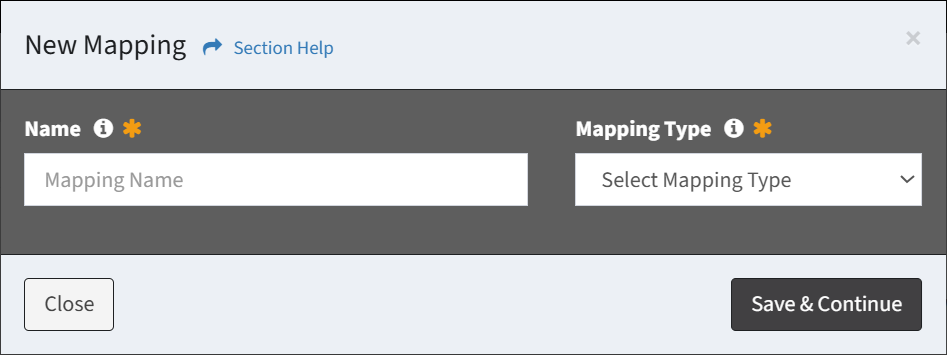
- Name – Name of the mapping (required)
- Mapping Type – Select type of the mapping (Data Columns, Linking Records, Linking Waves, Unlinking Waves, Linking Tasks, Unlinking Tasks) (required)
- Click the Save & Continue button when finished to create the mapping. You will be redirected to the Edit Mapping page. Click the Close button to cancel the operation.
- The new mapping function is only available to users in the Administrator security group
- Enter the main query of the new mapping in the query window. Data mappings can access the connected ETL database and the ReadyWorks database.
NOTE: When using SQL functions for columns, be sure to use aliases signified by the keyword AS (see Line 2 in sample query below).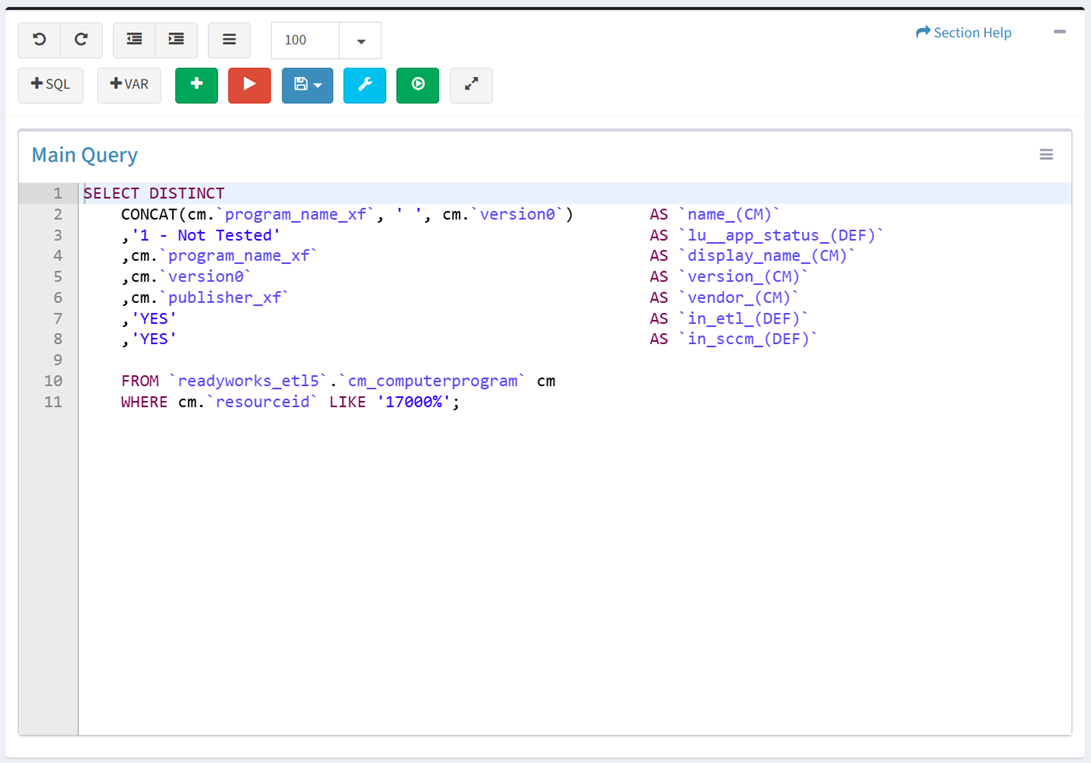
- Use the editing buttons to format the query
- Undo – Undo the last edit

- Redo – Redo the last edit that was undone

- Block Outdent – Remove an indent from a line or block

- Block Indent – Set a line or block in from the margin

- Comment – Comment out a line or block

- Limit Result – Select the number of rows to display from the drop down (100 (default), 500, 1000, All)

- Theme – Color theme of query (Theme1, Theme2)

NOTE: Theme was deprecated in version 7.6.0912. - Add SQL – Add sample SQL to the query

- Add Variable – Add mapping variable to the query

- App Filters Variable – Insert variable %[etl_app_filter__cm.name]% to filter a query based on App Filters
- Example Query: SELECT * FROM readyworks_etl5.cm_computerprogram cm WHERE %[etl_app_filter__cm.name]%
- App Filters Variable – Insert variable %[etl_app_filter__cm.name]% to filter a query based on App Filters
- Undo – Undo the last edit
- Click the
 button to add a helper query. Data mappings can access the connected ETL database and the ReadyWorks database.
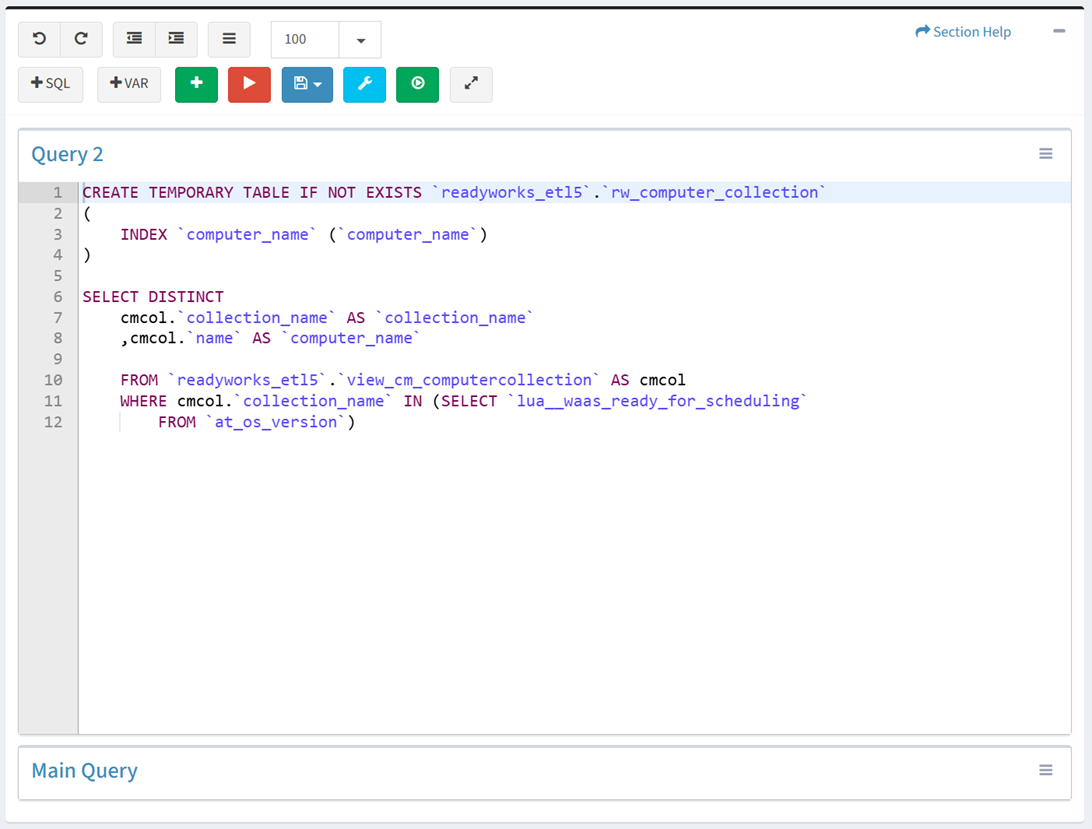
- Click the name of a query to expand or minimize the query window

- Click the
 button to run the query and preview the output before saving
- Select the number of rows to display from the drop down (100 (default), 500, 1000, All)

- Select the number of rows to display from the drop down (100 (default), 500, 1000, All)
- Click the
 button to bring op the Settings dialog
- Configure the mapping settings and then click the Close button
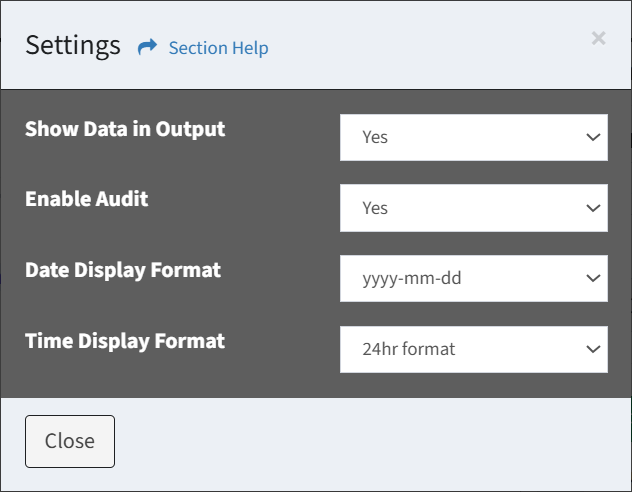
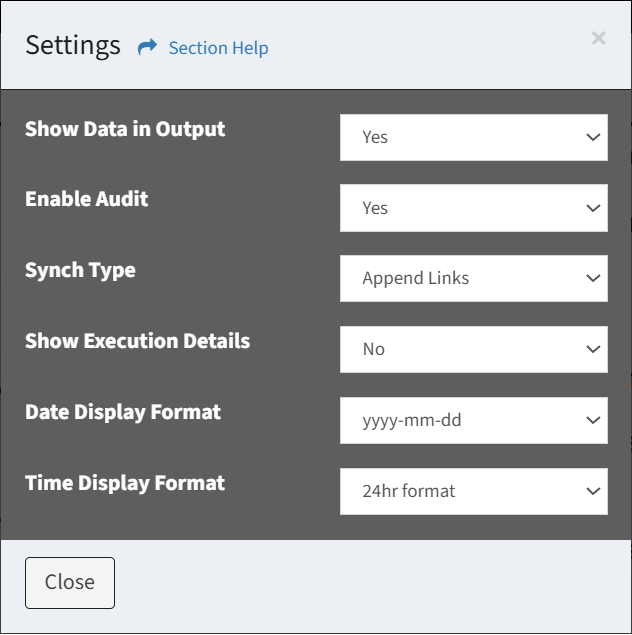
- Show Data in Output – Choose if data is displayed in output
- Enable Audit – Choose if auditing (logging) is enabled or disabled
- Date Display Format – Date display format of the user (yyyy-mm-dd, mm/dd/yyyy, dd/mm/yyyy, dd mon yyyy)
- Time Display Format – Time display format of the user (24hr format, 12hr (AM/PM) format)
- Synch Type – Select the type of synch (Linking Records, Linking Waves, Unlinking Waves, Linking Tasks, Unlinking Tasks)
- Reload Links – Drop and reload links for the selected data type
- Append Links – Append new links for the selected data type
- Show Execution Details – Choose if verbose output is displayed during execution (Linking Records, Linking Waves, Unlinking Waves, Linking Tasks, Unlinking Tasks)
- Configure the mapping settings and then click the Close button
- Click the
 button to run the data mapping (as it would from a cron job)
 - Click the
 button to expand the query to full window mode. Click the
  button to exit full window mode.
 - Use the
 menu to manage queries
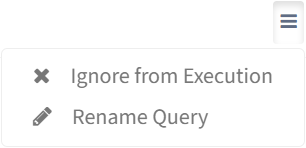

- Ignore from Execution – Ignore a query from execution
- Rename Query – Rename a query
- Move Up – Move a query up in the order
- Move Down – Move a query down in the order
- Delete Query – Delete a query
- Use the floating toolbar to format, run, and save the query when you are scrolled down

- Use the editing buttons to format the query
- View the results of the query in the Output window
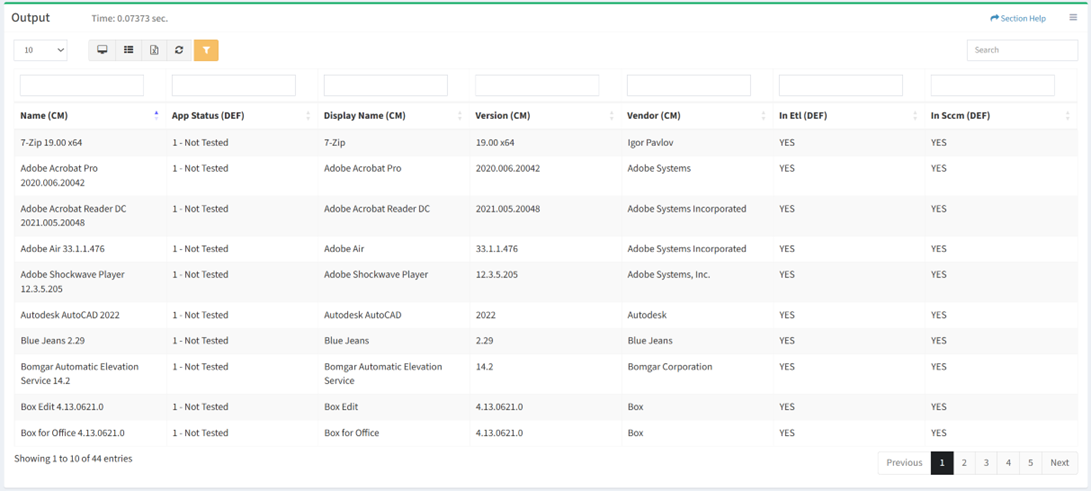
NOTE: Encrypted data columns are masked to the end user when previewing the output. - Enter the mapping properties in the Mapping Properties window
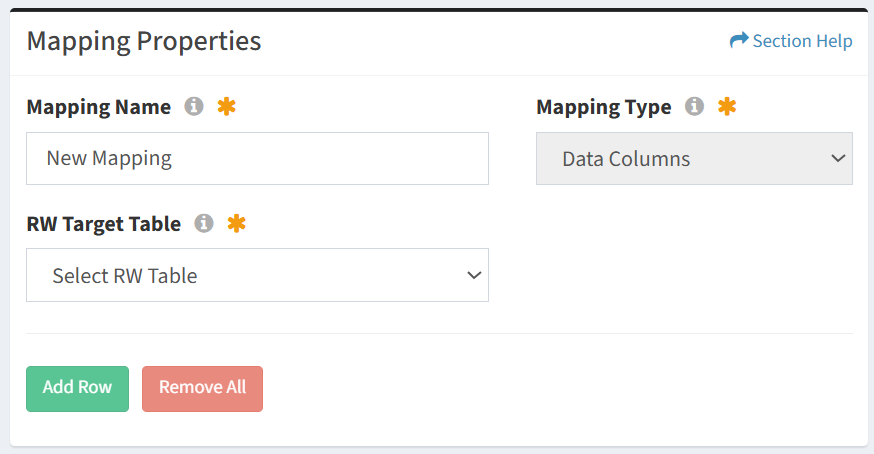
- Mapping Name – Name of the mapping (required)
- Mapping Type – Type of the mapping (Data Columns, Linking Records, Linking Waves, Unlinking Waves, Linking Tasks, Unlinking Tasks)
- RW Target Table – Select ReadyWorks table that is the target of the mapping
- Click the Add Row button to add rows to the mapping
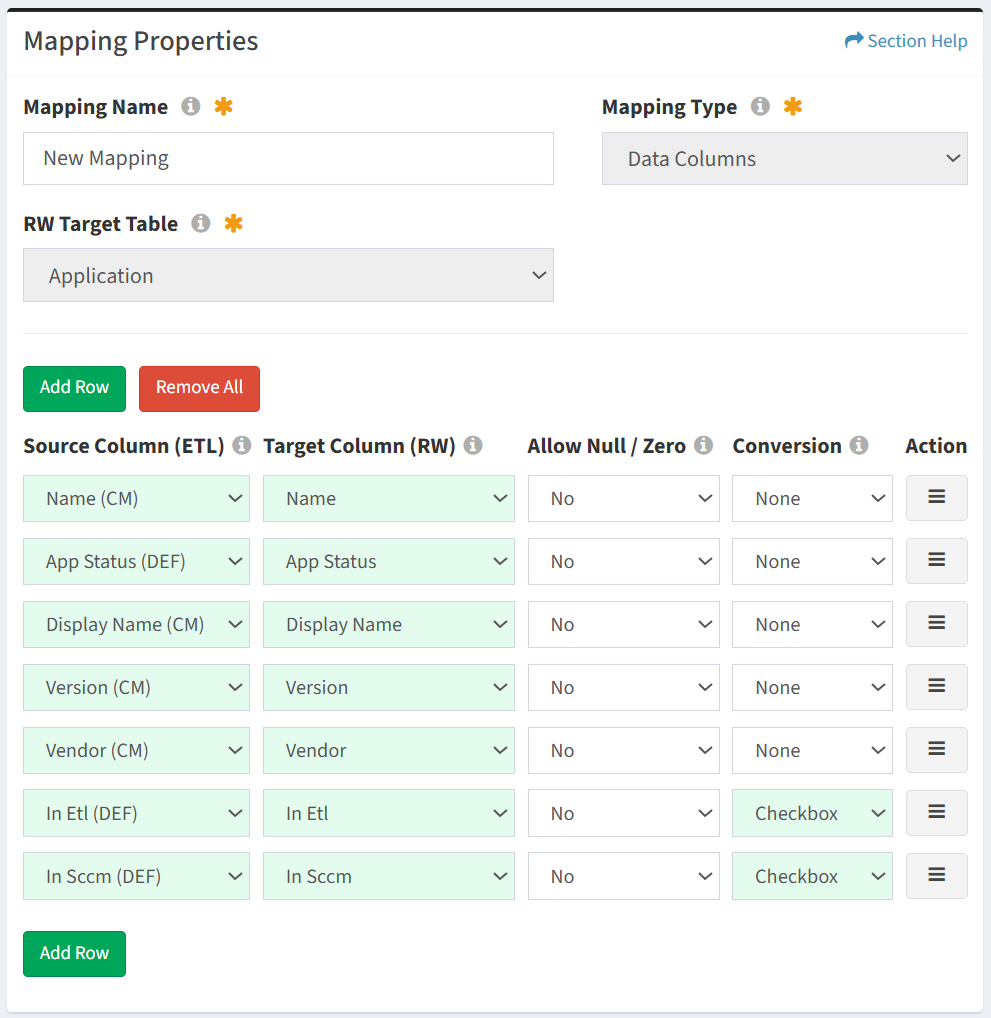
- Source Column (ETL) – Select source column of the mapping
NOTE: The Name field of a data record cannot contain the string ” | “. - Target Column (RW) – Select target column of the mapping
- Allow Null / Zero – Choose if value of the mapping can be set to NULL or zero
NOTE: Enable Allow Null to overwrite data when the source changes to NULL (or directly through the SQL statement). When disabled, NULL values are skipped. - Conversion – Select conversion method of the mapping
- Boolean
- Checkbox
- Date
- Datetime
- FQDN
- GUID
- NetBIOS
- Use the
 menu to manage rows

- Move Up – Move a row up in the order
- Move Down – Move a row down in the order
- Ignore – Ignore a row
- Delete – Delete a row
- Add Row – Add new rows for additional mappings
- Remove All – Remove all rows
- Click the
 button to Quick Save or Full Save the mapping. A Quick Save does not run the query while a Full Save does, and can take longer to save depending on the query.
NOTE: The RW Target Table is required to save a mapping.

