
Search Knowledge Base by Keyword
Plan Information
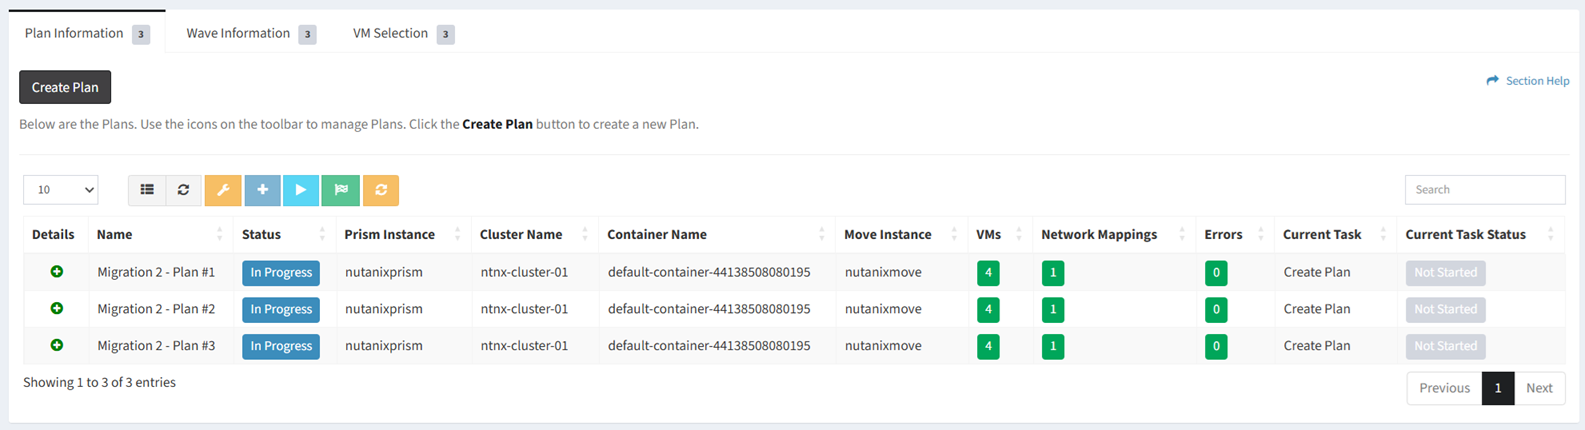
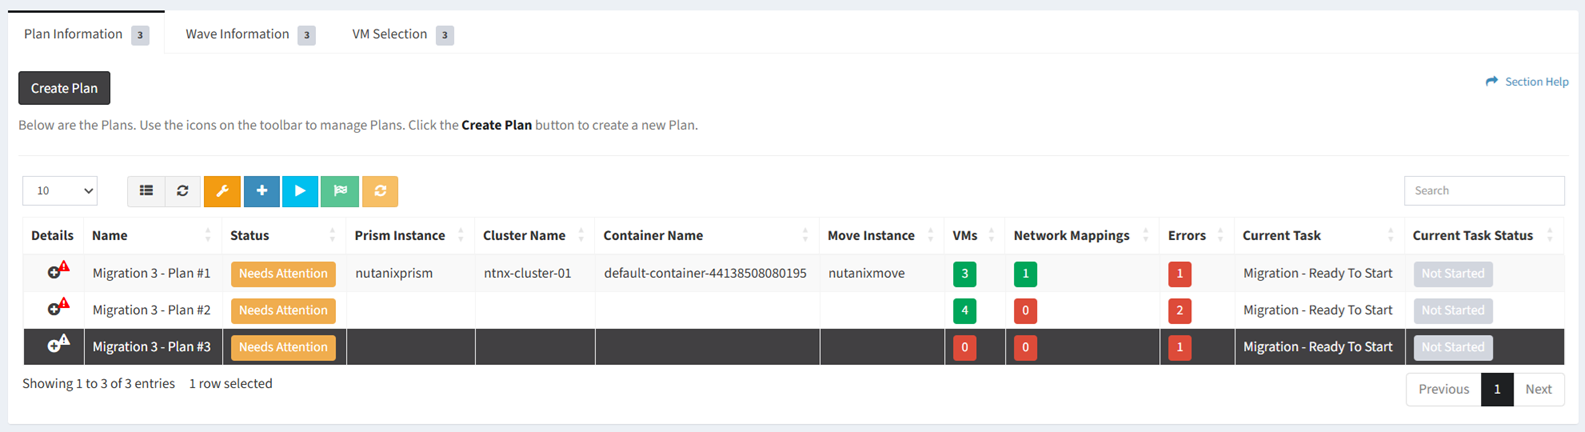
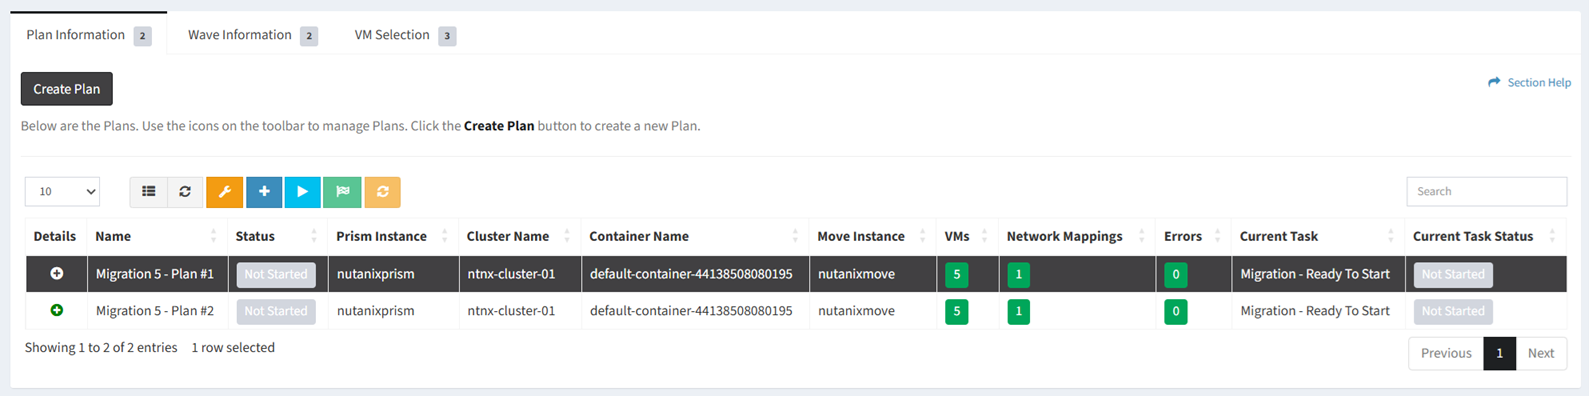
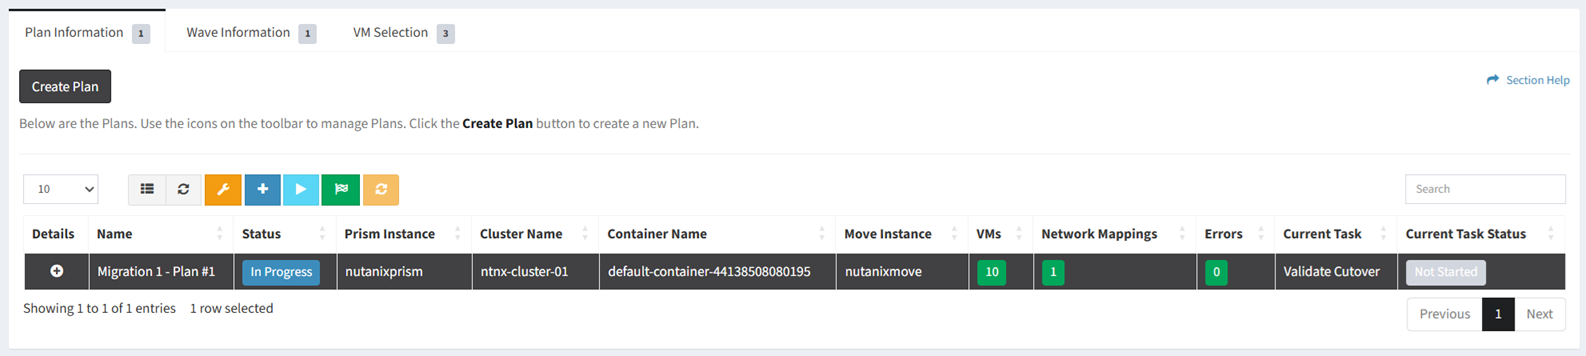
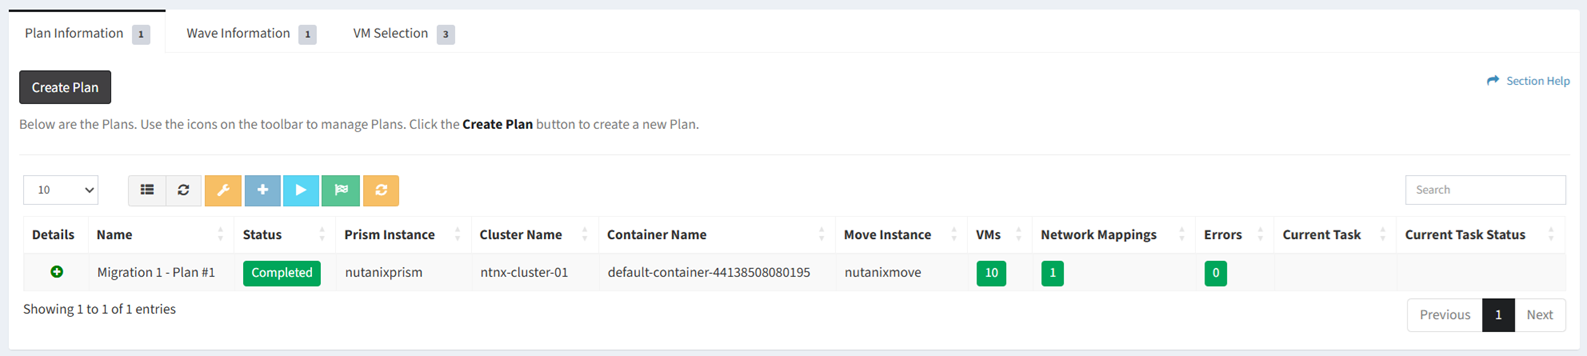
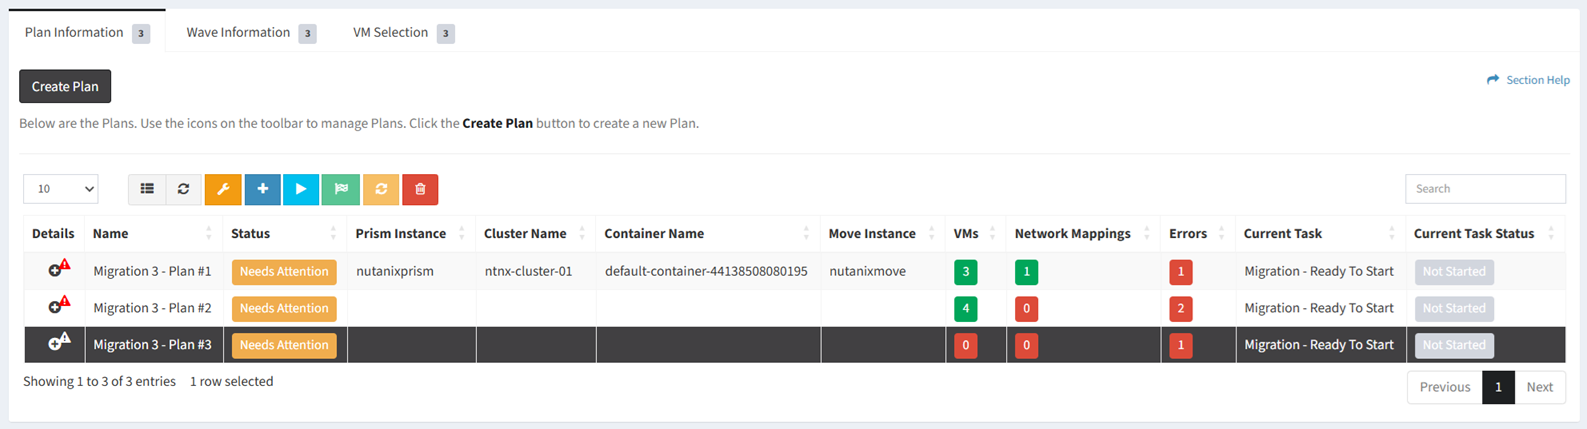
The Plan Information tab provides the ability to manage migration plans.
Available operations:
- Create new plans by clicking on the Create Plan button
- View a list of plans in the migration
- Columns available
- Id (hidden by default) – System Id of the migration
- Name – Name of the migration
- Status – Status of the plan (Needs Attention, Not Started, In Progress, Completed, Cancelled, Failed, On Hold, Unknown)
- Prim Instance – Name of the target Nutanix Prism instance
- Cluster Name – Name of the target Nutanix cluster
- Container Name – Name of the target Nutanix container
- Move Instance – Name of the Nutanix Move instance
- VMs – Total number of VMs assigned to the plan
- Network Mappings – Total number of network mappings configured
- Errors – Total number of errors in the plan
- Wave (hidden by default) – Wave associated with the plan
- Wave Status (hidden by default) – Status of the wave associated with the plan
- Current Task – Current task of the plan
- Current Task Status – Status of the current task of the plan
- Click
 to view the details of plans
- Columns available
- Manage plan settings by selecting a plan (row) and clicking the Manage Plan Settings button on the toolbar
- Assign VMs to plans by selecting a plan (row) and clicking the Assign VMs to Plan button on the toolbar
- Set plan tasks to start early by selecting a plan (row) and clicking the Set Current Task to Start Early button on the toolbar
- Finish plans by selecting a plan (row) and clicking the Finish Plan button on the toolbar
- Reset plans by selecting a plan (row) and clicking the Reset Plan button on the toolbar
- Delete plans by selecting a plan (row) and clicking the Delete Plan button on the toolbar
- You can also change the number of visible rows in the table, set column visibility, refresh the table, and search for text
New Plan
From the Plan Information tab, you can create plans. To create:
- Click the Create Task button to bring up the New Plan dialog
- Enter the properties of the new plan
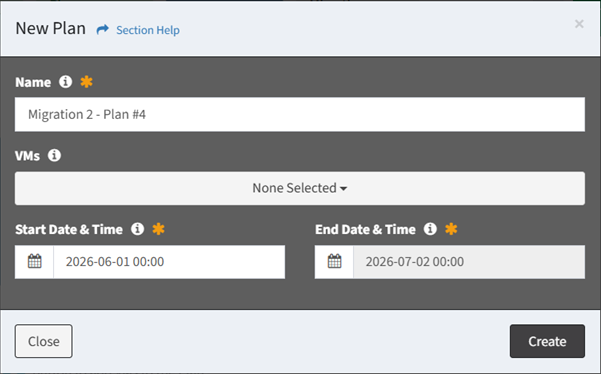
- Name – Name of the plan (required)
- VMs – Assign VMs to the plan (optional)
- Start Date & Time – Select the start goal of the plan (required)
NOTE: The start and end goals of the plan must be contained within the migration start and end boundaries. - End Date & Time – End goal of the plan (read only)
NOTE: The end goal is populated with the minimum duration of the migration. The minimum duration is determined by the Move Migration Task Chain Template.
- Click the Create button when finished to create the plan. You will be redirected back to the Plan Information tab. Click the Close button to cancel the operation.
Plan Settings
From the Plan Information tab, you can manage plan settings. To manage:
- Select a plan (row) to manage
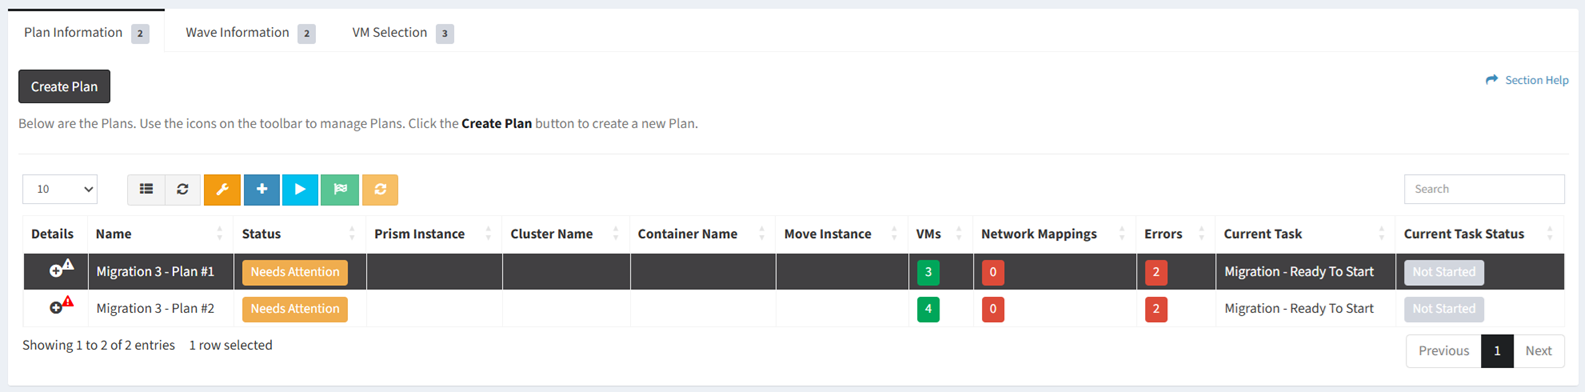
- Click the Manage Plan Settings button on the toolbar to bring up the Plan Settings dialog

- The plan settings button is grayed out unless a plan (row) is selected


- The plan settings function is only available to users in the Administrator security group
- The plan settings button is grayed out unless a plan (row) is selected
- Select the target information for the plan. Click the Save & Continue button to save the target information and continue to the next step. Click the Close button to cancel the operation.
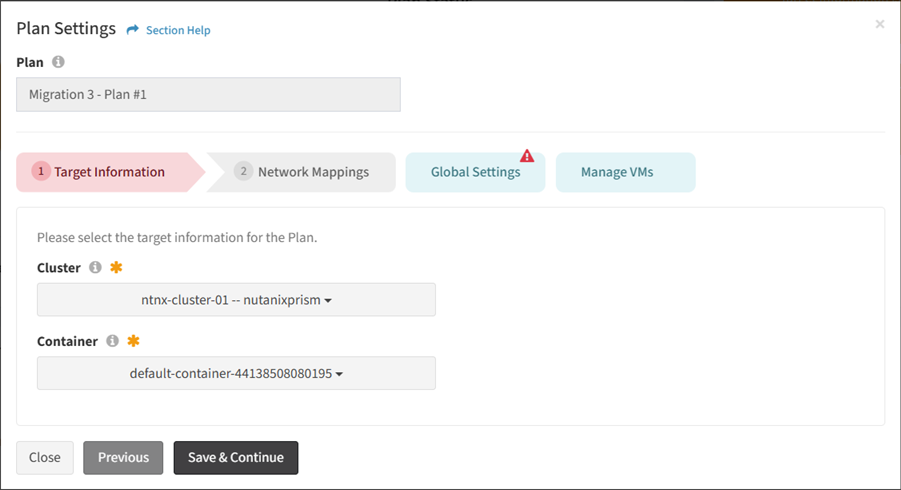
- Cluster – Target cluster of the plan (required)
- Prism Cluster – Prism cluster of the plan (required)
- Container – Target container of the cluster (required)
- Move Instance – Move instance of the plan (required)
- Select a target network for each source network. Click the Save button to save the network mappings and continue to the next step. Click the Close button to cancel the operation.
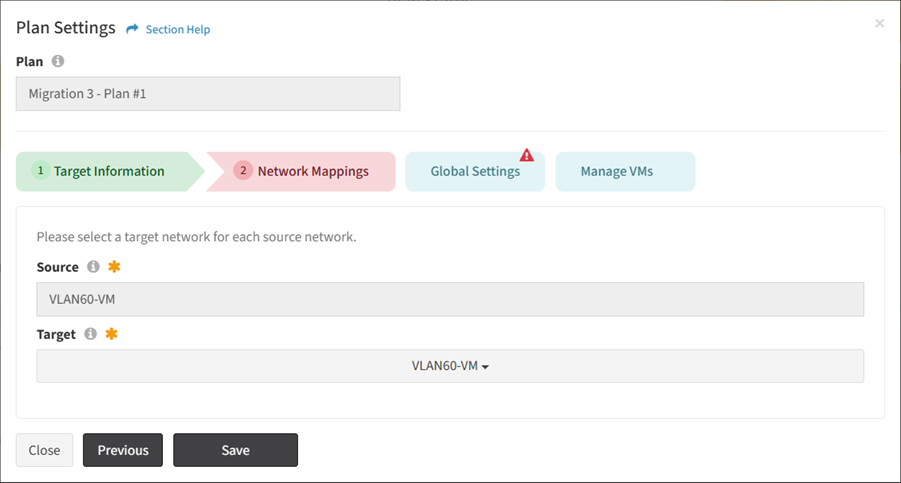
- Source – Network in the source environment (read only)
- Target – Network in the target environment (required)
- Update the global settings of the plan. Click the Save Global Settings button to save the the global settings. Click the Close button to cancel the operation.
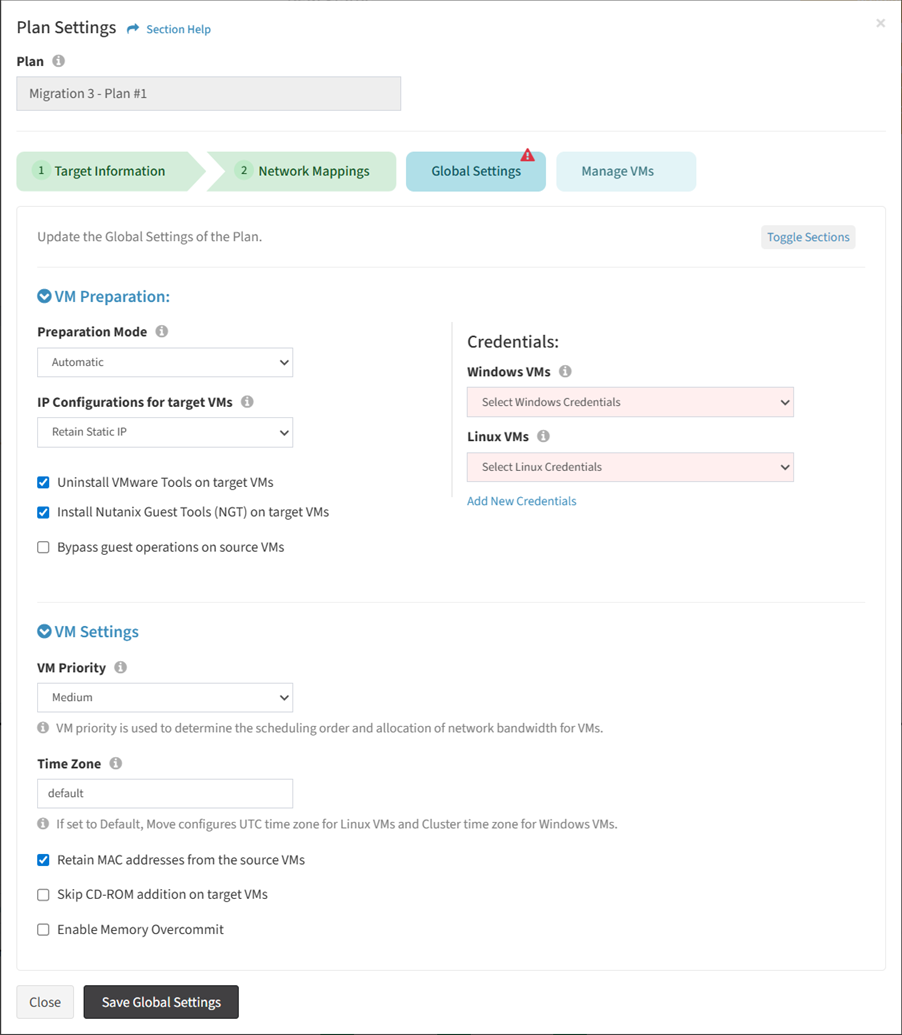
- VM Preparation
- Preparation Mode – Preparation mode for VMs in the plan (Automatic, Manual)
- IP Configurations for target VMs – IP configurations for the target VMs (Retain Static IP, DHCP)
- Uninstall VMware Tools on target VMs – Uninstall VMware tools on the target VMs
- Install Nutanix Guest Tools (NGT) on target VMs – Install Nutanix Guest Tools on the target VMs
- Bypass guest operations on source VMs – Bypass guest operations on the source VMs
- Credentials
- Windows VMs – Credentials for Windows VMs in the plan (required for Windows VMs)
- Linux VMs – Credentials for Linux VMs in the plan (required for Linux VMs)
- Click Add New Credentials to create new credentials
- VM Settings
- VM Priority – Priority of the VMs in the plan
- Time Zone – Time zone of the VMs in the plan
- Retain MAC addresses from the source VMs – Retain MAC addresses from the source VMs
- Skip CD-ROM addition on target VMs – Skip CD-ROM addition on the target VMs
- Enable Memory Overcommit – Enable memory overcommitment
- VM Preparation
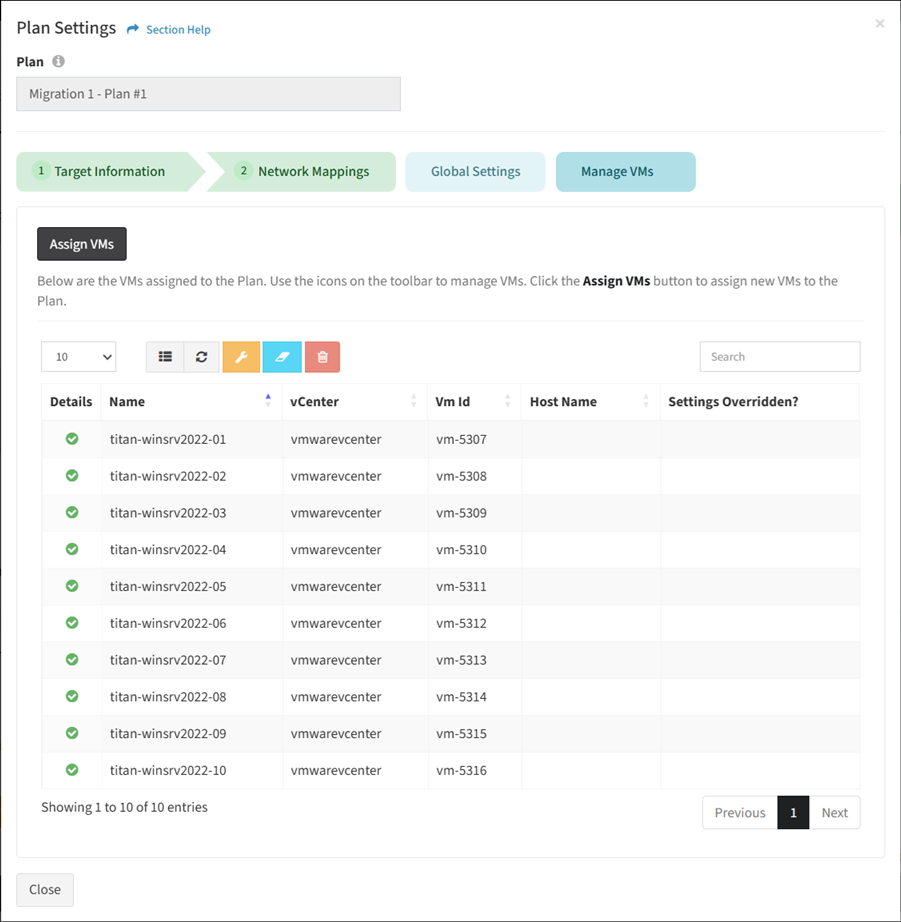
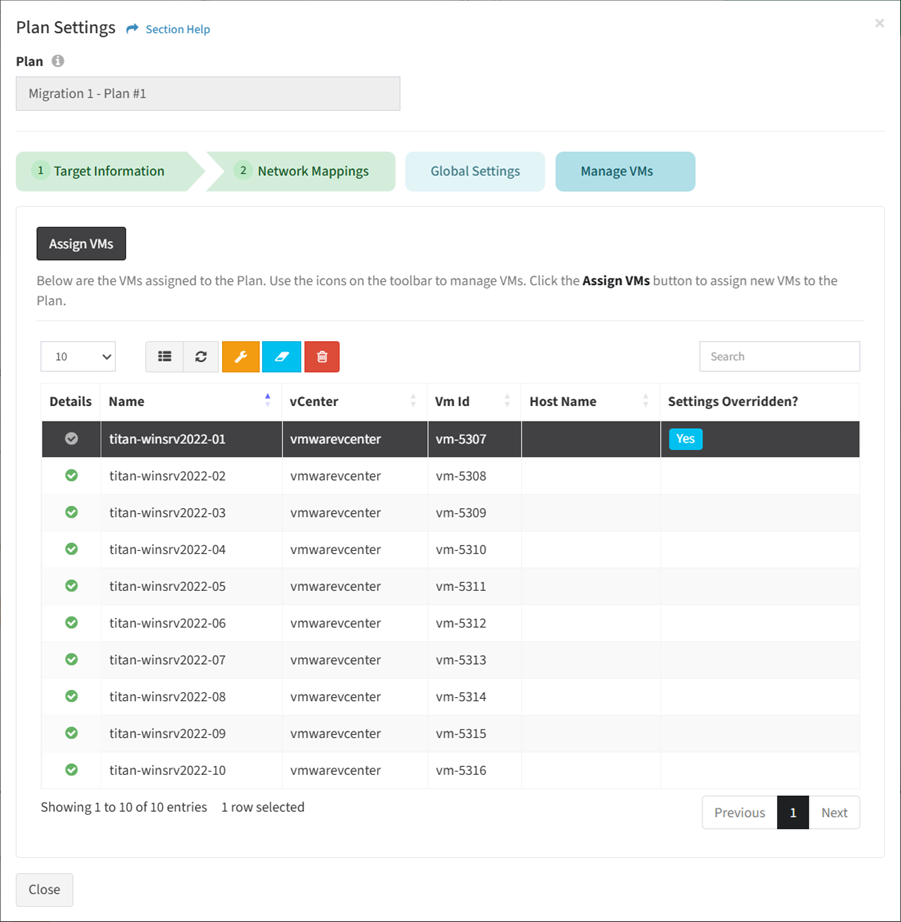
- Manage the VMs assigned to the plan. Click the Assign VMs button to assign VMs to the plan. Select a VM (row) and click the Manage VM Settings button to override the settings of VMs. Select one or more VMs (rows) and click the Clear Settings button to clear the overridden VM settings. Select one or more VMs (rows) and click the Remove VMs from Plan button to remove VMs from the plan. Click the Close button to cancel the operation.
New Credentials (Global Settings)
From the Global Settings tab, you can create credentials. To create:
- Click Add New Credentials to bring up the New Credentials dialog
- Enter the properties of the new credentials

- Name – Name of the credentials (required)
- Username – Username of the credentials (required)
- Password – Password of the credentials (required)
- Use PEM Key – Whether a PEM key is used for the credentials (not currently supported)
- Click the Create button when finished to create the credentials. You will be redirected back to the Global Settings tab. Click the Close button to cancel the operation.
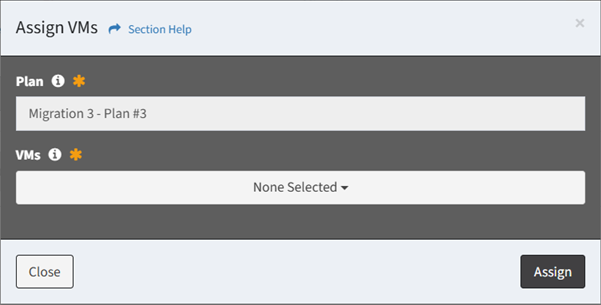
Assign VMs
From the Manage VMs tab, you can assign VMs to the plan. To assign:
- Click the Assign VMs button to bring up the Assign VMs dialog
- Select VMs to assign to the plan

- Click the Assign button when finished to assign the VMs to the plan. You will be redirected back to the Manage VMs tab. Click the Close button to cancel the operation.
VM Settings
From the Manage VMs tab, you can override VM settings. To override:
- Select a VM (row) to override
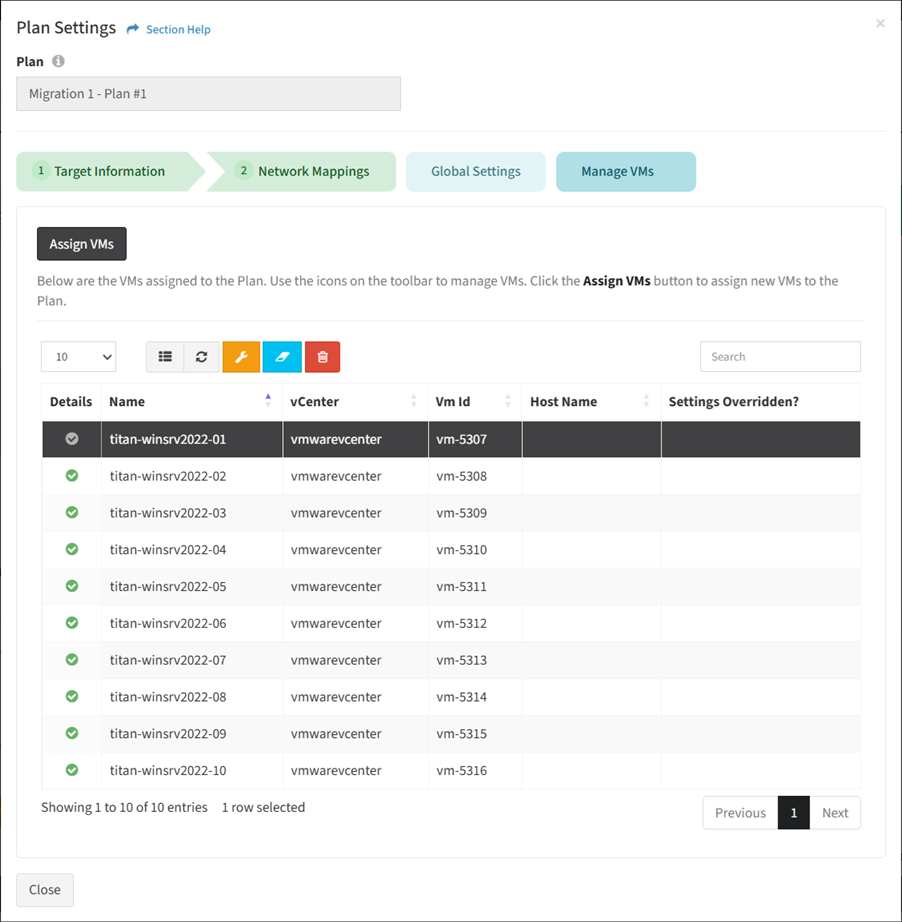
- Click the Manage VM Settings button on the toolbar to bring up the VM Settings dialog
- The settings button is grayed out unless a VM (row) is selected


- The settings function is only available to users in the Administrator security group
- The settings button is grayed out unless a VM (row) is selected
- Update the settings of the VM. Click the Save VM Settings button to save the the VM settings. Click the Close button to cancel the operation.
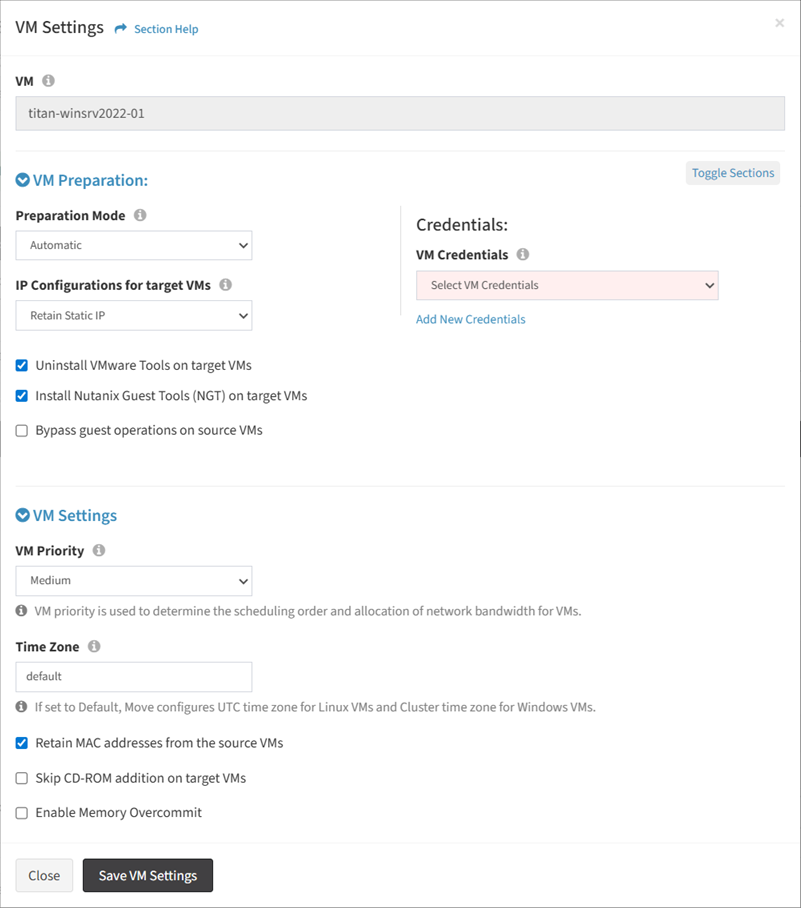
- VM Preparation
- Preparation Mode – Preparation mode for the VMs (Automatic, Manual)
- IP Configurations for target VMs – IP configurations for the target VMs (Retain Static IP, DHCP)
- Uninstall VMware Tools on target VMs – Uninstall VMware tools on the target VMs
- Install Nutanix Guest Tools (NGT) on target VMs – Install Nutanix Guest Tools on the target VMs
- Bypass guest operations on source VMs – Bypass guest operations on the source VMs
- Credentials
- VM Credentials – Credentials for the VMs
- Click Add New Credentials to create new credentials
- VM Settings
- VM Priority – Priority of the VMs
- Time Zone – Time zone of the VMs
- Retain MAC addresses from the source VMs – Retain MAC addresses from the source VMs
- Skip CD-ROM addition on target VMs – Skip CD-ROM addition on the target VMs
- Enable Memory Overcommit – Enable memory overcommitment
- VM Preparation
New Credentials (VM Settings)
From the VM Settings tab, you can create credentials. To create:
- Click Add New Credentials to bring up the New Credentials dialog
- Enter the properties of the new credentials
- Name – Name of the credentials (required)
- Username – Username of the credentials (required)
- Password – Password of the credentials (required)
- Use PEM Key – Whether a PEM key is used for the credentials (not currently supported)
- Click the Create button when finished to create the credentials. You will be redirected back to the VM Settings tab. Click the Close button to cancel the operation.
Clear Settings
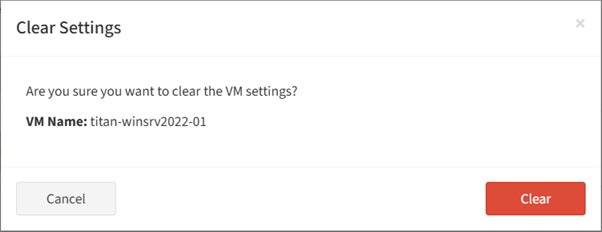
From the Manage VMs tab, you can clear overridden VM settings. To clear:
- Select one or more VMs (rows) to clear overridden settings
- Click the Clear Settings button on the toolbar

- The clear button is grayed out unless a VM (row) is selected
- The clear function is only available to users in the Administrator security group
- The clear button is grayed out unless a VM (row) is selected
- Click the Clear button to confirm the clear operation. Click the Cancel button to cancel the operation.
Remove VMs from Plan
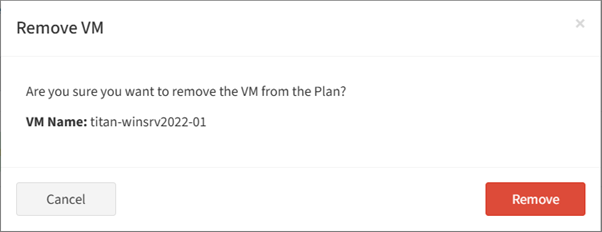
From the Manage VMs tab, you can remove VMs from the plan. To remove:
- Select one or more VMs (rows) to remove
- Click the Remove VMs from Plan button on the toolbar

- The remove button is grayed out unless a VM (row) is selected
- The remove function is only available to users in the Administrator security group
- The remove button is grayed out unless a VM (row) is selected
- Click the Remove button to confirm the remove operation. Click the Cancel button to cancel the operation.
Assign VMs to Plan
From the Plan Information tab, you can assign VMs to the plan. To assign:
- Select a plan (row) to assign VMs to
- Click the Assign VMs to Plan button on the toolbar to bring up Manage VMs tab on the Plan Settings dialog

- The assign button is grayed out unless a plan (row) is selected
- The assign function is only available to users in the Administrator security group
- The assign button is grayed out unless a plan (row) is selected
- From the Manage VMs tab, click the Assign VMs button to bring up the Assign VMs dialog
- Select VMs to assign to the plan
- Click the Assign button when finished to assign the VMs to the plan. You will be redirected back to the Manage VMs tab. Click the Close button to cancel the operation.
- Select VMs to assign to the plan
Set Current Task to Start Early
From the Plan Information tab, you can set the current task of the plan to start early. To start early:
- Select a plan (row) to start early
- Click the Set Current Task to Start Early button on the toolbar

- The start early button is grayed out unless a plan (row) is selected
- The start early function is only available to users in the Administrator security group
- The start early button is grayed out unless a plan (row) is selected
- The start goal of the current task will be updated to the current time in order for it to be processed sooner. When the current task is Migration – Ready to Start, it is marked complete to signify approval to start the plan.
Finish Plan
From the Plan Information tab, you can finish a plan when the current task is Validate Cutover. To finish:
- Select a plan (row) to finish
- Click the Finish Plan button on the toolbar

- The finish button is grayed out unless a plan (row) with the current task of Validate Cutover is selected

- The finish function is only available to users in the Administrator security group
- The finish button is grayed out unless a plan (row) with the current task of Validate Cutover is selected
- The Validate Cutover task is marked complete to signify approval that the cutover has been successfully validated
Reset Plan
From the Plan Information tab, you can reset plans in a failed state. To reset:
- Select a plan (row) to reset
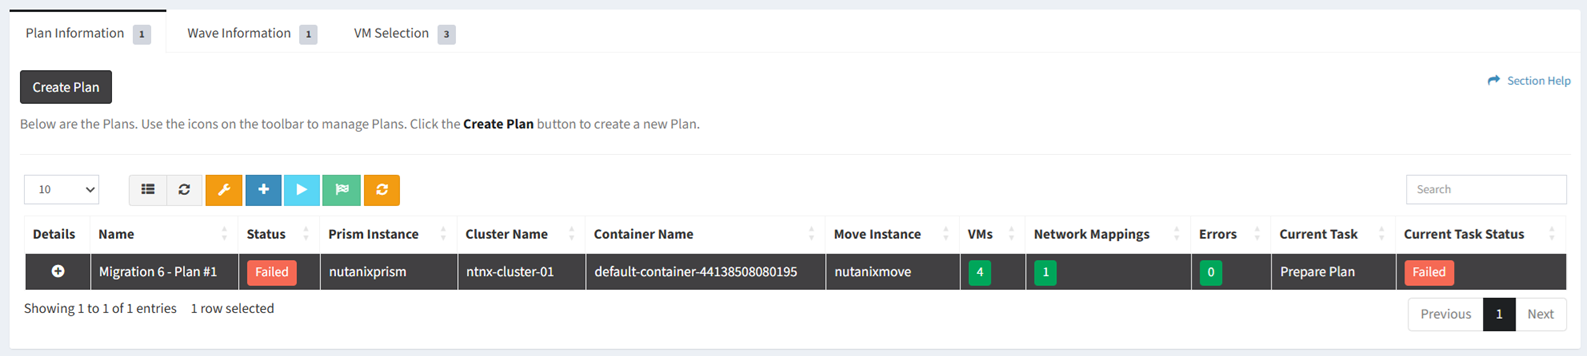
- Click the Reset Plan button on the toolbar

- The reset button is grayed out unless a plan (row) in a failed state is selected

- The reset function is only available to users in the Administrator security group
- The reset button is grayed out unless a plan (row) in a failed state is selected
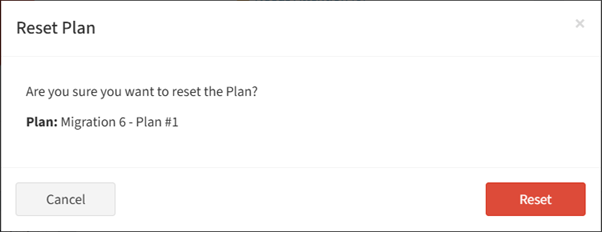
- Click the Reset button to confirm the reset operation. Click the Cancel button to cancel the operation.
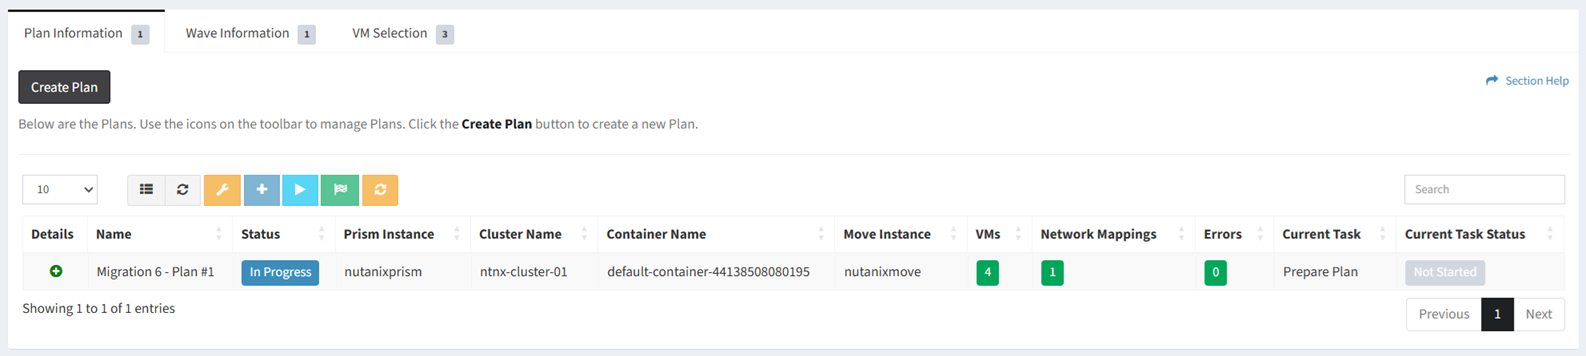
- The current task is reset to not started and the plan is reset to in progress
Delete Plan
From the Plan Information tab, you can delete plans. To delete:
- Select a plan (row) to delete
- Click the Delete Plan button on the toolbar
- The delete button is only visible when Enable Delete has been checked under Settings – Options (top right corner of the UI)

- The delete button is enabled (ungrayed out) when a plan (row) is selected

- The delete function is only available to users in the Administrator security group
- The delete button is only visible when Enable Delete has been checked under Settings – Options (top right corner of the UI)
- Click the Delete button to confirm the delete operation. Click the Cancel button to cancel the operation.
