Search Knowledge Base by Keyword
-
Introduction
-
Fundamentals
-
My ReadyWorks
-
Analytics
-
-
-
- Available Reports
- All Data Types
- Application Certification Status
- Application Discovery
- Application Group Analysis
- App Group to SCCM Collection Analysis
- Application Install Count
- Application License Management
- Application Usage
- Data Type Column Mappings
- Record Count by Property
- Data Links Count by Data Type
- Build Sheet
- Computer User Assignment
- Delegate Relationships
- ETL5 Staging Data
- Migration Readiness (Basic)
- Migration Readiness (Complex)
- O365 License Management
- O365 Migration Readiness
- Patch Summary
- SCCM OSD Status
- Scheduled Computers by Wave
- Scheduled Users by Manager
- User Migration Readiness
- VIP Users
- Wave & Task Details
- Wave Group
- Windows 10 Applications
- Show all articles ( 14 ) Collapse Articles
-
-
-
-
Orchestration
-
Data
-
-
- View Primary Data
- Record Properties
- Images
- Notes
- Waves
- Tasks
- Attachments
- History
- Rationalization
- QR Code
- Linked Records
- SCCM Add/Remove Programs
- Altiris Add/Remove Programs
- Related Records
- Advanced Search
- Relationship Chart
- Primary Data Permissions
- Show all articles ( 2 ) Collapse Articles
-
Integration
-
-
-
- View Connection
- Connection Properties
- Make Into Connector
- Delete Connection
- Connection Error Settings
- Inbound Jobs
- Outbound Jobs
- New Inbound Job
- New Outbound Job
- Job Error Settings
- Enable Job
- Disable Job
- Edit Inbound Job
- Edit Outbound Job
- Upload File
- Run Inbound Job
- Run Outbound Job
- Set Runtime to Now
- Reset Job
- Delete Job
- Job Log
- Show all articles ( 6 ) Collapse Articles
-
-
- View Connector
- Connector Properties
- Authentication Methods
- New Authentication Method
- Authentication Method Error Settings
- Edit Authentication Method
- Delete Authentication Method
- Fields
- Edit Field
- Inbound Job Fields
- Edit Inbound Job Field
- Inbound Job Templates
- New Inbound Job Template
- Job Template Error Settings
- Edit Inbound Job Template
- Delete Inbound Job Template
- Outbound Job Fields
- Edit Outbound Job Field
- Outbound Job Templates
- New Outbound Job Template
- Edit Outbound Job Template
- Delete Outbound Job Template
- Show all articles ( 7 ) Collapse Articles
-
-
- ETL5 Connector Info
- Absolute
- Azure Active Directory
- Comma-Separated Values (CSV) File
- Generic Rest JSON API
- Generic Rest XML API
- Ivanti (Landesk)
- JAMF
- JSON Data (JSON) File
- MariaDB
- Microsoft Endpoint Manager: Configuration Manager
- Microsoft SQL
- Microsoft Intune
- Oracle MySQL
- PostgreSQL
- Pure Storage
- ServiceNow
- Tanium
- XML Data (XML) File
- JetPatch
- Lenovo XCLarity
- Nutanix Move
- Nutanix Prism
- Nutanix Prism - Legacy
- RVTools
- Simple Object Access Protocol (SOAP)
- VMware vCenter
- VMware vCenter SOAP
- Show all articles ( 13 ) Collapse Articles
-
-
Admin
-
-
-
- Modules
- Attachments
- Bulk Edit
- Data Generator
- Data Mapping
- Data Quality
- ETL
- Form Builder
- Images
- Multi-Factor Authentication
- Notifications
- Rationalization
- Relationship Chart
- Reports
- Rules
- Single Sign-On
- T-Comm
- User Experience
- Show all articles ( 4 ) Collapse Articles
-
-
API
-
Administration
-
FAQs
-
Solutions
Update Column Value on Data Record
< Back
The Update Column Value on Data Record action button updates the column value of a data type when clicked. Options can be configured to show or hide the confirmation modal. The configuration information is outlined below.
Front-End (HTML)
- The HTML in this example is being used to render a confirmation modal (dialog) before the data records are updated. It is a fail-safe to prevent users from accidentally highlighting a row in the report and clicking the action button without confirmation.
- The confirmation modal can be turned on or off with a JS variable (confirmation_modal)
- There are a number of colors that can be utilized for the confirmation modal. To change the default blue color in the example, update the CSS class definition on Line 1. You can also remove the color specific CSS class to get a generic white modal.

- Available colors:
- modal-primary – Blue
- modal-info – Light Blue
- modal-success – Green
- modal-warning – Amber
- modal-danger – Red
- Available colors:
- If using more than one action button on a report, you will need to make sure the id on Line 1 of the modal div is unique for each modal. In this example, we are using value_change_modal for the id. This is also defined again as a variable on Line 2 in the JS.

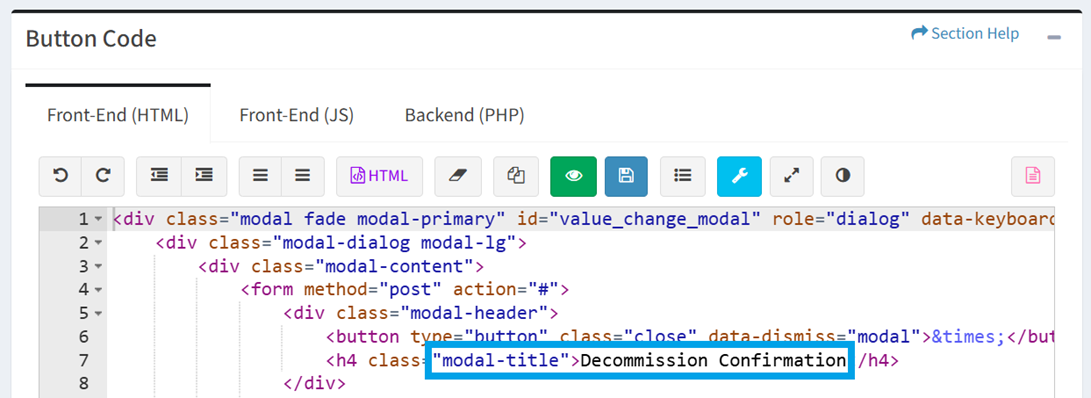
- Update the modal-title on Line 7 to the desired text to display for the title of the confirmation modal
Front-End (JS)
- The JS client-side code is being used to interact with the HTML DOM. It has standard code to render the action button on a report, and provide controls and event listeners for the action button.
- Toggle the confirmation_modal variable on Line 1 to true to show the confirmation modal, or false to bypass the confirmation modal

- If changing the modal id from HTML in the step above, then you will need to make sure the same modal id is defined in the modal_id JS variable on Line 2

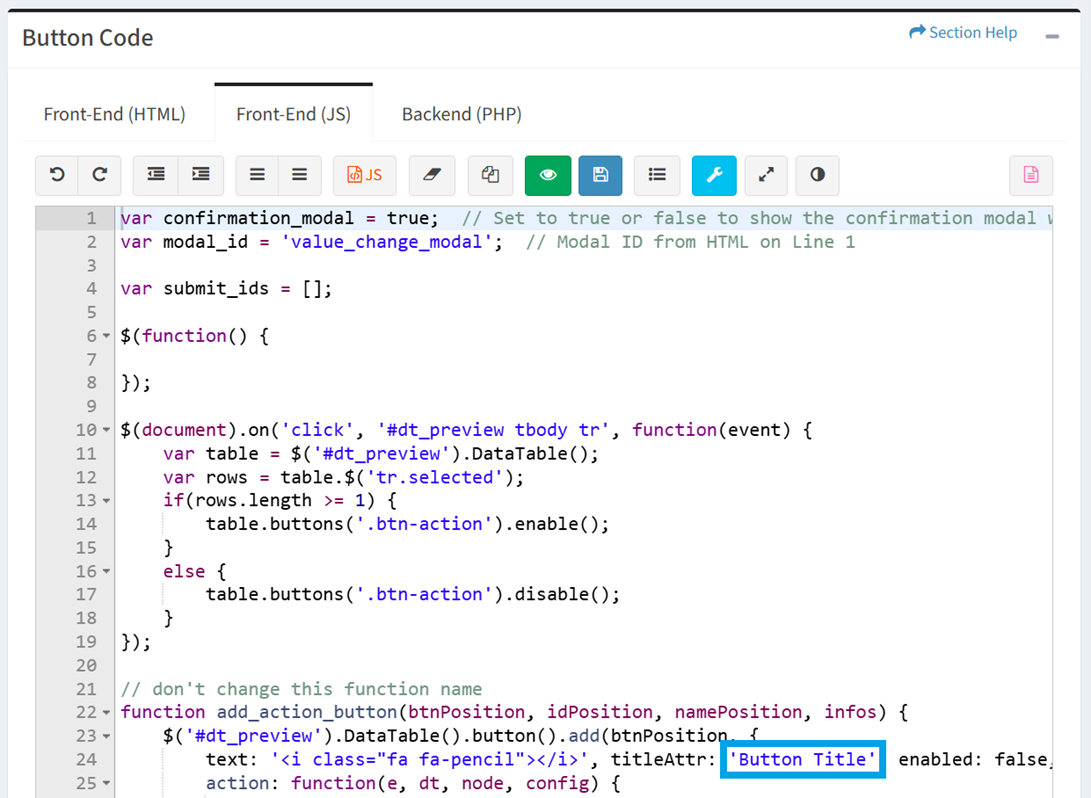
- Update the action button title text on Line 24 to display the desired text when an end user hovers over the action button on a report
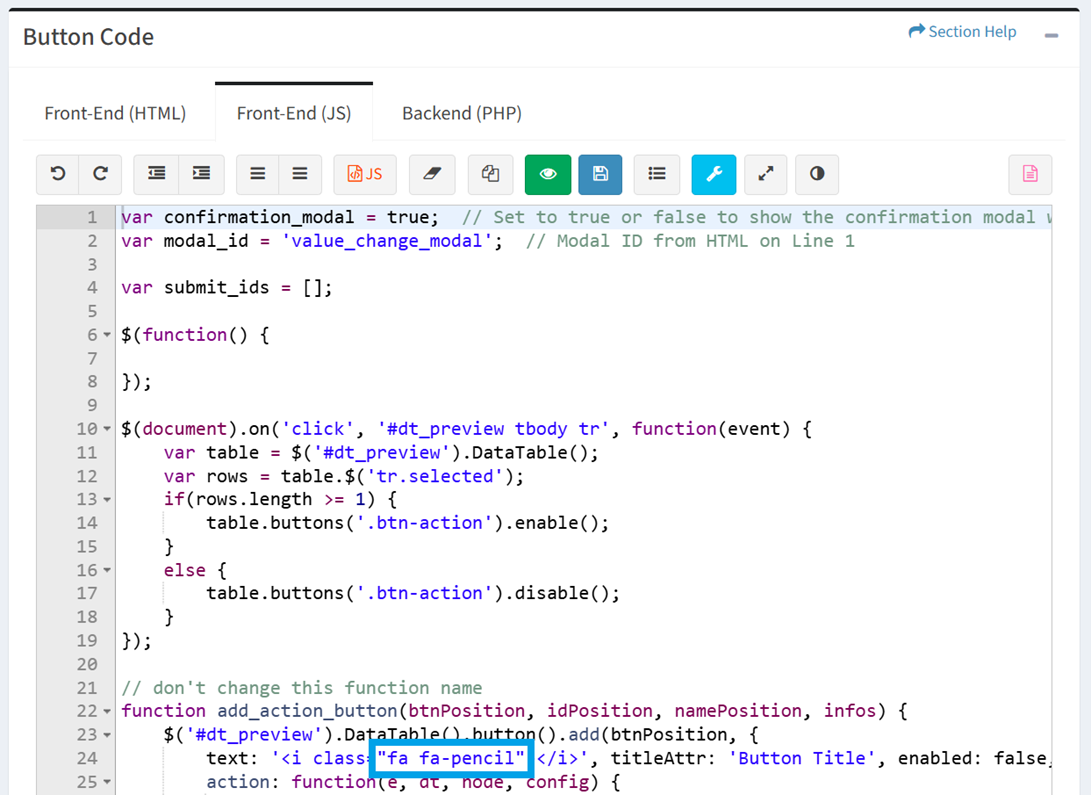
- Update the CSS icon used by the action button on Line 24. For a complete list of available Icon Class names, visit the Icon Library tab.
Backend (PHP)
- Backend server-side processing is handled inside of this PHP space. A few pre-defined variables need to be updated to account for the Data Type Id, column name, and new value.
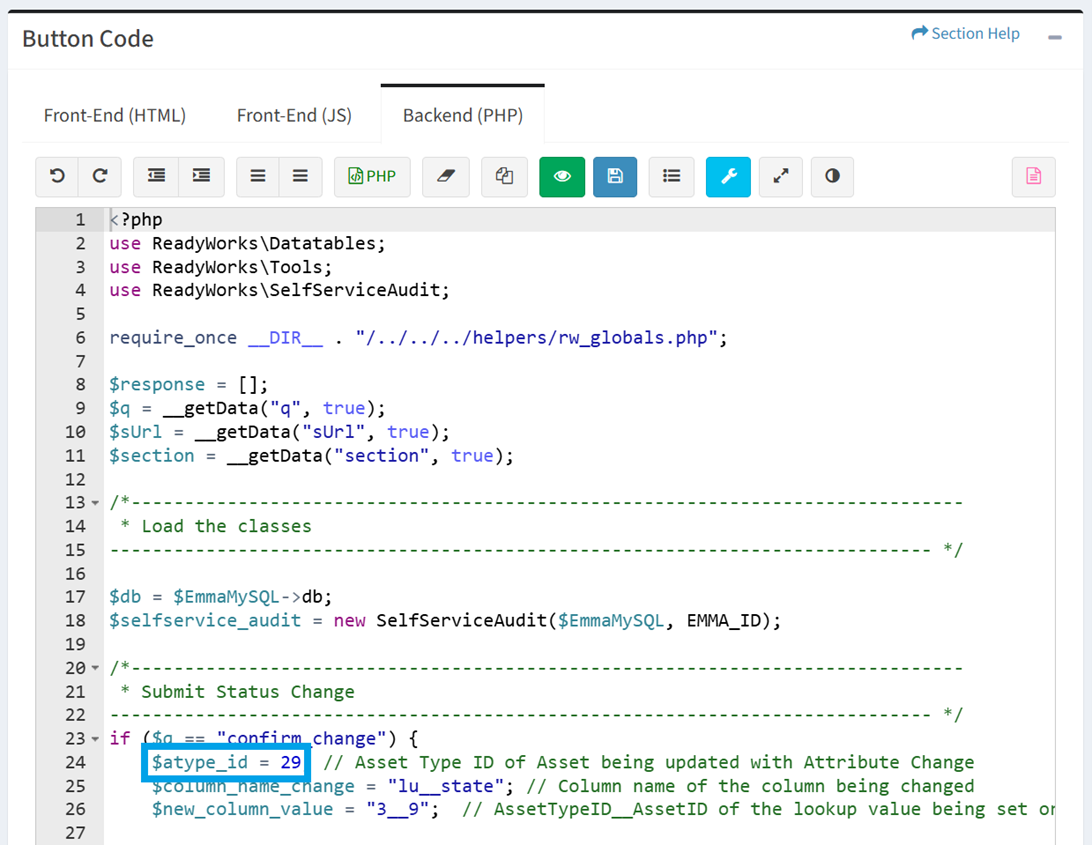
- Update the $atype_id variable on Line 24 to the Data Type Id of the data type being updated
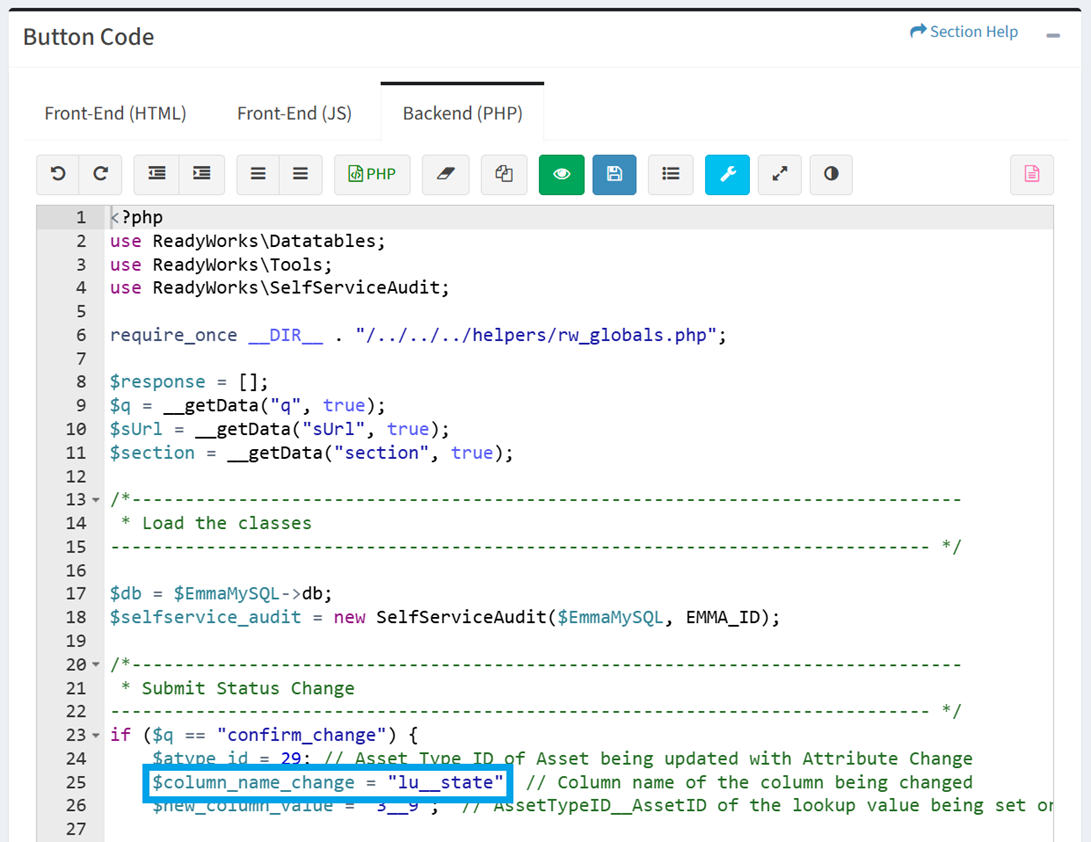
- Update the $column_name_change variable on Line 25 to the column name of the column being updated inside of the Data Type Id defined in the previous step
- Update Line 26 to the value that you are assigning to the column in the previous step. For lookup and alias columns, the format of the value is DataTypeId__RecordId where the DataTypeId is referencing lookup/alias list Data Type Id, and the number after the __ is the Record Id of the lookup value. For non-lookup columns, the actual value can be set to this variable (e.g., YES).
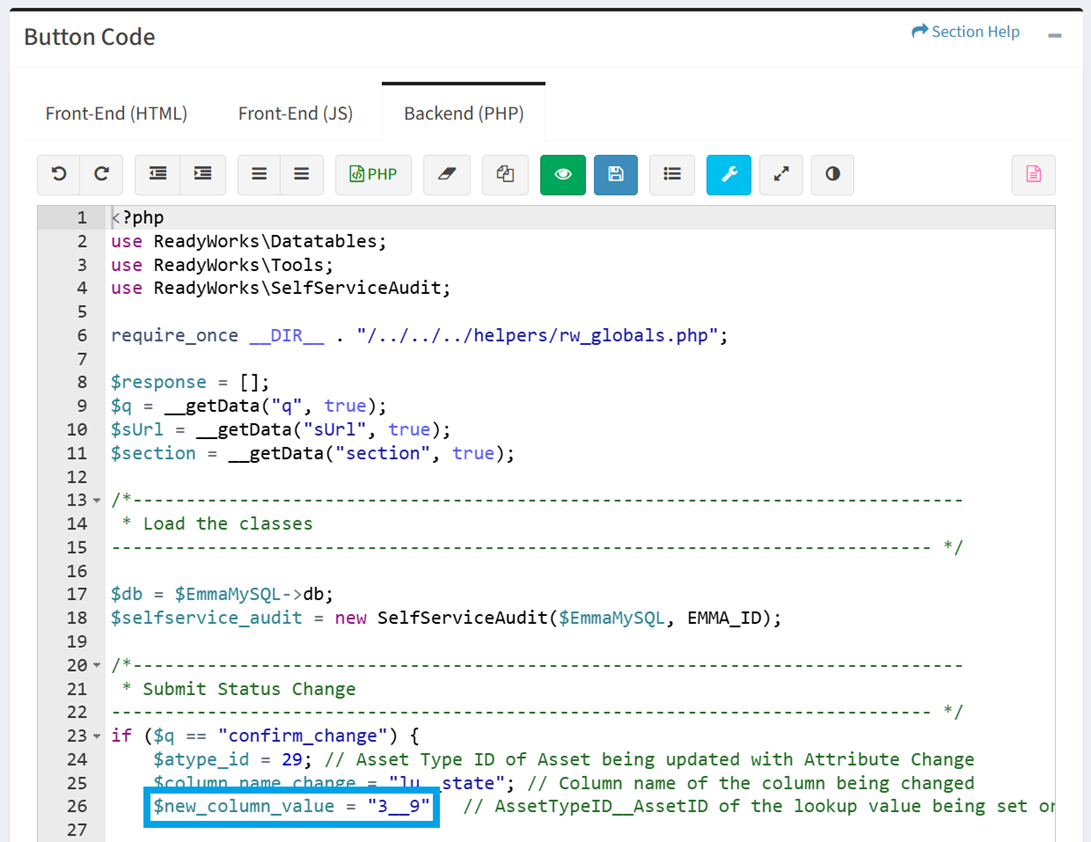
- For the values provided in the example:
- The action button is being used to update the Server data type with a Data Type Id of 29
- The lu__state lookup column on the Server data type is being updated
- The State data type has a Data Type Id of 3
- The Decommissioned list item inside of the State data type has a Record Id of 9. This is how the new column value is set to 3__9.
General Information
- Click the
 button to choose if the action button supports selection of single or multiple datatable rows. The code inside the action button supports both approaches. If Single Select is selected, then only one record at a time can be updated. If Multi Select is selected, the user can select more than one row to update in bulk.

- Click the
 button to bring op the Button Properties dialog to assign the action button to a report or data type
- Configure the button properties and then click the Update button. Click the Close button to cancel the operation.
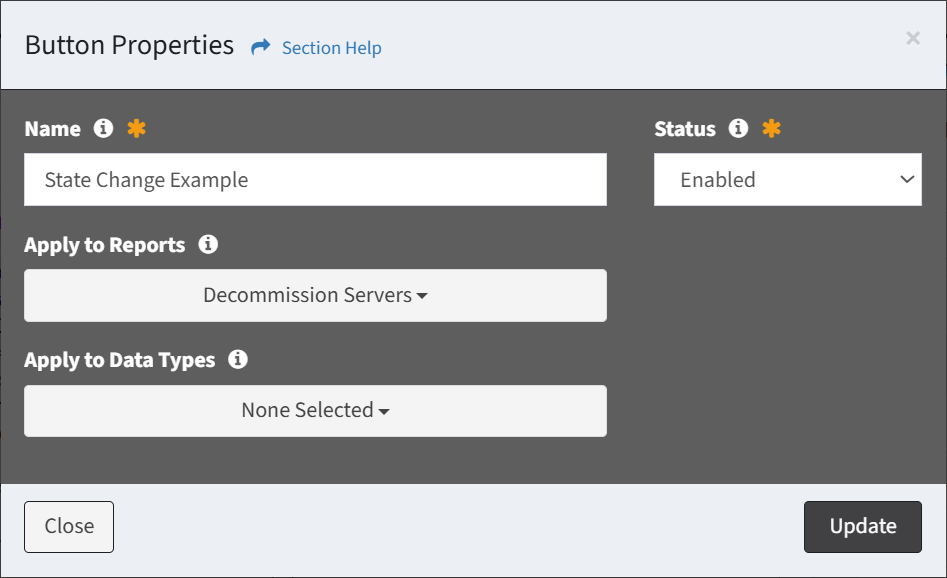
- Name – Name of the action button (required)
- Status – Choose if the action button is enabled (required)
- Apply to Reports – Select reports to apply the action button to
NOTE: Action buttons can also be assigned to reports in the Report Builder. - Apply to Data Types – Select data types to apply the action button to
- Configure the button properties and then click the Update button. Click the Close button to cancel the operation.
- Click the
 button to save the action button

