Search Knowledge Base by Keyword
-
Introduction
-
Fundamentals
-
My ReadyWorks
-
Analytics
-
-
-
- Available Reports
- All Data Types
- Application Certification Status
- Application Discovery
- Application Group Analysis
- App Group to SCCM Collection Analysis
- Application Install Count
- Application License Management
- Application Usage
- Data Type Column Mappings
- Record Count by Property
- Data Links Count by Data Type
- Build Sheet
- Computer User Assignment
- Delegate Relationships
- ETL5 Staging Data
- Migration Readiness (Basic)
- Migration Readiness (Complex)
- O365 License Management
- O365 Migration Readiness
- Patch Summary
- SCCM OSD Status
- Scheduled Computers by Wave
- Scheduled Users by Manager
- User Migration Readiness
- VIP Users
- Wave & Task Details
- Wave Group
- Windows 10 Applications
- Show all articles ( 14 ) Collapse Articles
-
-
-
-
Orchestration
-
Data
-
-
- View Primary Data
- Record Properties
- Images
- Notes
- Waves
- Tasks
- Attachments
- History
- Rationalization
- QR Code
- Linked Records
- SCCM Add/Remove Programs
- Altiris Add/Remove Programs
- Related Records
- Advanced Search
- Relationship Chart
- Primary Data Permissions
- Show all articles ( 2 ) Collapse Articles
-
Integration
-
-
-
- View Connection
- Connection Properties
- Make Into Connector
- Delete Connection
- Connection Error Settings
- Inbound Jobs
- Outbound Jobs
- New Inbound Job
- New Outbound Job
- Job Error Settings
- Enable Job
- Disable Job
- Edit Inbound Job
- Edit Outbound Job
- Upload File
- Run Inbound Job
- Run Outbound Job
- Set Runtime to Now
- Reset Job
- Delete Job
- Job Log
- Show all articles ( 6 ) Collapse Articles
-
-
- View Connector
- Connector Properties
- Authentication Methods
- New Authentication Method
- Authentication Method Error Settings
- Edit Authentication Method
- Delete Authentication Method
- Fields
- Edit Field
- Inbound Job Fields
- Edit Inbound Job Field
- Inbound Job Templates
- New Inbound Job Template
- Job Template Error Settings
- Edit Inbound Job Template
- Delete Inbound Job Template
- Outbound Job Fields
- Edit Outbound Job Field
- Outbound Job Templates
- New Outbound Job Template
- Edit Outbound Job Template
- Delete Outbound Job Template
- Show all articles ( 7 ) Collapse Articles
-
-
- ETL5 Connector Info
- Absolute
- Azure Active Directory
- Comma-Separated Values (CSV) File
- Generic Rest JSON API
- Generic Rest XML API
- Ivanti (Landesk)
- JAMF
- JSON Data (JSON) File
- MariaDB
- Microsoft Endpoint Manager: Configuration Manager
- Microsoft SQL
- Microsoft Intune
- Oracle MySQL
- PostgreSQL
- Pure Storage
- ServiceNow
- Tanium
- XML Data (XML) File
- JetPatch
- Lenovo XCLarity
- Nutanix Move
- Nutanix Prism
- Nutanix Prism - Legacy
- RVTools
- Simple Object Access Protocol (SOAP)
- VMware vCenter
- VMware vCenter SOAP
- Show all articles ( 13 ) Collapse Articles
-
-
Admin
-
-
-
- Modules
- Attachments
- Bulk Edit
- Data Generator
- Data Mapping
- Data Quality
- ETL
- Form Builder
- Images
- Multi-Factor Authentication
- Notifications
- Rationalization
- Relationship Chart
- Reports
- Rules
- Single Sign-On
- T-Comm
- User Experience
- Show all articles ( 4 ) Collapse Articles
-
-
API
-
Administration
-
FAQs
-
Solutions
Records
< Back
The Records tab provides a mechanism to create or update data records in bulk.
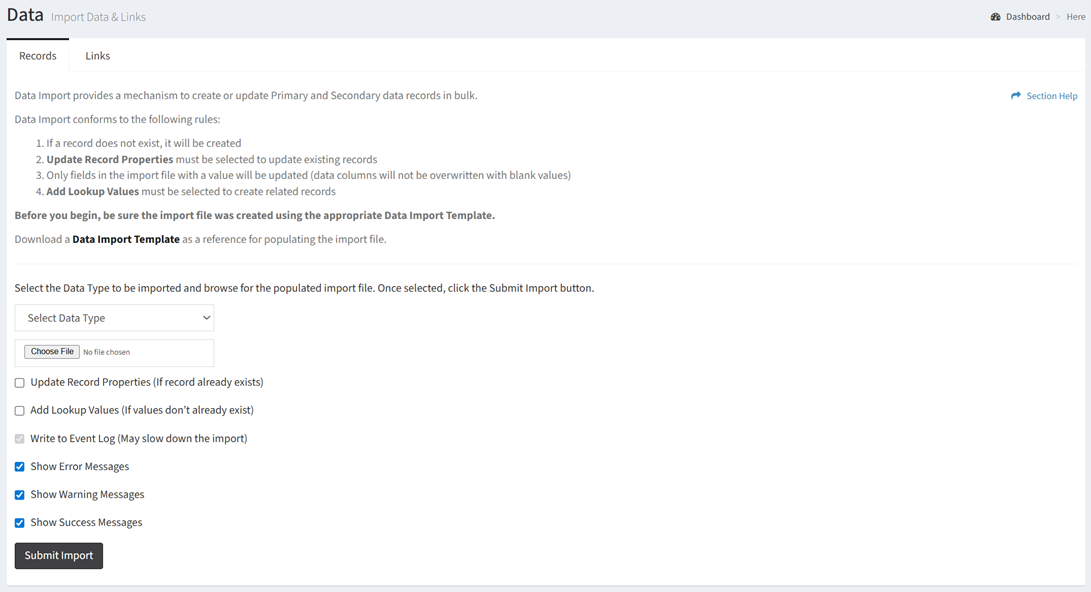
Import Records
From the Records tab, you can create new or update data records. To import:
- Click the Data Import Template hyperlink to bring up the Download Data Import Template dialog
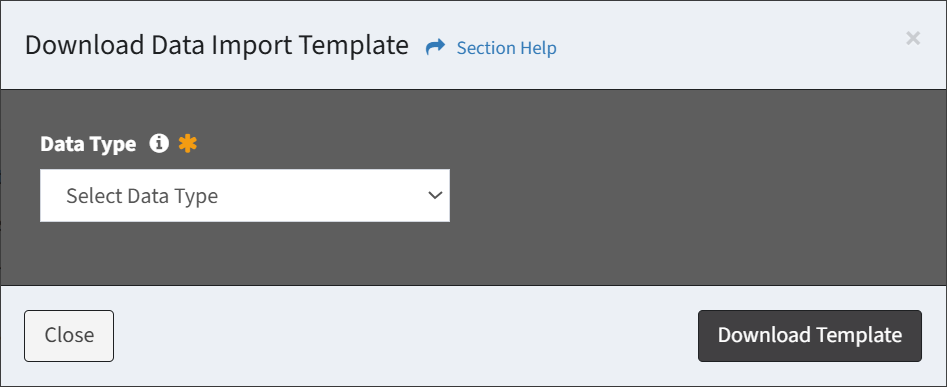
- Select a data type from the Data Type drop down
NOTE: The data import template will include all data type data columns including those with Visible set to No - Click the Download Template button to download the data import template to populate. Click the Close button to close out of the dialog. You will be redirected back to the Data Import page.
NOTE: The Name field of a data record cannot contain the string ” | “.
- Select a data type from the Data Type drop down
- Once you have completed the template, browse for the data import file
NOTE: Be sure to save your template in CSV UTF-8 (Comma delimited) (*.csv) to preserve any special characters and to format the date columns appropriately. - Select the data type from the drop down
- Check Update Record Properties to update existing data records.
TIP: Leave unchecked when you are adding new data records to avoid updating data records inadvertently - Check Add Lookup Values to create related data records
- Check Write to Event Log to log the import (may slow down the import)
NOTE: Force import logging (shown above) through additional ReadyWorks settings. - Prefilter the results by error, warning or success messages by checking or unchecking any of the three checkboxes
- Click the Submit Import button to create or update the data records. Navigate to another page to cancel the operation.
- Only fields in the import file with a value will be updated (data columns will not be overwritten with blank values). This allows you to update a single data column if that is all that needs to be updated.
- The import function is only available to users in the Administrator and Regular User security groups
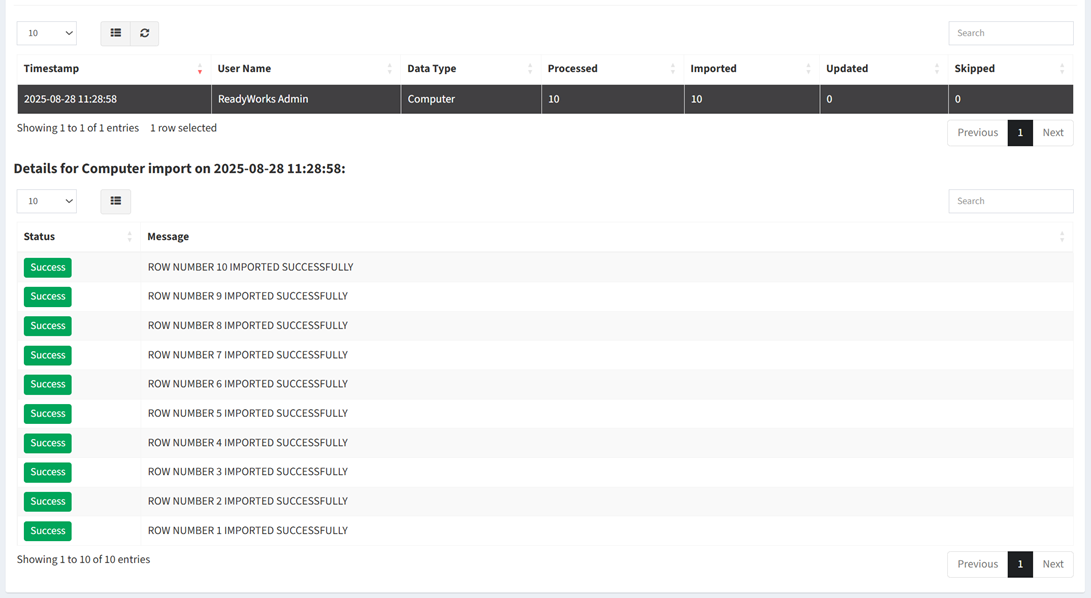
- The results of the import will be displayed at the bottom of the page

- You can view additional details by selecting an import (row)
Download Template
From the Records tab, you can download a template used to create new or update data records. To download:
- Click the Data Import Template hyperlink to bring up the Download Data Import Template dialog

- Select a data type from the Data Type drop down
NOTE: The data import template will include all data type data columns including those with Visible set to No - Click the Download Template button to download the data import template to populate. Click the Close button to close out of the dialog. You will be redirected back to the Data Import page.
- Select a data type from the Data Type drop down
Format Date Columns
Date columns must be formatted correctly for the import to succeed. To format:
- Select the Date Only or Date Time columns in Excel and right click to choose Format Cells
- In the Number tab, click on Date from the Category list, and then click on Custom
NOTE: The order of the clicks is required so the Custom tab will have date formatting populated into the Type field.
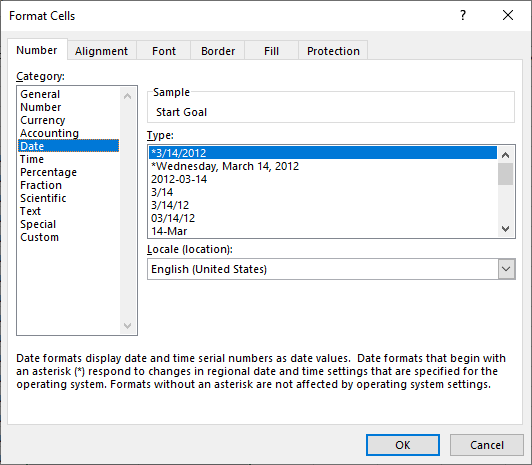
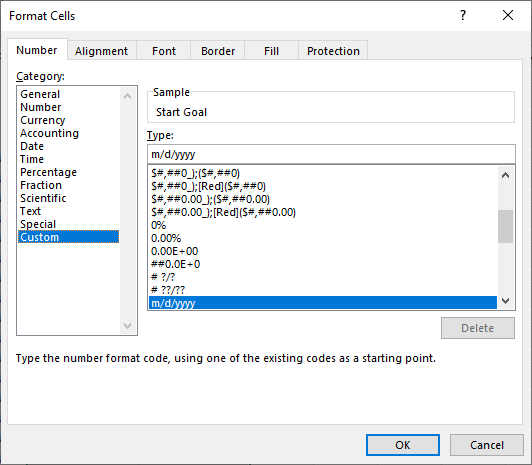
- In the Type field, enter [$-en-US]m/d/yyyy;@ (Date Only) or [$-en-US]m/d/yyyy h:mm;@ (Date Time)
NOTE: Entering two digits for the hour (hh) will cause the import to fail with a single digit hour (e.g. 09:00).

- Click OK and save the CSV
NOTE: Be sure to save your template in CSV UTF-8 (Comma delimited) (*.csv) to preserve any special characters.

