
Search Knowledge Base by Keyword
Report Builder
From the Reports Configuration page, you can build new reports. To build a report:
- Click the New Report button to bring up the New Report dialog
- Select the type of report to build
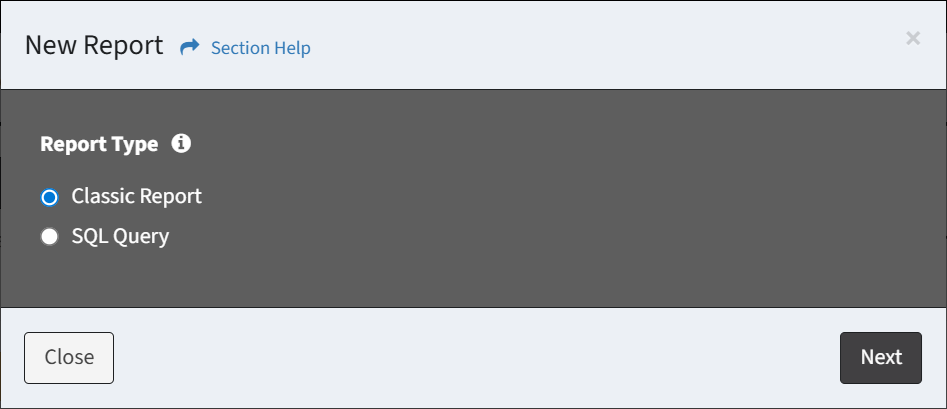
- Classic Report – Report built from the UI
- SQL Query – Report built from a SQL query
- Click the Next button when finished to build the report. You will be redirected to the Report Builder with Classic Report selected and the SQL Query Report Builder with SQL Query selected. Click the Close button to cancel the operation.
- The new report function is only available to users in the Administrator security group
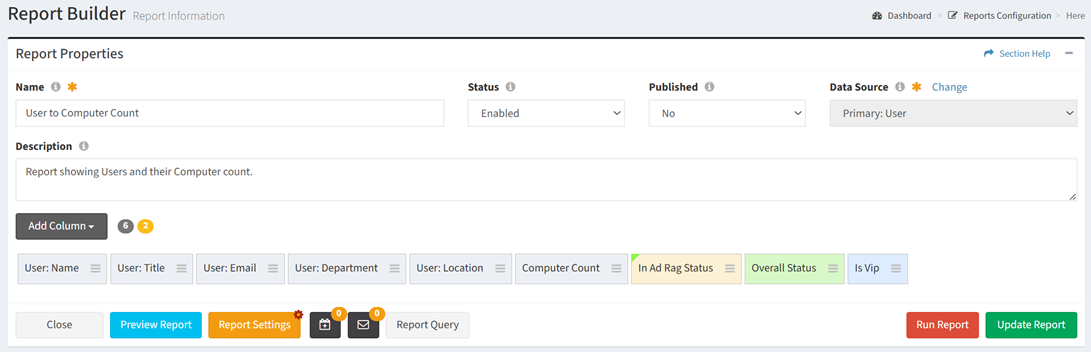
New Classic Report
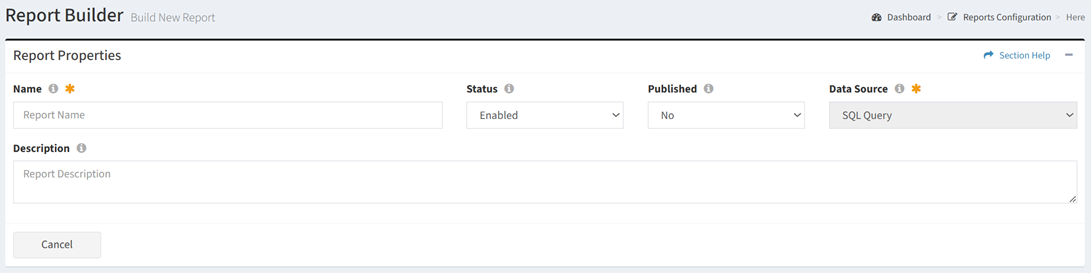
From the Report Builder page, you can build new Classic reports. To build a Classic report:
- Enter the properties of the new report
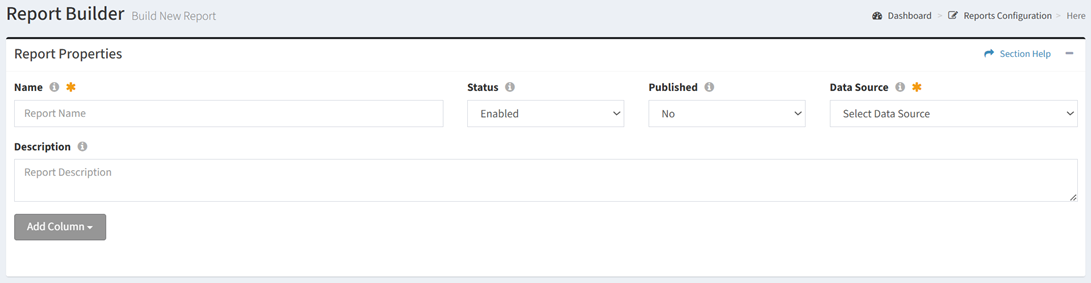
- Name – Name of the report (required)
- Status – Choose if the report is enabled (required)
- Published – Choose if the report is published (optional)
- Data Source – Name of the source data table for the report (required)
NOTE: Changing the data source after adding columns will remove any existing columns from the report.- Data Types (Primary, Secondary)
- Orchestration (Waves, Tasks)
- Event Logs (Exception Log, Login History, Session Termination, System Events, T-Comm History, User Experience Audit)
- Description – Description of the report (optional)
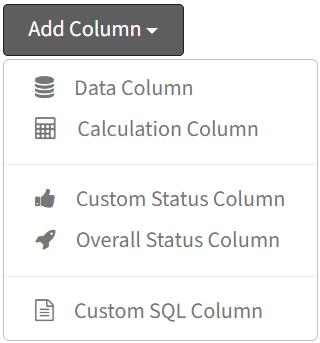
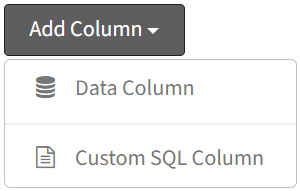
- Add data columns to the report
- Data Types
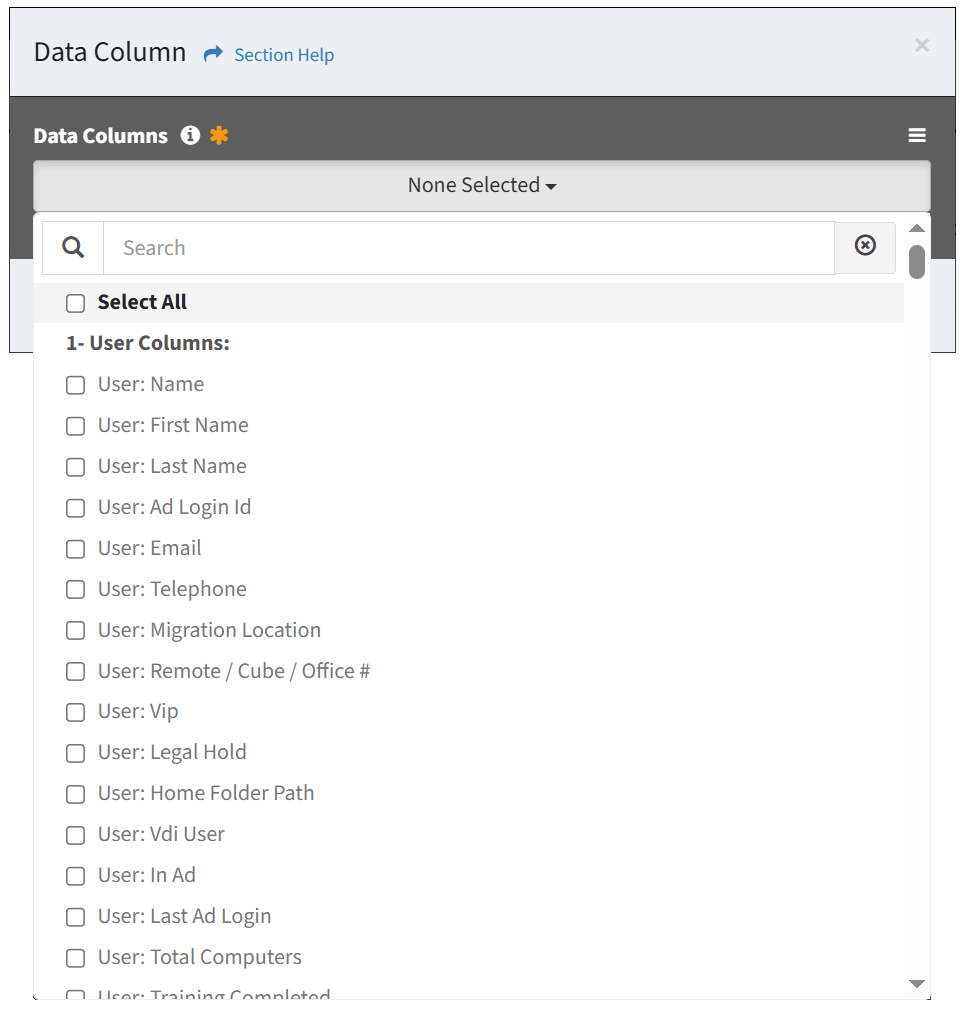
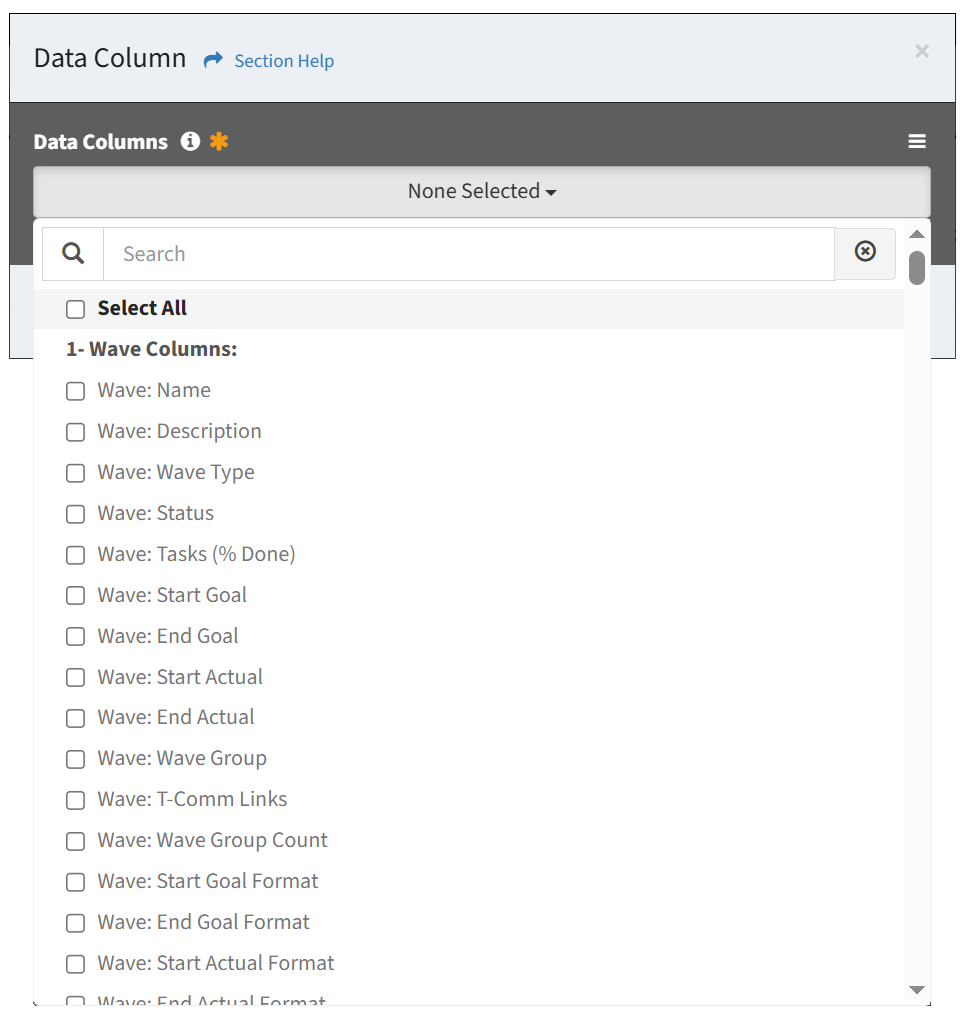
- From the Add Column drop down, select Data Column to bring up the Data Column dialog
- Select the data columns of the new report from the Data Columns drop down and then click the Add button. Click the Close button to cancel the operation.
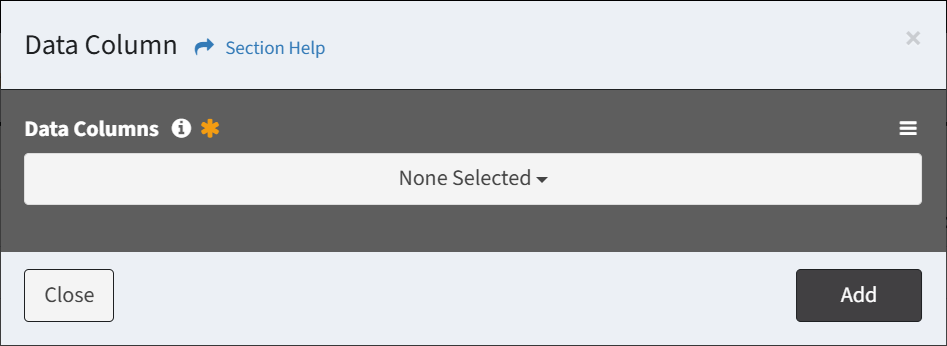
- Use the
 menu to change the sort order of the Data Columns drop down
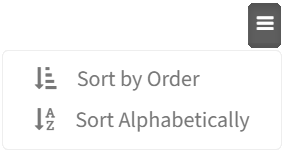
- Sort by Order – Sorts data columns in the order they appear on data types (default)
- Sort Alphabetically – Sorts data columns alphabetically
- Use the
- Added data columns are displayed below the Add Column button

NOTE: The first column must be from the selected data source.
- From the Add Column drop down, select Data Column to bring up the Data Column dialog
- Orchestration (Waves)
- From the Add Column drop down, select Data Column to bring up the Data Column dialog
- Select the data columns of the new report from the Data Columns drop down and then click the Add button. Click the Close button to cancel the operation.
- Use the menu to change the sort order of the Data Columns drop down
- Sort by Order – Sorts data columns in the order they appear on waves, tasks, and data types (default)
- Sort Alphabetically – Sorts data columns alphabetically
- Use the
- Added data columns are displayed below the Add Column button

NOTE: The first column must be from the selected data source.
- From the Add Column drop down, select Data Column to bring up the Data Column dialog
- Event Logs (System Events)
- From the Add Column drop down, select Data Column to bring up the Data Column dialog
- Select the data columns of the new report from the Data Columns drop down and then click the Add button. Click the Close button to cancel the operation.
- Use the menu to change the sort order of the Data Columns drop down
- Sort by Order – Sorts data columns in the order they appear on event logs (default)
- Sort Alphabetically – Sorts data columns alphabetically
- Use the
- Added data columns are displayed below the Add Column button

NOTE: The first column must be from the selected data source.
- From the Add Column drop down, select Data Column to bring up the Data Column dialog
- Data Types
- Add a calculation column to the report (Data Types only)
- From the Add Column drop down, select Calculation Column to bring up the Calculation Column dialog
- Enter the properties of the calculation column and then click the Add button. Click the Close button to cancel the operation.

- Column Name – Name of the column (required)
- Function – Select the calculation to be performed (only COUNT is currently supported) (required)
- Linked Data Type – Select a data type linked to the selected data source (required)
- Added calculation columns are displayed below the Add Column button at the end of the column list

NOTE: Only one calculation column on a report is currently supported.
- From the Add Column drop down, select Calculation Column to bring up the Calculation Column dialog
- Add custom status columns to the report (Data Types only)
- From the Add Column drop down, select Custom Status Column to bring up the New Custom Status dialog
- Select the data column of the new custom status from the Data Column drop down
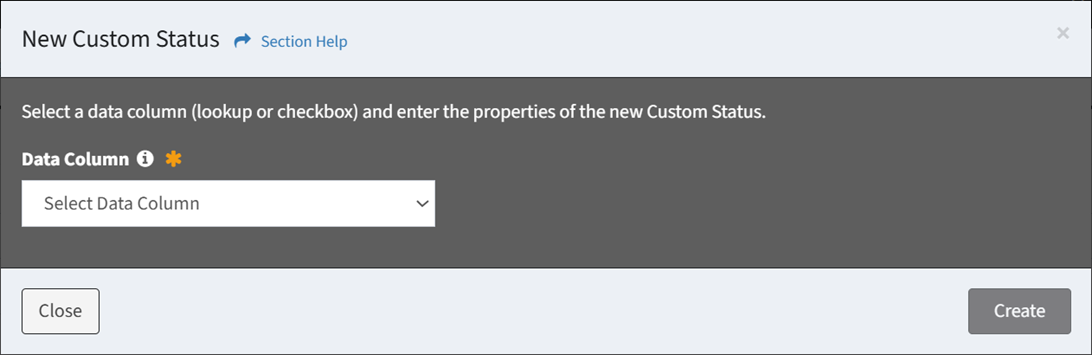
- Enter the properties of the custom status column and then click the Create button. Click the Close button to cancel the operation.

- Column Label – Name of the column (required)
- Values Type – Type of values (Fixed Values, Range Values) (required)
- Value – Values (or value ranges) of the selected data column
- Status – Select RAG status of each value to include in the custom status (at least one status is required)
NOTE: From the RAG Status module, you can manage RAG statuses.
- Added custom status columns are displayed in yellow below the Add Column button at the end of the column list

- From the Add Column drop down, select Custom Status Column to bring up the New Custom Status dialog
- Add an overall status column to the report (Data Types only)
- From the Add Column drop down, select Overall Status Column to bring up the Overall Status dialog
- Enter the properties of the overall status column and then click the Update button. Click the Close button to cancel the operation.
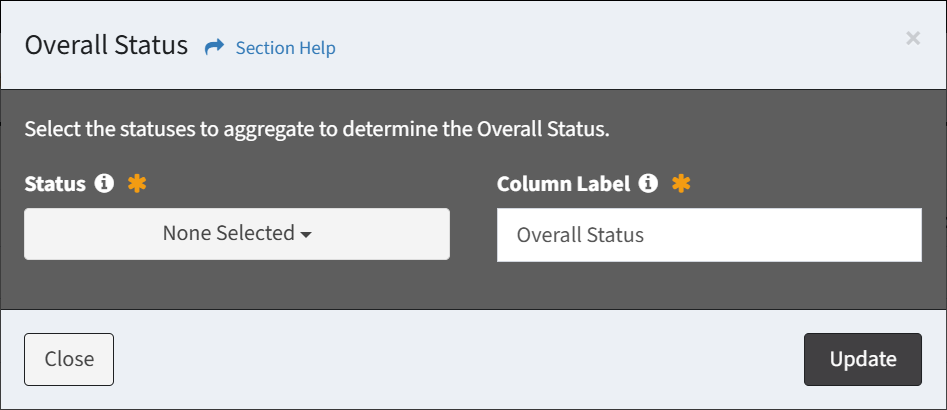
- Status – Select custom statuses to aggregate to determine overall status (at least one status is required)
- Column Label – Name of the column (required)
- Added overall status column is displayed in green below the Add Column button at the end of the column list. Custom statuses included in the overall status are dog eared in green.

- From the Add Column drop down, select Overall Status Column to bring up the Overall Status dialog
- Add custom SQL columns to the report
- Data Types
- From the Add Column drop down, select Custom SQL Column to bring up the New SQL Column dialog
- Enter the SQL query of the custom SQL column and then click the Create button. Click the Close button to cancel the operation.
- SELECT Statement – Enter SELECT statement of the custom SQL query (required)
- JOIN Statement – Enter JOIN statement of the custom SQL query
- WHERE Clause – Enter WHERE clause of the custom SQL query
- GROUP BY Statement – Enter GROUP BY statement of the custom SQL query
- Added custom SQL columns are displayed in blue below the Add Column button at the end of the column list

- Enter the SQL query of the custom SQL column and then click the Create button. Click the Close button to cancel the operation.
- To configure custom status, select Custom Status from the
 menu to bring up the Edit Custom Status dialog
- Edit the properties of the custom status and then click the Update button. Click the Close button to cancel the operation.

- Value – Values of the selected data column
- Status – Select RAG status of each value to include in the custom status
NOTE: From the RAG Status module, you can manage RAG statuses.
- Edit the properties of the custom status and then click the Update button. Click the Close button to cancel the operation.
- From the Add Column drop down, select Custom SQL Column to bring up the New SQL Column dialog
- Orchestration (Waves)
- From the Add Column drop down, select Custom SQL Column to bring up the New SQL Column dialog
- Enter the SQL query of the custom SQL column and then click the Create button. Click the Close button to cancel the operation.
- SELECT Statement – Enter SELECT statement of the custom SQL query (required)
- JOIN Statement – Enter JOIN statement of the custom SQL query
- WHERE Clause – Enter WHERE clause of the custom SQL query
- GROUP BY Statement – Enter GROUP BY statement of the custom SQL query
- Added custom SQL columns are displayed in blue below the Add Column button at the end of the column list

- Enter the SQL query of the custom SQL column and then click the Create button. Click the Close button to cancel the operation.
- To configure custom status, select Custom Status from the menu to bring up the Edit Custom Status dialog

- Edit the properties of the custom status and then click the Update button. Click the Close button to cancel the operation.
- Value – Values of the selected data column
- Status – Select RAG status of each value to include in the custom status
NOTE: From the RAG Status module, you can manage RAG statuses.
- Edit the properties of the custom status and then click the Update button. Click the Close button to cancel the operation.
- From the Add Column drop down, select Custom SQL Column to bring up the New SQL Column dialog
- Event Logs (System Events)
- From the Add Column drop down, select Custom SQL Column to bring up the New SQL Column dialog
- Enter the SQL query of the custom SQL column and then click the Create button. Click the Close button to cancel the operation.
- SELECT Statement – Enter SELECT statement of the custom SQL query (required)
- JOIN Statement – Enter JOIN statement of the custom SQL query
- WHERE Clause – Enter WHERE clause of the custom SQL query
- GROUP BY Statement – Enter GROUP BY statement of the custom SQL query
- Added custom SQL columns are displayed in blue below the Add Column button at the end of the column list

- Enter the SQL query of the custom SQL column and then click the Create button. Click the Close button to cancel the operation.
- To configure custom status, select Custom Status from the menu to bring up the Edit Custom Status dialog
- Edit the properties of the custom status and then click the Update button. Click the Close button to cancel the operation.
- Value – Values of the selected data column
- Status – Select RAG status of each value to include in the custom status
NOTE: From the RAG Status module, you can manage RAG statuses.
- Edit the properties of the custom status and then click the Update button. Click the Close button to cancel the operation.
- From the Add Column drop down, select Custom SQL Column to bring up the New SQL Column dialog
- Data Types
- Drag and drop to reorder columns

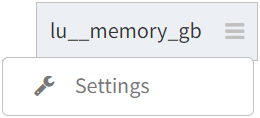
- To configure column settings, select Settings from the
 menu to bring up the Column Settings dialog
- Configure the column settings and then click the Save button. Click the Close button to cancel the operation.
- Override Column – Override the default column name
- Visible – Whether the column is visible by default. Use column visibility to view the column on the report.
- Hyperlink – Display a hyperlink to the data record (Name, Lookup, Lookup Alias, Link, and Linked Name fields only)
- Custom Label Colors – Select custom label colors for each value (Checkbox, Select, and Status fields with less than 20 values only)
- Top Level Filter – Display column as a top level filter (Lookup and Lookup Alias fields only)
- Custom Filter – Create a custom filter for the column
- Configure the column settings and then click the Save button. Click the Close button to cancel the operation.
- To delete a column, select Delete Column from the menu
- Click the Delete button to confirm the delete operation. Click the Cancel button to cancel the operation.
- Click the Delete button to confirm the delete operation. Click the Cancel button to cancel the operation.
- Configure the settings of the report (optional)
- Click the Report Settings button to bring up the Report Settings dialog
- Configure the settings of the report and then click the Save button. Click the Close button to cancel the operation.
- Pin Left Columns – Select the number of left columns to pin (None, 1, 2, or 3)
- Pin Right Columns – Select the number of right columns to pin (None, 1, 2, or 3)
- Filter Type – Select the filter type (Simple Filter)
- Limit Preview Results – Select the number of rows to display in the report preview (only in the preview)
- Column Sort Order – Configure a column sort order (default sort order is on the Name field ascending)
- Apply Global Where Clause – Add a where clause for additional filtering on the report
- Require Top Level Filter – Choose if selecting a top level filter is required before a report can be run
- Assign action or form buttons to the report (optional)
- Click the
 button to bring up the Assign Buttons to Report dialog
 - To assign a button, select a type from the Type drop down, select an action or form button from the Button drop down, and then click the Assign button. Click the Close button to cancel the operation.
NOTE: From the Action Buttons module you can manage action buttons. From the Form Builder module you can manage forms.- Edit the properties of the button
- Position – Position of the button on the toolbar
- Status – Choose if the button is enabled
- Edit the properties of the button
- To unassign a button, select a button (row) to unassign
- Click the Unassign button on the toolbar

- The unassign button is grayed out unless a button (row) is selected


- The unassign function is only available to users in the Administrator security group
- The unassign button is grayed out unless a button (row) is selected
- Click the Unassign button to confirm the unassign operation. Click the Cancel button to cancel the operation.
- Click the Unassign button on the toolbar
- Click the
- Subscribe recipients to the report (optional)
- Click the
 button to bring up the Subscribe Recipients to Report dialog
 - To subscribe a report recipient, select a recipient from the Recipients drop down, and then click the Save button. Click the Close button to cancel the operation.
NOTE: From the Report Recipients tab you can manage subscriptions to report recipients. - To unsubscribe a report recipient, deselect a recipient from the Recipients drop down, and then click the Save button. Click the Close button to cancel the operation.

- Click the
- Click the Preview Report button to preview the report before saving
 NOTE: Encrypted data columns are masked to the end user when previewing the report.
 - Click the Report Query button to bring up the Report Query dialog to view and copy the query. The Report Query button is not available until the report has been previewed.
- Click the Create Report button when finished to create the report. You will be redirected back to the Reports Configuration page. Click the Cancel button to cancel the operation.
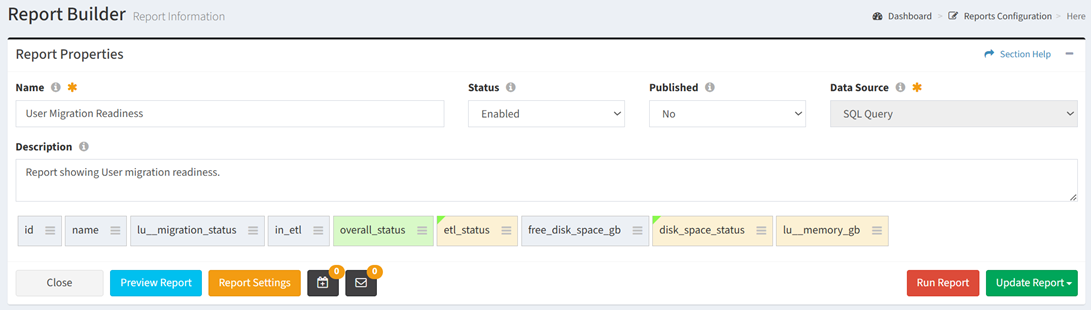
New SQL Query Report
From the Report Builder page, you can build new SQL Query reports. To build a SQL Query report:
- Enter the properties of the new report
- Name – Name of the report (required)
- Status – Choose if the report is enabled (required)
- Published – Choose if the report is published (optional)
- Data Source – Name of the source for the report (SQL Query)
- Description – Description of the report (optional)
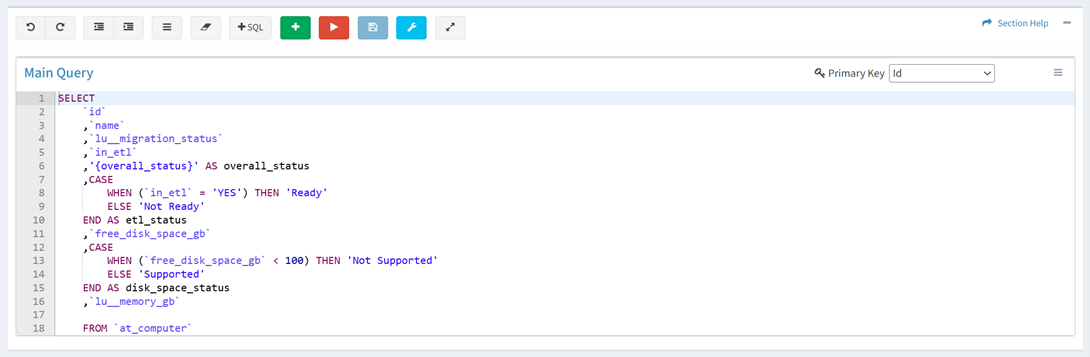
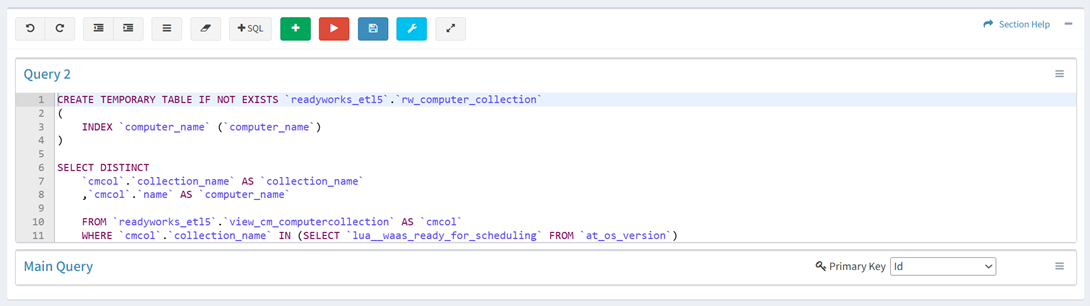
- Enter the main query of the new report in the query window. SQL Query reports can access the connected ETL database and the ReadyWorks database.
NOTE: When using SQL functions for columns, be sure to use aliases signified by the keyword AS (See Line 10 in sample query below).
- Use the editing buttons to format the query
- Undo – Undo the last edit

- Redo – Redo the last edit that was undone

- Block Outdent – Remove an indent from a line or block

- Block Indent – Set a line or block in from the margin

- Comment – Comment out a line or block

- Clear – Clear the query

- Add SQL – Add sample SQL to the query

- Undo – Undo the last edit
- Select the Primary Key of the query

NOTE: Columns with blank values cannot be used as the Primary Key. It is best practice to use the Id, Name, or a column that contains unique values and contains no blank values as the Primary Key. - Click the
 button to add a helper query. SQL Query reports can access the connected ETL database and the ReadyWorks database.
- Click the name of a query to expand or minimize the query window

- Click the
 button to run the query and preview the report before saving
 - The
 button is grayed out until the query has been previewed successfully
 - Click the
 button to bring op the Settings dialog
- Configure the settings and then click the Save button. Click the Close button to cancel the operation.
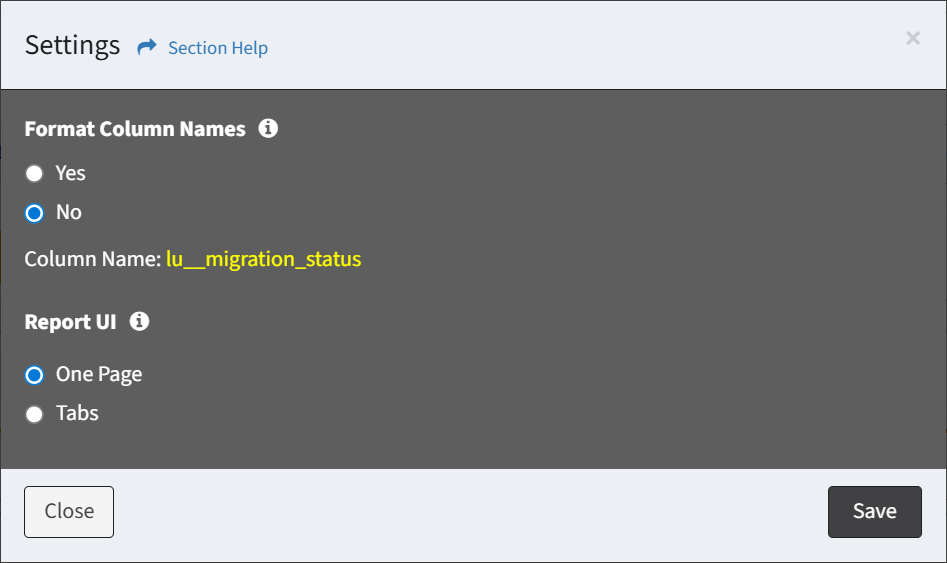
- Format Column Names – Choose if column names are formatted
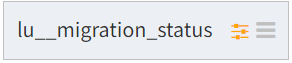
- Unformatted – lu__migration_status
- Formatted – Migration Status
- Report UI – Choose the display of the Report UI (One Page, Tabs)
NOTE: Changing the display will result in the loss of any unsaved changes.
- Format Column Names – Choose if column names are formatted
- Configure the settings and then click the Save button. Click the Close button to cancel the operation.
- Click the
 button to expand the query to full window mode. Click the
  button to exit full window mode.
 - Use the
 menu to manage queries
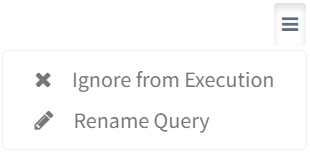
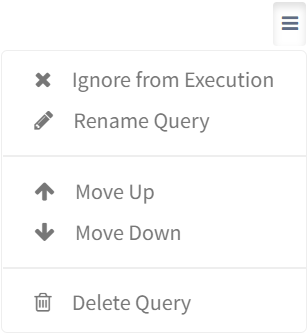
- Ignore from Execution – Ignore a query from execution
- Rename Query – Rename a query
- Move Up – Move a query up in the order
- Move Down – Move a query down in the order
- Delete Query – Delete a query
- Use the editing buttons to format the query
- To configure column settings, select Settings from the menu to bring up the Column Settings dialog
- Configure the column settings and then click the Save button. Click the Close button to cancel the operation.
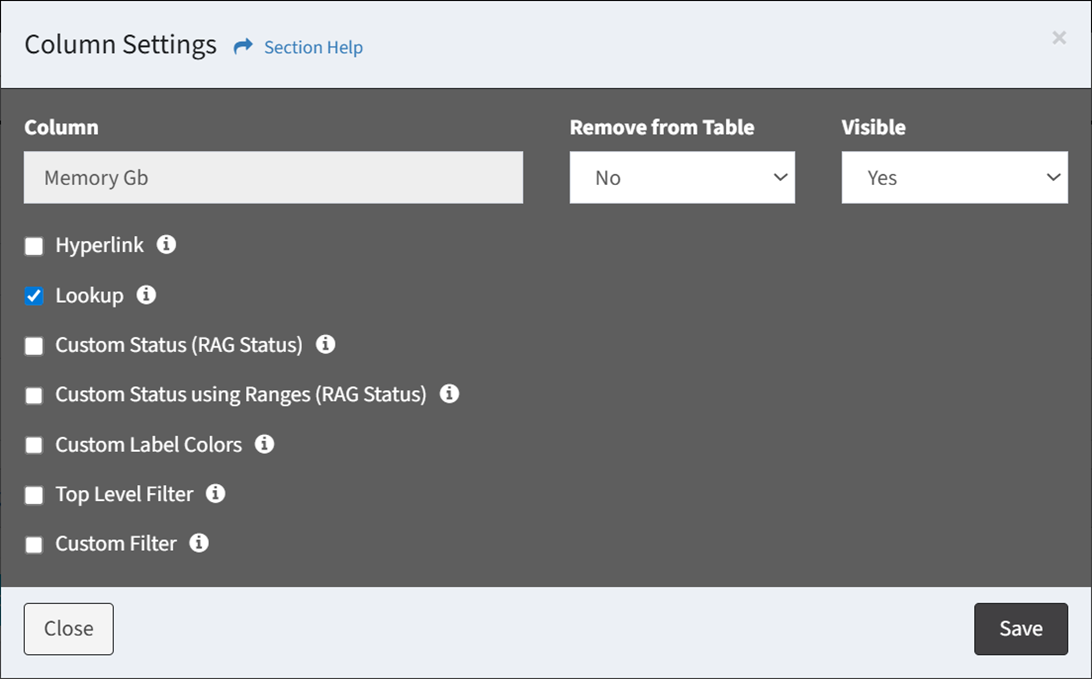
- Remove from Table – Remove column from the displayed results (column will remain in the query output)
- Visible – Whether the column is visible by default. Use column visibility to view the column on the report.
- Hyperlink – Display a hyperlink to the data type (Name, Lookup, Lookup Alias, Link, and Linked Name fields only)
- Lookup – Mark column as a lookup (lu__, lum__, lua__, and luam__ columns will be checked automatically)
- Custom Status (RAG Status) – Display RAG status for each value
- Enter the properties of the custom status column
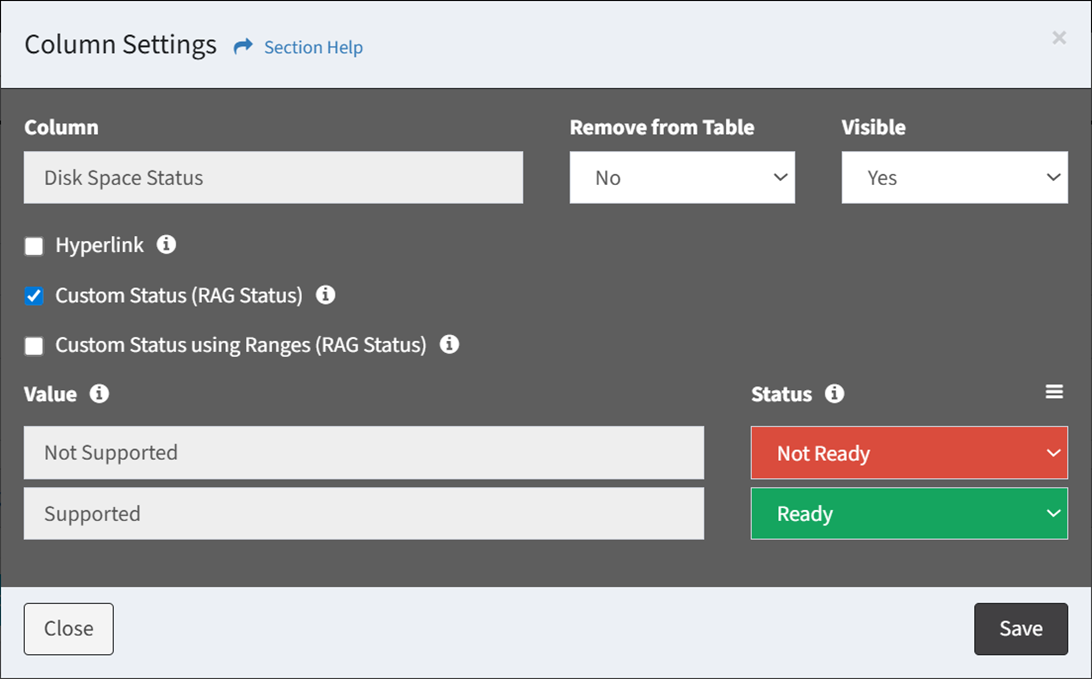
- Value – Values of the selected data column
- Status – Select RAG status of each value to include in the custom status
NOTE: From the RAG Status module, you can manage RAG statuses.
- Custom status columns are displayed in yellow

- Enter the properties of the custom status column
- Custom Status using Ranges (RAG Status) – Display RAG status for value ranges
- Enter the properties of the custom status column
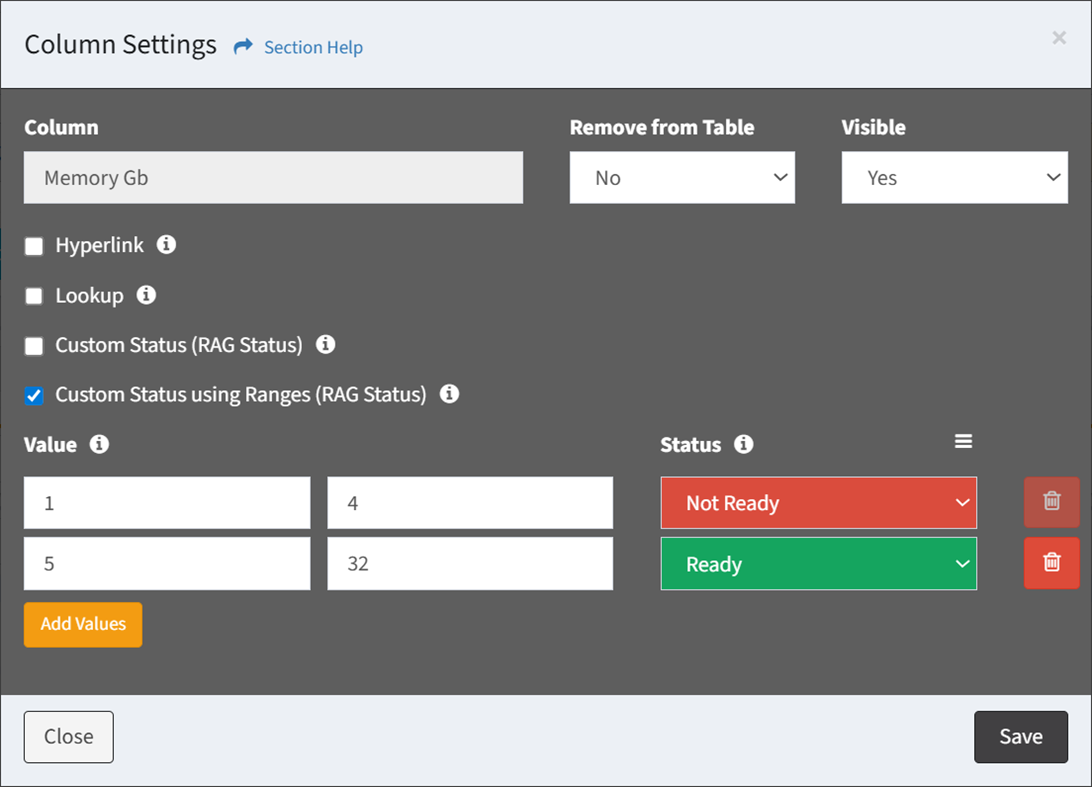
- Value – Value range of the selected data column
- Status – Select RAG status of each value range to include in the custom status
NOTE: From the RAG Status module, you can manage RAG statuses. - Click the Add Values button to add a value range to the custom status
- Click the Delete button to delete a value range (row)
- Custom status columns are displayed in yellow

- Enter the properties of the custom status column
- Custom Label Colors – Select custom label colors for each value (Checkbox, Select, and Status fields with less than 20 values only)
- Top Level Filter – Display column as a top level filter (Lookup and Lookup Alias fields only)
- Custom Filter – Create a custom filter for the column
- Configure the column settings and then click the Save button. Click the Close button to cancel the operation.
- To configure overall status column settings, select Settings from the
 menu of an overall status column (displayed in green) to bring up the Overall Status dialog

NOTE: Click the Add SQL button and select Overall Status Column from the drop down to add an overall status column to the query.- Enter the properties of the overall status column and then click the Update button. Click the Close button to cancel the operation.
- Status – Select custom statuses to aggregate to determine overall status (at least one status is required)
- Column Label – Name of the column (from the query)
- Overall status column is displayed in green. Custom statuses included in the overall status are dog eared in green.

- Enter the properties of the overall status column and then click the Update button. Click the Close button to cancel the operation.
- Configure the settings of the report (optional)
- Click the Report Settings button to bring up the Report Settings dialog
- Configure the settings of the report and then click the Save button. Click the Close button to cancel the operation.
- Pin Left Columns – Select the number of left columns to pin (None, 1, 2, or 3)
- Pin Right Columns – Select the number of right columns to pin (None, 1, 2, or 3)
- Column Sort Order – Configure a column sort order (default sort order is on the Name field ascending)
- Require Top Level Filter – Choose if selecting a top level filter is required before a report can be run
- Assign action or form buttons to the report (optional)
- Click the button to bring up the Assign Buttons to Report dialog
- To assign a button, select a type from the Type drop down, select an action or form button from the Button drop down, and then click the Assign button. Click the Close button to cancel the operation.
NOTE: From the Action Buttons module you can manage action buttons. From the Form Builder module you can manage forms.- Edit the properties of the button
- Position – Position of the button on the toolbar
- Status – Choose if the button is enabled
- Edit the properties of the button
- To unassign a button, select a button (row) to unassign
- Click the Unassign button on the toolbar
- The unassign button is grayed out unless a button (row) is selected
- The unassign function is only available to users in the Administrator security group
- The unassign button is grayed out unless a button (row) is selected
- Click the Unassign button to confirm the unassign operation. Click the Cancel button to cancel the operation.
- Click the Unassign button on the toolbar
- Click the
- Subscribe recipients to the report (optional)
- Click the button to bring up the Subscribe Recipients to Report dialog
- To subscribe a report recipient, select a recipient from the Recipients drop down, and then click the Save button. Click the Close button to cancel the operation.
NOTE: From the Report Recipients tab you can manage subscriptions to report recipients. - To unsubscribe a report recipient, deselect a recipient from the Recipients drop down, and then click the Save button. Click the Close button to cancel the operation.
- Click the
- Click the Preview Report button to preview the report before saving
NOTE: Encrypted data columns are masked to the end user when previewing the report. - Click the Create Report button when finished to create the report. You will be redirected back to the Reports Configuration page. Click the Cancel button to cancel the operation.
Edit Report
From the Reports Configuration page, you can edit reports built with the Report Builder. To edit a report:
- Select a Report Builder report (row) to edit
- Click the Edit Report button on the toolbar to bring up the Report Builder wizard

- The edit button is grayed out unless a report (row) is selected


- The edit function is only available to users in the Administrator security group
- The edit button is grayed out unless a report (row) is selected
- You will be redirected to the Report Builder for a Classic Report and the SQL Query Report Builder for a SQL Query
Edit Classic Report
From the Report Builder page, you can edit Classic reports. To edit a Classic report:
- Edit the properties of the report
- Name – Name of the report (required)
- Status – Choose if the report is enabled (required)
- Published – Choose if the report is published (optional)
- Data Source – Name of the source data table for the report (required)
NOTE: Changing the data source after adding columns will remove any existing columns from the report.- Data Types (Primary, Secondary)
- Orchestration (Waves, Tasks)
- Event Logs (Exception Log, Login History, Session Termination, System Events, T-Comm History, User Experience Audit)
- Description – Description of the report (optional)
- Add data columns to the report
- Data Types
- From the Add Column drop down, select Data Column to bring up the Data Column dialog
- Select the data columns of the new report from the Data Columns drop down and then click the Add button. Click the Close button to cancel the operation.
- Use the menu to change the sort order of the Data Columns drop down
- Sort by Order – Sorts data columns in the order they appear on data types (default)
- Sort Alphabetically – Sorts data columns alphabetically
- Use the
- Added data columns are displayed below the Add Column button
NOTE: The first column must be from the selected data source.
- From the Add Column drop down, select Data Column to bring up the Data Column dialog
- Orchestration (Waves)
- From the Add Column drop down, select Data Column to bring up the Data Column dialog
- Select the data columns of the new report from the Data Columns drop down and then click the Add button. Click the Close button to cancel the operation.
- Use the menu to change the sort order of the Data Columns drop down
- Sort by Order – Sorts data columns in the order they appear on waves, tasks, and data types (default)
- Sort Alphabetically – Sorts data columns alphabetically
- Use the
- Added data columns are displayed below the Add Column button
NOTE: The first column must be from the selected data source.
- From the Add Column drop down, select Data Column to bring up the Data Column dialog
- Event Logs (System Events)
- From the Add Column drop down, select Data Column to bring up the Data Column dialog
- Select the data columns of the new report from the Data Columns drop down and then click the Add button. Click the Close button to cancel the operation.
- Use the menu to change the sort order of the Data Columns drop down
- Sort by Order – Sorts data columns in the order they appear on event logs (default)
- Sort Alphabetically – Sorts data columns alphabetically
- Use the
- Added data columns are displayed below the Add Column button
NOTE: The first column must be from the selected data source.
- From the Add Column drop down, select Data Column to bring up the Data Column dialog
- Data Types
- Add a calculation column to the report (Data Types only)
- From the Add Column drop down, select Calculation Column to bring up the Calculation Column dialog
- Enter the properties of the calculation column and then click the Add button. Click the Close button to cancel the operation.
- Column Name – Name of the column (required)
- Function – Select the calculation to be performed (only COUNT is currently supported) (required)
- Linked Data Type – Select a data type linked to the selected data source (required)
- Added calculation columns are displayed below the Add Column button at the end of the column list
NOTE: Only one calculation column on a report is currently supported.
- From the Add Column drop down, select Calculation Column to bring up the Calculation Column dialog
- Add custom status columns to the report (Data Types only)
- From the Add Column drop down, select Custom Status Column to bring up the New Custom Status dialog
- Select the data column of the new custom status from the Data Column drop down
- Enter the properties of the custom status column and then click the Create button. Click the Close button to cancel the operation.
- Column Label – Name of the column (required)
- Values Type – Type of values (Fixed Values, Range Values) (required)
- Value – Values (or value ranges) of the selected data column
- Status – Select RAG status of each value to include in the custom status (at least one status is required)
NOTE: From the RAG Status module, you can manage RAG statuses.
- Added custom status columns are displayed in yellow below the Add Column button at the end of the column list
- From the Add Column drop down, select Custom Status Column to bring up the New Custom Status dialog
- Add an overall status column to the report (Data Types only)
- From the Add Column drop down, select Overall Status Column to bring up the Overall Status dialog
- Enter the properties of the overall status column and then click the Update button. Click the Close button to cancel the operation.
- Status – Select custom statuses to aggregate to determine overall status (at least one status is required)
- Column Label – Name of the column (required)
- Added overall status column is displayed in green below the Add Column button at the end of the column list. Custom statuses included in the overall status are dog eared in green.
- From the Add Column drop down, select Overall Status Column to bring up the Overall Status dialog
- Add custom SQL columns to the report
- Data Types
- From the Add Column drop down, select Custom SQL Column to bring up the New SQL Column dialog
- Enter the SQL query of the custom SQL column and then click the Create button. Click the Close button to cancel the operation.
- SELECT Statement – Enter SELECT statement of the custom SQL query (required)
- JOIN Statement – Enter JOIN statement of the custom SQL query
- WHERE Clause – Enter WHERE clause of the custom SQL query
- GROUP BY Statement – Enter GROUP BY statement of the custom SQL query
- Added custom SQL columns are displayed in blue below the Add Column button at the end of the column list
- Enter the SQL query of the custom SQL column and then click the Create button. Click the Close button to cancel the operation.
- To configure custom status, select Custom Status from the menu to bring up the Edit Custom Status dialog
- Edit the properties of the custom status and then click the Update button. Click the Close button to cancel the operation.
- Value – Values of the selected data column
- Status – Select RAG status of each value to include in the custom status
NOTE: From the RAG Status module, you can manage RAG statuses.
- Edit the properties of the custom status and then click the Update button. Click the Close button to cancel the operation.
- From the Add Column drop down, select Custom SQL Column to bring up the New SQL Column dialog
- Orchestration (Waves)
- From the Add Column drop down, select Custom SQL Column to bring up the New SQL Column dialog
- Enter the SQL query of the custom SQL column and then click the Create button. Click the Close button to cancel the operation.
- SELECT Statement – Enter SELECT statement of the custom SQL query (required)
- JOIN Statement – Enter JOIN statement of the custom SQL query
- WHERE Clause – Enter WHERE clause of the custom SQL query
- GROUP BY Statement – Enter GROUP BY statement of the custom SQL query
- Added custom SQL columns are displayed in blue below the Add Column button at the end of the column list

- Enter the SQL query of the custom SQL column and then click the Create button. Click the Close button to cancel the operation.
- To configure custom status, select Custom Status from the menu to bring up the Edit Custom Status dialog
- Edit the properties of the custom status and then click the Update button. Click the Close button to cancel the operation.
- Value – Values of the selected data column
- Status – Select RAG status of each value to include in the custom status
NOTE: From the RAG Status module, you can manage RAG statuses.
- Edit the properties of the custom status and then click the Update button. Click the Close button to cancel the operation.
- From the Add Column drop down, select Custom SQL Column to bring up the New SQL Column dialog
- Event Logs (System Events)
- From the Add Column drop down, select Custom SQL Column to bring up the New SQL Column dialog
- Enter the SQL query of the custom SQL column and then click the Create button. Click the Close button to cancel the operation.
- SELECT Statement – Enter SELECT statement of the custom SQL query (required)
- JOIN Statement – Enter JOIN statement of the custom SQL query
- WHERE Clause – Enter WHERE clause of the custom SQL query
- GROUP BY Statement – Enter GROUP BY statement of the custom SQL query
- Added custom SQL columns are displayed in blue below the Add Column button at the end of the column list
- Enter the SQL query of the custom SQL column and then click the Create button. Click the Close button to cancel the operation.
- To configure custom status, select Custom Status from the menu to bring up the Edit Custom Status dialog
- Edit the properties of the custom status and then click the Update button. Click the Close button to cancel the operation.
- Value – Values of the selected data column
- Status – Select RAG status of each value to include in the custom status
NOTE: From the RAG Status module, you can manage RAG statuses.
- Edit the properties of the custom status and then click the Update button. Click the Close button to cancel the operation.
- From the Add Column drop down, select Custom SQL Column to bring up the New SQL Column dialog
- Data Types
- Drag and drop to reorder columns
- To configure column settings, select Settings from the menu to bring up the Column Settings dialog
- Configure the column settings and then click the Save button. Click the Close button to cancel the operation.
- Override Column – Override the default column name
- Visible – Whether the column is visible by default. Use column visibility to view the column on the report.
- Hyperlink – Display a hyperlink to the data record (Name, Lookup, Lookup Alias, Link, and Linked Name fields only)
- Custom Label Colors – Select custom label colors for each value (Checkbox, Select, and Status fields with less than 20 values only)
- Top Level Filter – Display column as a top level filter (Lookup and Lookup Alias fields only)
- Custom Filter – Create a custom filter for the column
- Configure the column settings and then click the Save button. Click the Close button to cancel the operation.
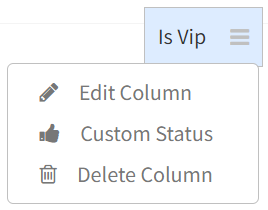
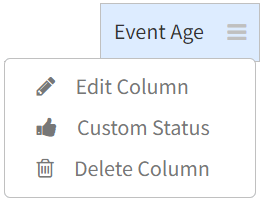
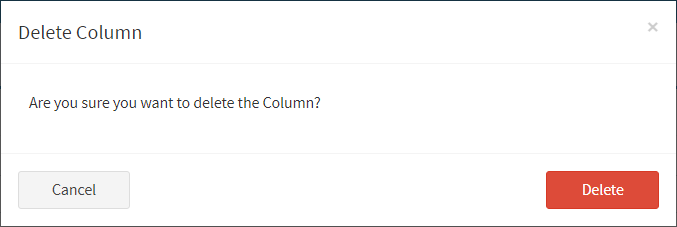
- To delete a column, select Delete Column from the menu
- Click the Delete button to confirm the delete operation. Click the Cancel button to cancel the operation.
- Click the Delete button to confirm the delete operation. Click the Cancel button to cancel the operation.
- Configure the settings of the report (optional)
- Click the Report Settings button to bring up the Report Settings dialog
- Configure the settings of the report and then click the Save button. Click the Close button to cancel the operation.
- Pin Left Columns – Select the number of left columns to pin (None, 1, 2, or 3)
- Pin Right Columns – Select the number of right columns to pin (None, 1, 2, or 3)
- Filter Type – Select the filter type (Simple Filter)
- Limit Preview Results – Select the number of rows to display in the report preview (only in the preview)
- Column Sort Order – Configure a column sort order (default sort order is on the Name field ascending)
- Apply Global Where Clause – Add a where clause for additional filtering on the report
- Require Top Level Filter – Choose if selecting a top level filter is required before a report can be run
- Assign action or form buttons to the report (optional)
- Click the button to bring up the Assign Buttons to Report dialog
- To assign a button, select a type from the Type drop down, select an action or form button from the Button drop down, and then click the Assign button. Click the Close button to cancel the operation.
NOTE: From the Action Buttons module you can manage action buttons. From the Form Builder module you can manage forms.- Edit the properties of the button
- Position – Position of the button on the toolbar
- Status – Choose if the button is enabled
- Edit the properties of the button
- To unassign a button, select a button (row) to unassign
- Click the Unassign button on the toolbar
- The unassign button is grayed out unless a button (row) is selected
- The unassign function is only available to users in the Administrator security group
- The unassign button is grayed out unless a button (row) is selected
- Click the Unassign button to confirm the unassign operation. Click the Cancel button to cancel the operation.
- Click the Unassign button on the toolbar
- Click the
- Subscribe recipients to the report (optional)
- Click the button to bring up the Subscribe Recipients to Report dialog
- To subscribe a report recipient, select a recipient from the Recipients drop down, and then click the Save button. Click the Close button to cancel the operation.
NOTE: From the Report Recipients tab you can manage subscriptions to report recipients. - To unsubscribe a report recipient, deselect a recipient from the Recipients drop down, and then click the Save button. Click the Close button to cancel the operation.
- Click the
- Click the Preview Report button to preview the report before saving
NOTE: Encrypted data columns are masked to the end user when previewing the report. - Click the Report Query button to bring up the Report Query dialog to view and copy the query. The Report Query button is not available until the report has been previewed.
- Click the Update Report button to save any changes to the report. Click the Cancel button to cancel the operation.
- Click the Run Report button to run the report
Edit SQL Query Report
From the Report Builder page, you can edit SQL Query reports. To edit a SQL Query report:
- Edit the properties of the report
- Name – Name of the report (required)
- Status – Choose if the report is enabled (required)
- Published – Choose if the report is published (optional)
- Data Source – Name of the source for the report (SQL Query)
- Description – Description of the report (optional)
- Edit the main query of the report in the query window. SQL Query reports can access the connected ETL database and the ReadyWorks database.
NOTE: When using SQL functions for columns, be sure to use aliases signified by the keyword AS (See Line 10 in sample query below).
- Use the editing buttons to format the query
- Undo – Undo the last edit
- Redo – Redo the last edit that was undone
- Block Outdent – Remove an indent from a line or block
- Block Indent – Set a line or block in from the margin
- Comment – Comment out a line or block
- Clear – Clear the query
- Add SQL – Add sample SQL to the query
- Undo – Undo the last edit
- Select the Primary Key of the query
NOTE: Columns with blank values cannot be used as the Primary Key. It is best practice to use the Id, Name, or a column that contains unique values and contains no blank values as the Primary Key. - Click the button to add a helper query. SQL Query reports can access the connected ETL database and the ReadyWorks database.
- Click the name of a query to expand or minimize the query window
- Click the button to run the query and preview the report before saving
- Click the button to bring op the Settings dialog
- Configure the settings and then click the Save button. Click the Close button to cancel the operation.
- Format Column Names – Choose if column names are formatted
- Unformatted – lu__migration_status
- Formatted – Migration Status
- Report UI – Choose the display of the Report UI (One Page, Tabs)
NOTE: Changing the display will result in the loss of any unsaved changes.
- Format Column Names – Choose if column names are formatted
- Configure the settings and then click the Save button. Click the Close button to cancel the operation.
- Click the button to expand the query to full window mode. Click the button to exit full window mode.
- Use the menu to manage queries
- Ignore from Execution – Ignore a query from execution
- Rename Query – Rename a query
- Move Up – Move a query up in the order
- Move Down – Move a query down in the order
- Delete Query – Delete a query
- Click the
 button to save (Quick Save) the query. A Quick Save does not run the query.
- Use the editing buttons to format the query
- To configure column settings, select Settings from the menu to bring up the Column Settings dialog
- Configure the column settings and then click the Save button. Click the Close button to cancel the operation.
- Remove from Table – Remove column from the displayed results (column will remain in the query output)
- Visible – Whether the column is visible by default. Use column visibility to view the column on the report.
- Hyperlink – Display a hyperlink to the data record (Name, Lookup, Lookup Alias, Link, and Linked Name fields only)
- Lookup – Mark column as a lookup (lu__, lum__, lua__, and luam__ columns will be checked automatically)
- Custom Status (RAG Status) – Display RAG status for each value
- Enter the properties of the custom status column
- Value – Values of the selected data column
- Status – Select RAG status of each value to include in the custom status
NOTE: From the RAG Status module, you can manage RAG statuses.
- Custom status columns are displayed in yellow
- Enter the properties of the custom status column
- Custom Status using Ranges (RAG Status) – Display RAG status for value ranges
- Enter the properties of the custom status column
- Value – Value range of the selected data column
- Status – Select RAG status of each value range to include in the custom status
NOTE: From the RAG Status module, you can manage RAG statuses. - Click the Add Values button to add a value range to the custom status
- Click the Delete button to delete a value range (row)
- Custom status columns are displayed in yellow
- Enter the properties of the custom status column
- Custom Label Colors – Select custom label colors for each value (Checkbox, Select, and Status fields with less than 20 values only)
- Top Level Filter – Display column as a top level filter (Lookup and Lookup Alias fields only)
- Custom Filter – Create a custom filter for the column
- Configure the column settings and then click the Save button. Click the Close button to cancel the operation.
- To configure overall status column settings, select Settings from the menu of an overall status column (displayed in green) to bring up the Overall Status dialog
NOTE: Click the Add SQL button and select Overall Status Column from the drop down to add an overall status column to the query.- Enter the properties of the overall status column and then click the Update button. Click the Close button to cancel the operation.
- Status – Select custom statuses to aggregate to determine overall status (at least one status is required)
- Column Label – Name of the column (from the query)
- Overall status column is displayed in green. Custom statuses included in the overall status are dog eared in green.
- Enter the properties of the overall status column and then click the Update button. Click the Close button to cancel the operation.
- Configure the settings of the report (optional)
- Click the Report Settings button to bring up the Report Settings dialog
- Configure the settings of the report and then click the Save button. Click the Close button to cancel the operation.
- Pin Left Columns – Select the number of left columns to pin (None, 1, 2, or 3)
- Pin Right Columns – Select the number of right columns to pin (None, 1, 2, or 3)
- Column Sort Order – Configure a column sort order (default sort order is on the Name field ascending)
- Require Top Level Filter – Choose if selecting a top level filter is required before a report can be run
- Assign action or form buttons to the report (optional)
- Click the button to bring up the Assign Buttons to Report dialog
- To assign a button, select a type from the Type drop down, select an action or form button from the Button drop down, and then click the Assign button. Click the Close button to cancel the operation.
NOTE: From the Action Buttons module you can manage action buttons. From the Form Builder module you can manage forms.- Edit the properties of the button
- Position – Position of the button on the toolbar
- Status – Choose if the button is enabled
- Edit the properties of the button
- To unassign a button, select a button (row) to unassign
- Click the Unassign button on the toolbar
- The unassign button is grayed out unless a button (row) is selected
- The unassign function is only available to users in the Administrator security group
- The unassign button is grayed out unless a button (row) is selected
- Click the Unassign button to confirm the unassign operation. Click the Cancel button to cancel the operation.
- Click the Unassign button on the toolbar
- Click the
- Subscribe recipients to the report (optional)
- Click the button to bring up the Subscribe Recipients to Report dialog
- To subscribe a report recipient, select a recipient from the Recipients drop down, and then click the Save button. Click the Close button to cancel the operation.
NOTE: From the Report Recipients tab you can manage subscriptions to report recipients. - To unsubscribe a report recipient, deselect a recipient from the Recipients drop down, and then click the Save button. Click the Close button to cancel the operation.
- Click the
- Click the Preview Report button to preview the report before saving
NOTE: Encrypted data columns are masked to the end user when previewing the report. - Click the Update Report button to save (Quick Update or Full Update) any changes to the report. A Quick Update saves the Report Properties (i.e., Name, Status, Published, Description, Settings) and does not run the query. A Full Update saves the the Report Properties, Report Settings, and SQL Query and runs the query. A Full Update can take longer to save depending on the query. Click the Cancel button to cancel the operation.
- Click the Run Report button to run the report
Data Column
From the Report Builder, you can add data columns to a report. To add data columns:
- Data Types
- From the Add Column drop down, select Data Column to bring up the Data Column dialog
- Select the data columns of the new report from the Data Columns drop down and then click the Add button. Click the Close button to cancel the operation.
- Use the menu to change the sort order of the Data Columns drop down
- Sort by Order – Sorts data columns in the order they appear on data types (default)
- Sort Alphabetically – Sorts data columns alphabetically
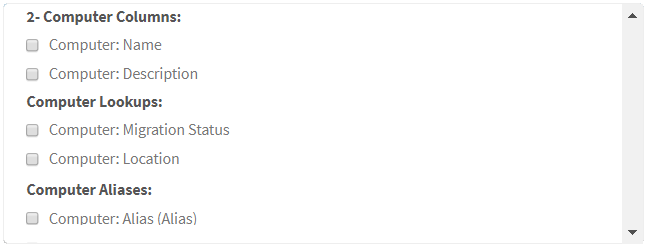
- Data columns are organized by data type with the selected data source listed first (1)
- Data types linked to the selected data source are listed subsequently in alphabetical order (2, 3, 4, etc.)
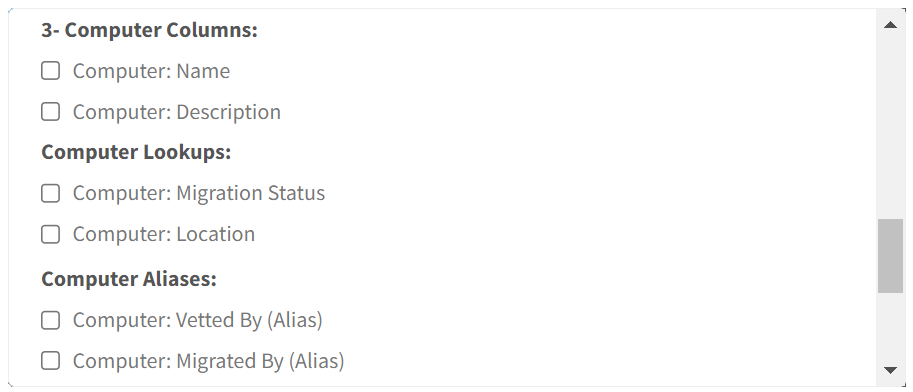
- Each data type is organized by Standard columns, Lookup columns, and Lookup Alias columns
- Use the
- From the Add Column drop down, select Data Column to bring up the Data Column dialog
- Orchestration (Waves)
- From the Add Column drop down, select Data Column to bring up the Data Column dialog
- Select the data columns of the new report from the Data Columns drop down and then click the Add button. Click the Close button to cancel the operation.
- Use the menu to change the sort order of the Data Columns drop down
- Sort by Order – Sorts data columns in the order they appear on waves, tasks, and data types (default)
- Sort Alphabetically – Sorts data columns alphabetically
- Data columns are organized by orchestration type (Wave, Task) with the selected data source listed first (1)
- Waves or tasks associated with the selected data source are listed second (2)
- Data types linked to the selected data source are listed subsequently (3, 4, 5, etc.)
- Each data type is organized by Standard columns, Lookup columns, and Lookup Alias columns
- Use the
- From the Add Column drop down, select Data Column to bring up the Data Column dialog
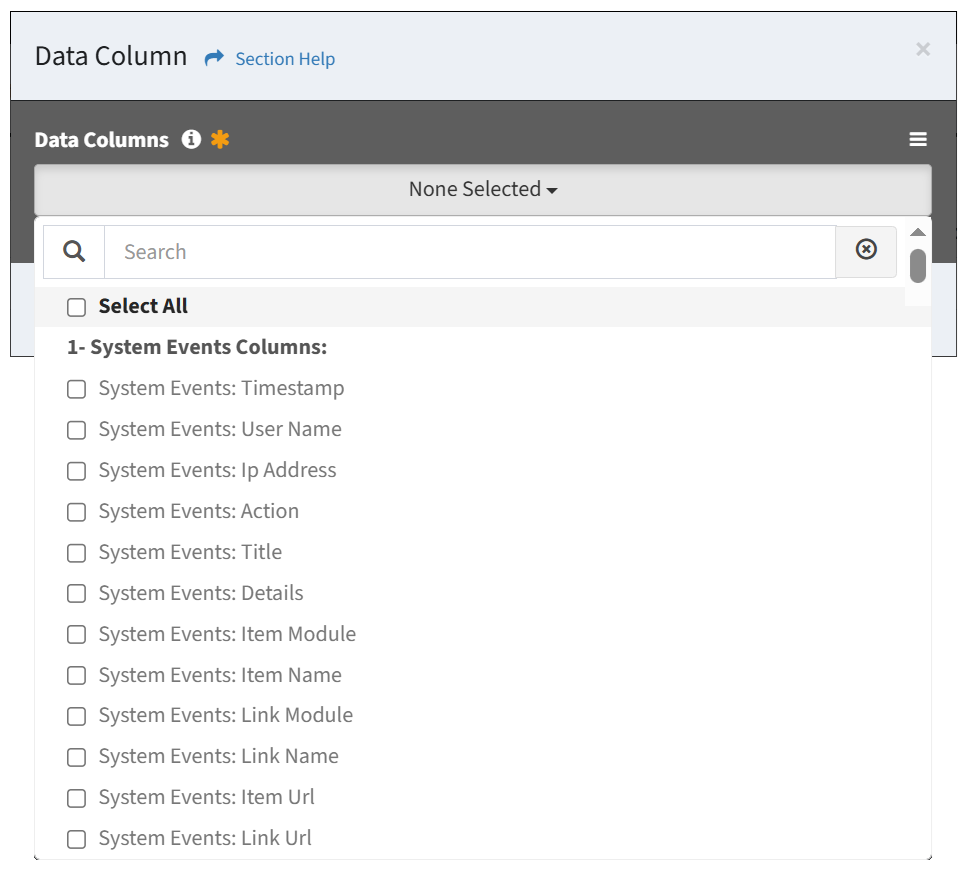
- Event Logs (System Events)
- From the Add Column drop down, select Data Column to bring up the Data Column dialog
- Select the data columns of the new report from the Data Columns drop down and then click the Add button. Click the Close button to cancel the operation.
- Use the menu to change the sort order of the Data Columns drop down
- Sort by Order – Sorts data columns in the order they appear on event logs (default)
- Sort Alphabetically – Sorts data columns alphabetically
- Data columns are organized by system events (1)
- Use the
- From the Add Column drop down, select Data Column to bring up the Data Column dialog
Calculation Column
From the Report Builder, you can add calculation columns to a report (Data Types only). To add calculation columns:
- From the Add Column drop down, select Calculation Column to bring up the Calculation Column dialog
- Enter the properties of the calculation column and then click the Add button. Click the Close button to cancel the operation.
- Column Name – Name of the column (required)
- Function – Select the calculation function to be performed (only COUNT is currently supported) (required)
- Linked Data Type – Select a data type linked to the selected data source (required)
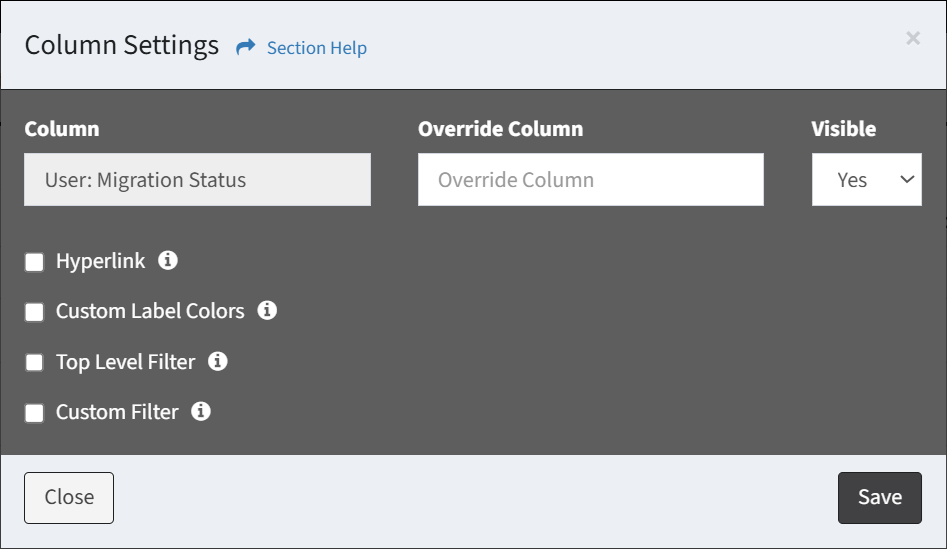
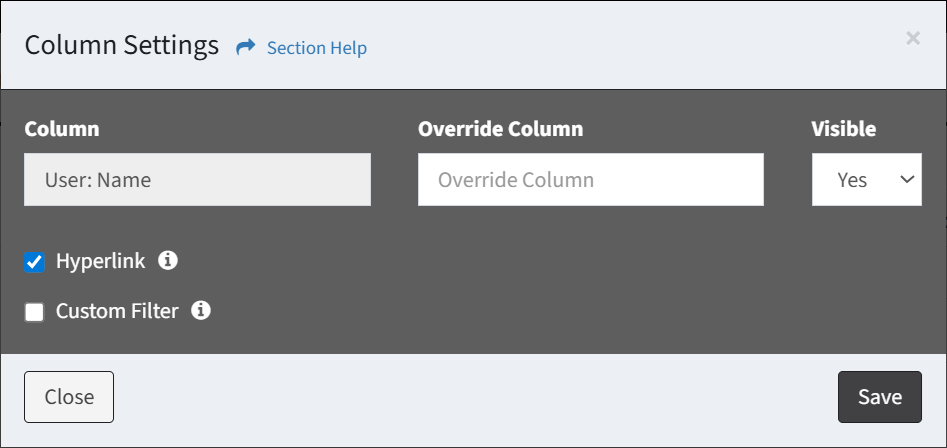
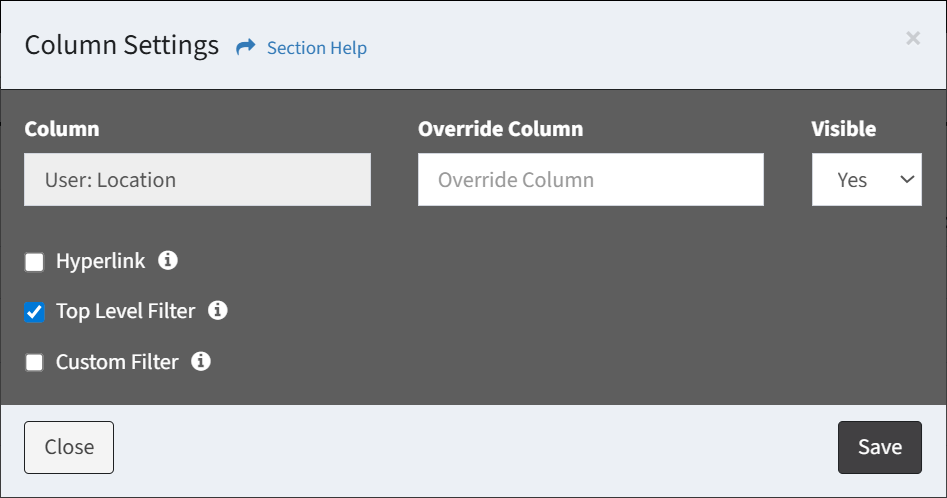
Column Settings
From the Report Builder, you can configure column settings. To configure column settings:
- From the menu, select Settings to bring up the Column Settings dialog

- Configure the column settings and then click the Save button. Click the Close button to cancel the operation.
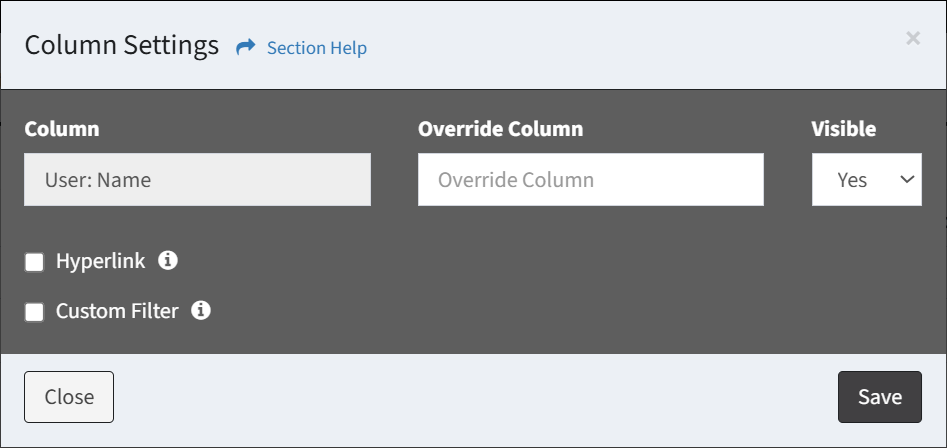
- Override Column – Override the default column name
- Name that overrides the default column name is listed in brackets

- Name that overrides the default column name is listed in brackets
- Visible – Whether the column is visible by default. Use column visibility to view the column on the report.
- Columns with Visible set to No are signified by an icon of an eye with a slash through it
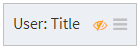
- Columns with Visible set to No are signified by an icon of an eye with a slash through it
- Hyperlink – Display a hyperlink to the data record (Name, Lookup, Lookup Alias, Link, and Linked Name fields only)
- Columns with a hyperlink are signified by a link icon
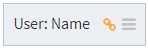
- Columns with a hyperlink are signified by a link icon
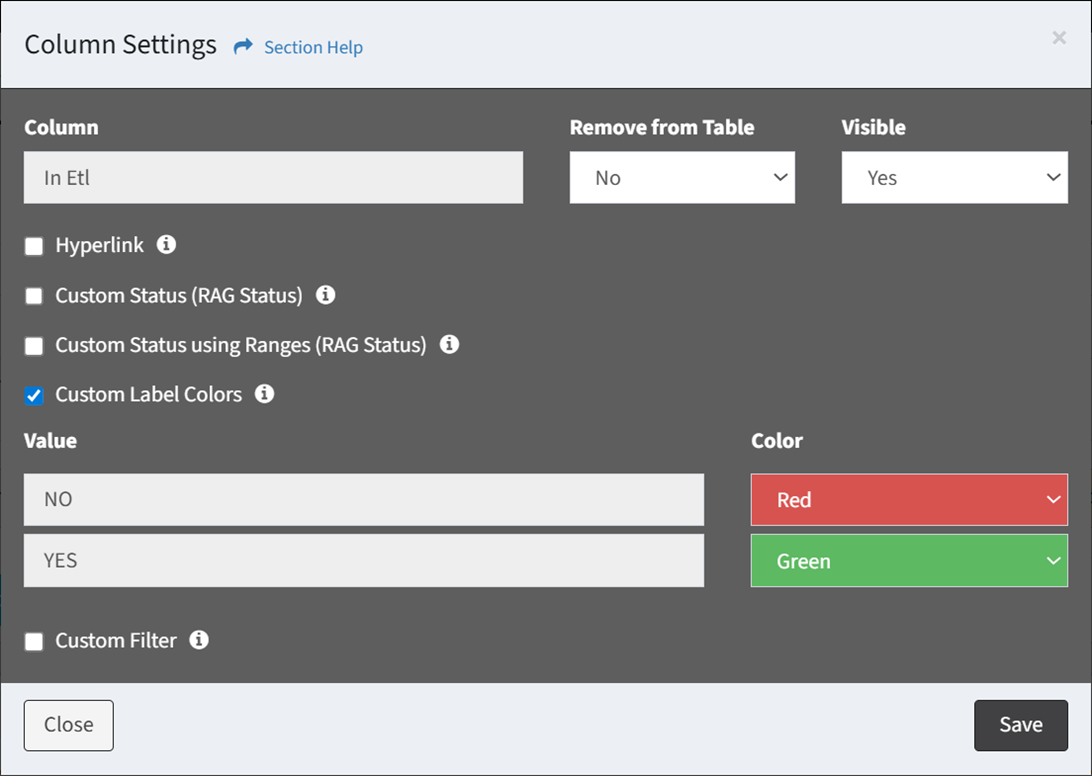
- Custom Label Colors – Select custom label colors for each value (Checkbox, Select, and Status fields with less than 20 values only)
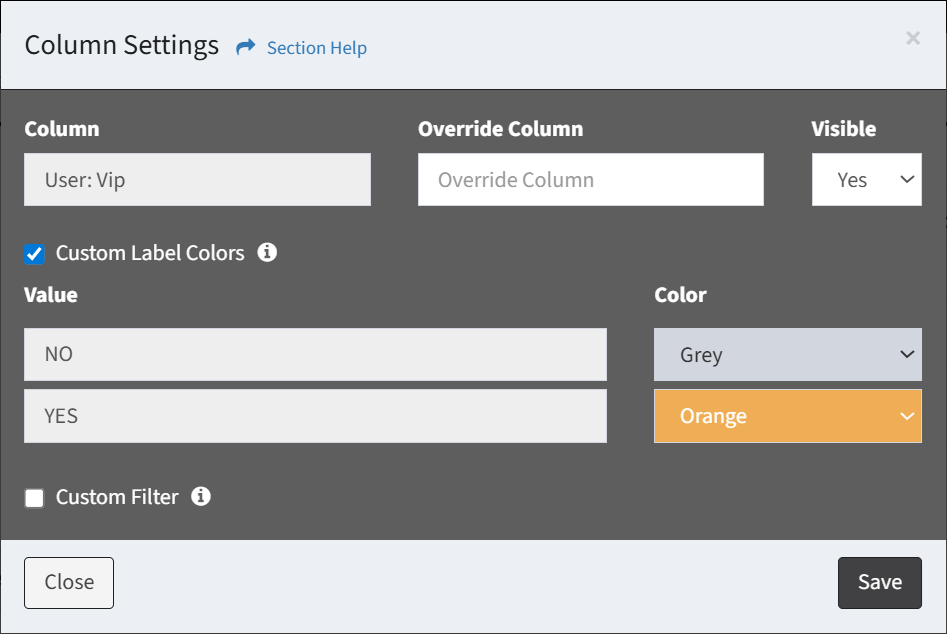
- Select a color for each value (Blue, Light Blue, Green, Red, Orange, Gray)
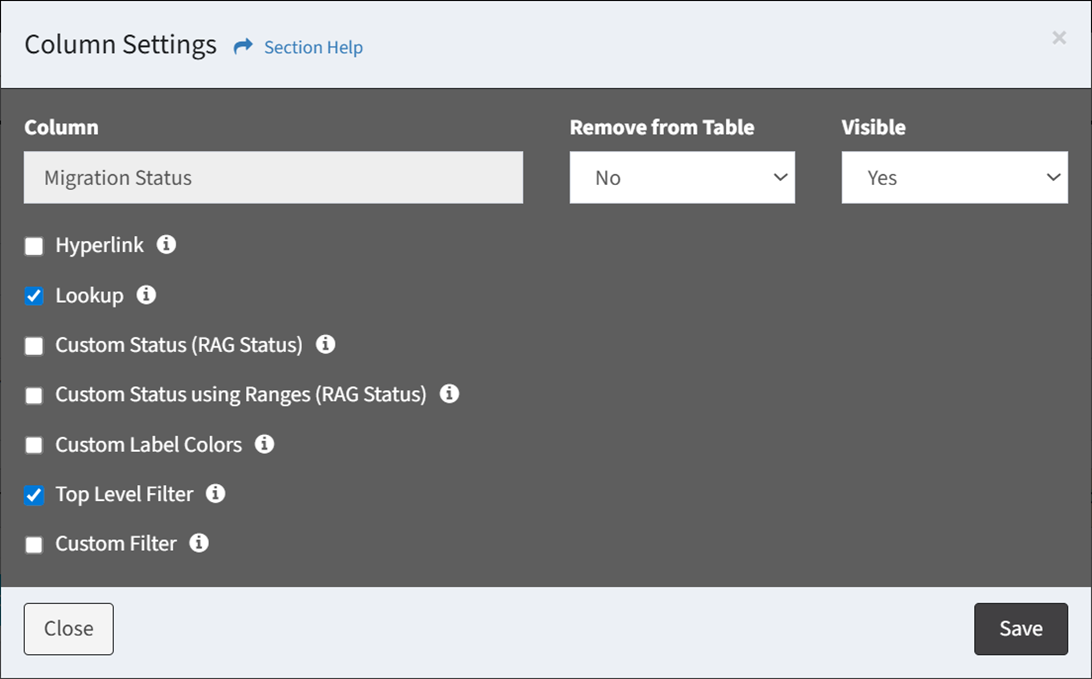
- Top Level Filter – Display column as a top level filter (Lookup and Lookup Alias fields only)
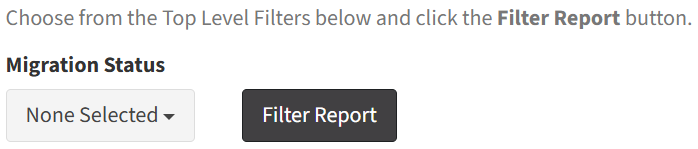
- Columns with a top level filter are signified by a slider icon

- Top level filters are displayed at the top of reports
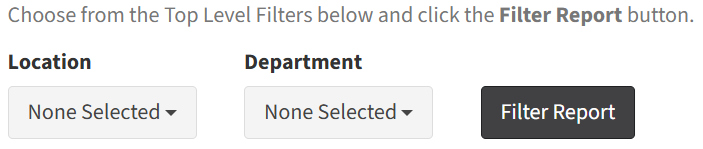
NOTE: Configure Require Top Level Filter under Report Settings to require selecting a top level filter before a report can be run.
- Columns with a top level filter are signified by a slider icon
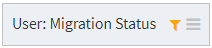
- Custom Filter – Create a custom filter for the column
- Enter values for the custom filter (one per row)
- Columns with a custom filter are signified by a filter icon
- Override Column – Override the default column name
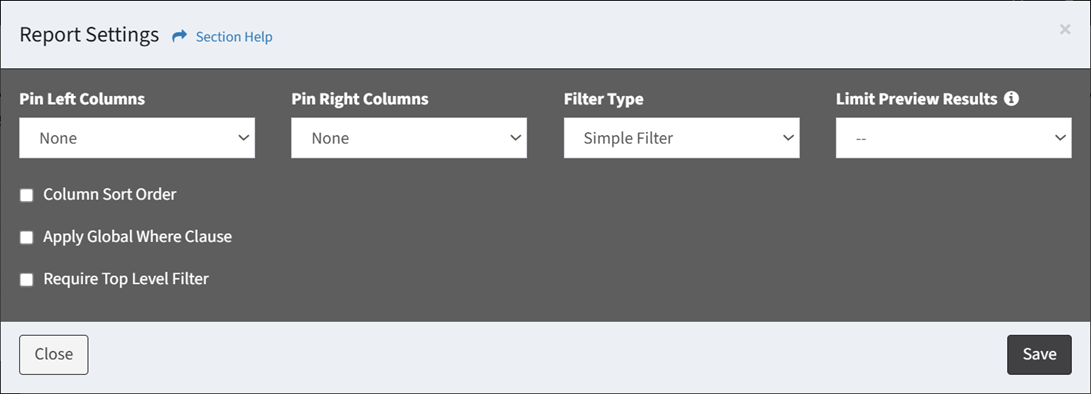
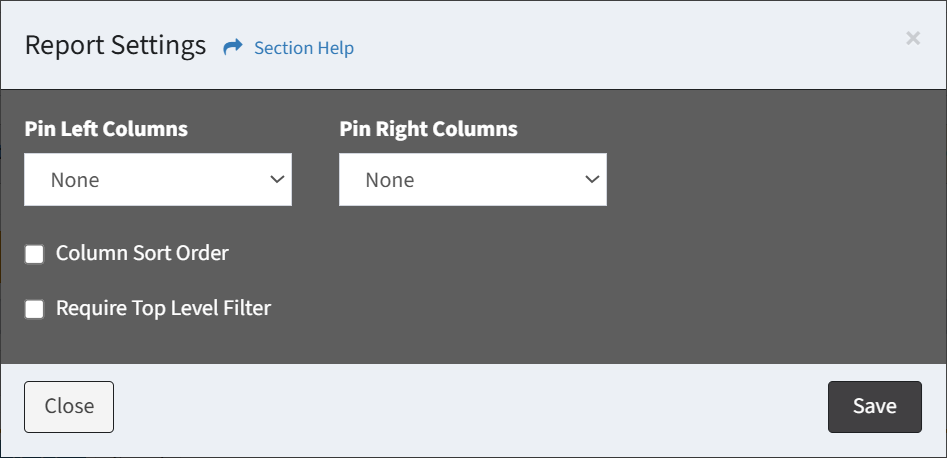
Report Settings
From the Report Builder, you can configure the report settings. To configure the report settings:
- Click the Report Settings button to bring up the Report Settings dialog
- Configure the settings of the report and then click the Save button. Click the Close button to cancel the operation.
- Pin Left Columns – Select the number of left columns to pin (None, 1, 2, or 3)
- Pin Right Columns – Select the number of right columns to pin (None, 1, 2, or 3)
- Filter Type – Select the filter type (Simple Filter)
- Limit Preview Results – Select the number of rows to display in the report preview (only in the preview)
- Column Sort Order – Configure a column sort order (default sort order is on the Name field ascending)
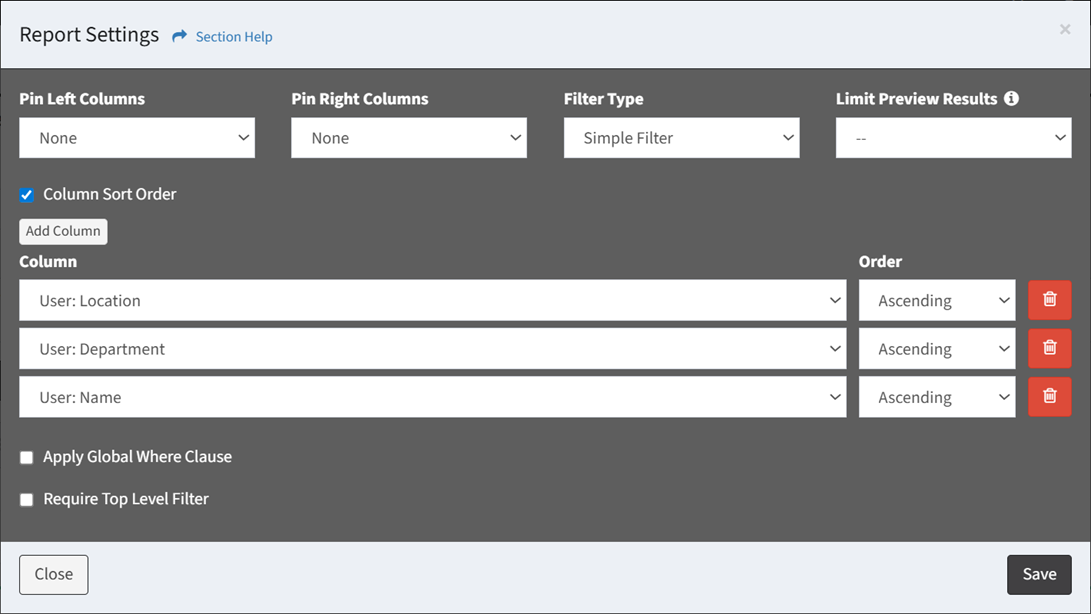
- Add Column – Add new rows (columns) to the sort order
- Column – Name of the data column to sort on
- Order – Sort order of the column (ascending or descending)
- Delete Row – Delete a row from the sort order
- Apply Global Where Clause – Add a where clause for additional filtering on the report
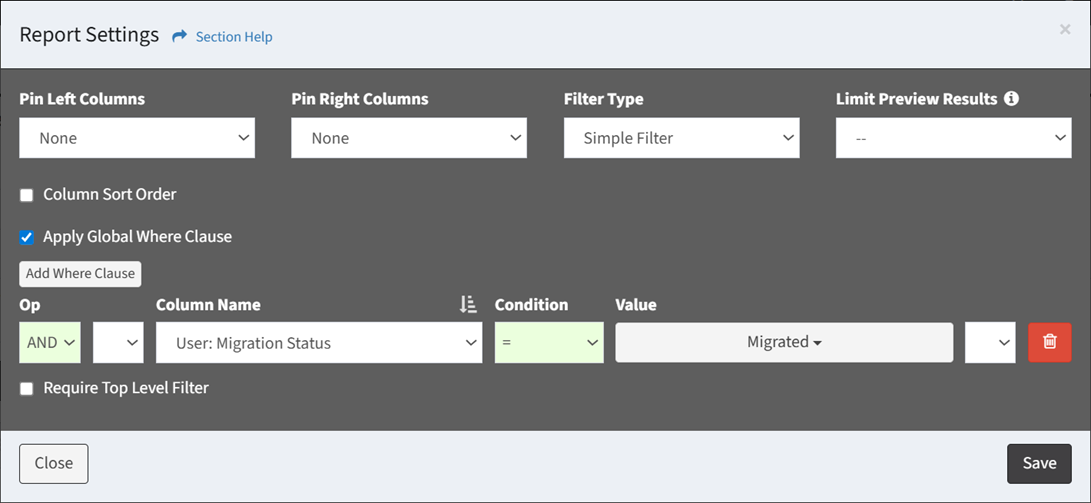
- Click the Add Where Clause button to add a condition to the where clause
- Use the Column Name drop down to select the data column to filter the report on
- Use the Condition drop down to select the condition of the where clause
- = (Equals) – Number equals the value
- != (Does Not Equal) – Number does not equal the value
- > (Greater Than) – Number is greater than the value
- < (Less Than) – Number is less than the value
- Between – Number, date, or date time is between the values
- In – String matches one of the values (multiple)
- Not In – String does not match any of the values (multiple)
- Start With – String starts with the value
- Ends With – String ends with the value
- Contains – String contains the value
- Does Not Contains – String does not contain the value
- Is – String is empty or a valid email
- Is Not – String is not empty or is not a valid email
- REGEX – String matches regular expression
- Use the Value drop down (or text box) to select (or enter) the value to filter the report
NOTE: Leave the value blank for Undefined values. - Click the Add Where Clause button to add additional conditions to the where clause
- Select the join operator of the conditions
- AND – Match all conditions
- OR – Match any condition
- Select the join operator of the conditions
- Click the Add Parenthesis and Close Parenthesis buttons to define the order to evaluate the conditions
- Click the Delete button to delete a condition (row)
- Require Top Level Filter – Choose if selecting a top level filter is required before a report can be run

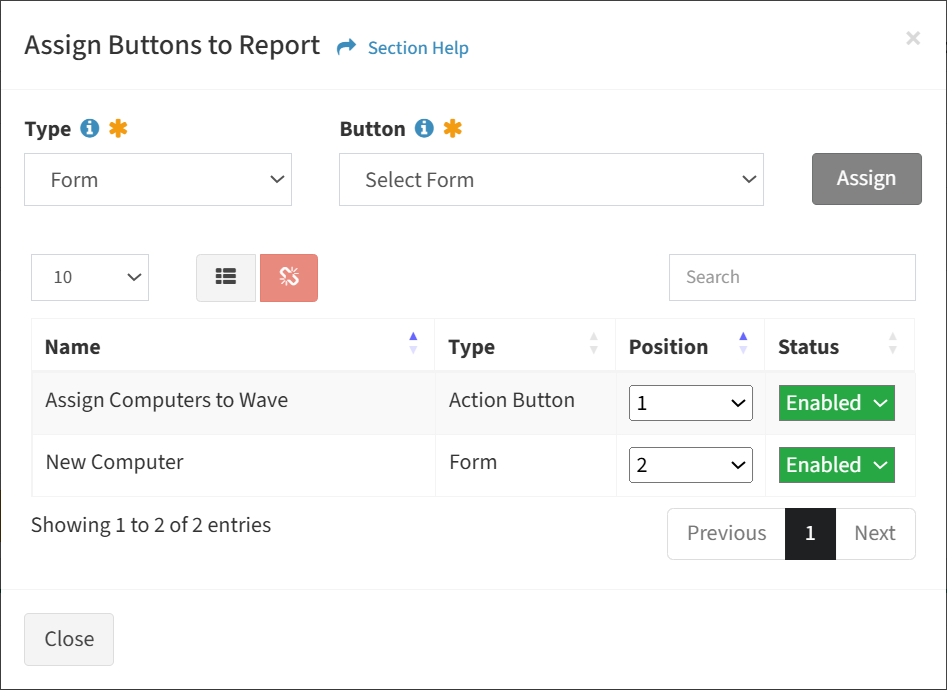
Assign Buttons
From the Report Builder, you can assign action or form buttons to the report. To assign buttons:
- Click the button to bring up the Assign Buttons to Report dialog
- To assign a button, select a type from the Type drop down, select an action or form button from the Button drop down, and then click the Assign button. Click the Close button to cancel the operation.
NOTE: From the Action Buttons module you can manage action buttons. From the Form Builder module you can manage forms.- Edit the properties of the button
- Position – Position of the button on the toolbar
- Status – Choose if the button is enabled
- Edit the properties of the button
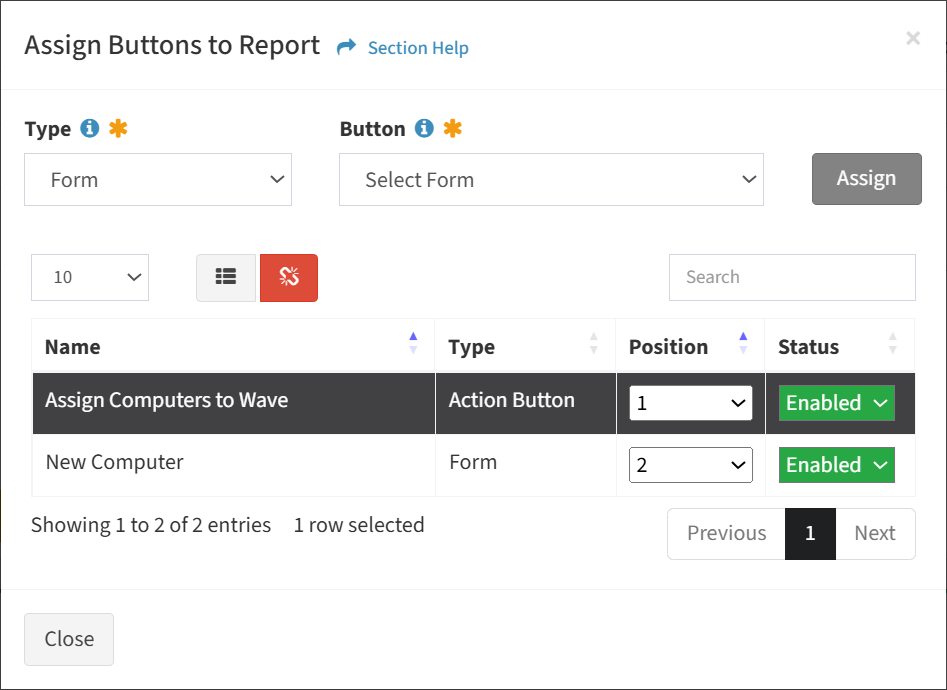
- To unassign a button, select a button (row) to unassign
- Click the Unassign button on the toolbar
- The unassign button is grayed out unless a button (row) is selected
- The unassign function is only available to users in the Administrator security group
- The unassign button is grayed out unless a button (row) is selected
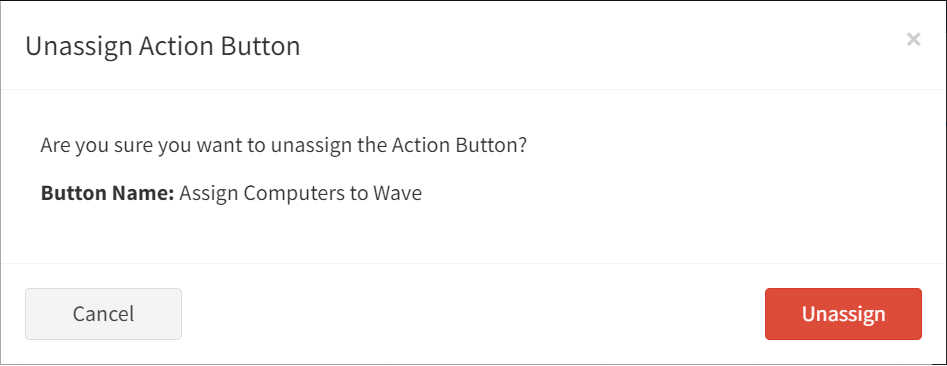
- Click the Unassign button to confirm the unassign operation. Click the Cancel button to cancel the operation.
- Click the Unassign button on the toolbar
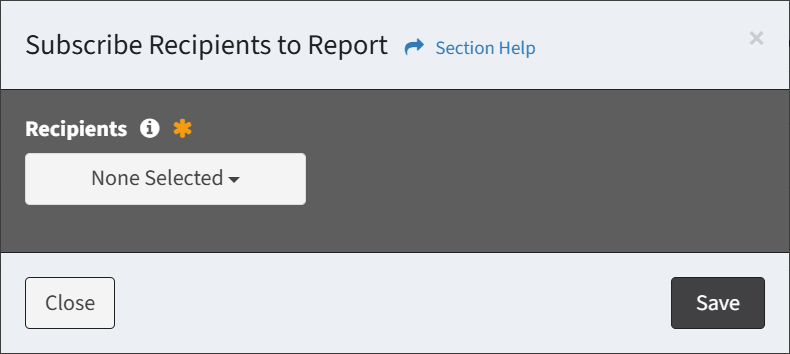
Subscribe Recipients
From the Report Builder, you can subscribe recipients to the report. To subscribe recipients:
- Click the button to bring up the Subscribe Recipients to Report dialog
- To subscribe a report recipient, select a recipient from the Recipients drop down, and then click the Save button. Click the Close button to cancel the operation.
NOTE: From the Report Recipients tab you can manage subscriptions to report recipients. - To unsubscribe a report recipient, deselect a recipient from the Recipients drop down, and then click the Save button. Click the Close button to cancel the operation.
Report Query
From the Report Builder, you can view the report query. To view the report query:
- Click the Report Query button to bring up the Report Query dialog
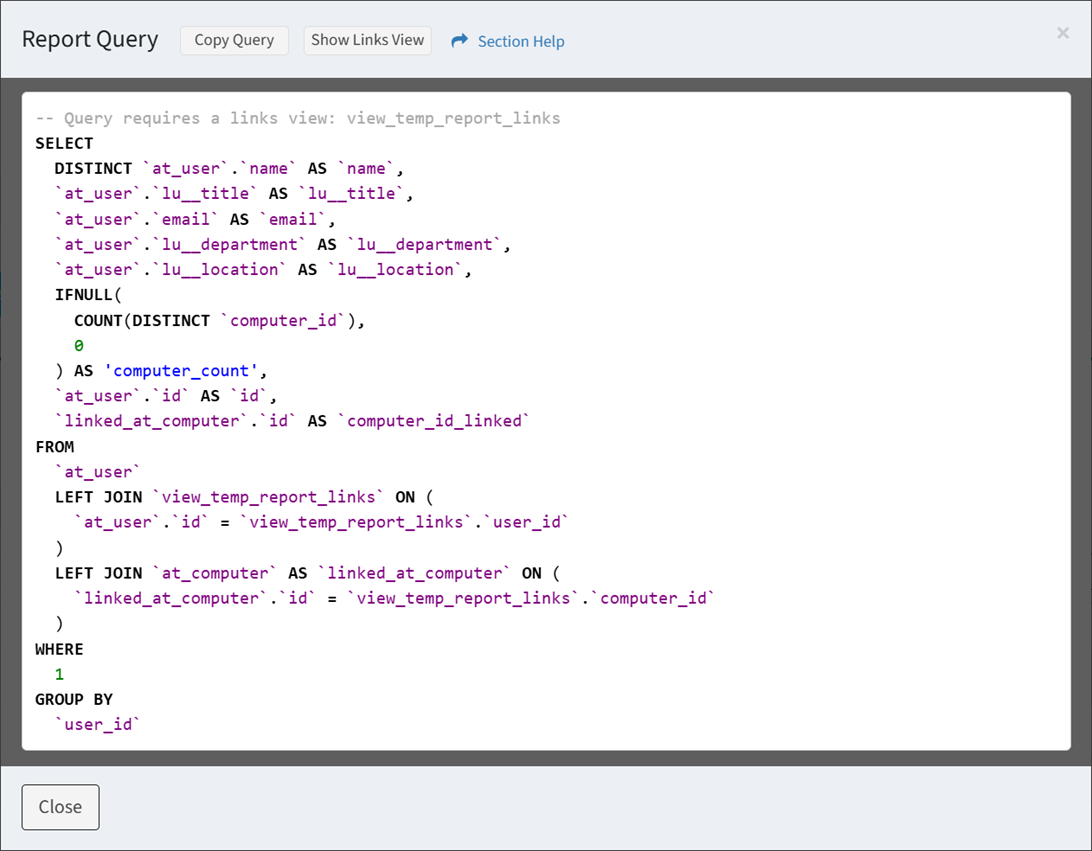
- Click the Copy Query button to copy the query to the clipboard
- Click the Show Links View button to view the report links view. Click the Hide Links View button to hide the report links view
New Custom Status
From the Report Builder, you can add custom status columns to a report (Data Types only). To add custom status columns:
- From the Add Column drop down, select Custom Status Column to bring up the New Custom Status dialog
- Select the data column of the new custom status from the Data Column drop down
- Enter the properties of the custom status column and then click the Create button. Click the Close button to cancel the operation.
- Column Label – Name of the column (required)
- Values Type – Type of values (Fixed Values, Range Values) (required)
- Value – Values (or value ranges) of the selected data column
- Status – Select RAG status of each value to include in the custom status (at least one status is required)
NOTE: From the RAG Status module, you can manage RAG statuses.
- Added custom status columns are displayed in yellow below the Add Column button at the end of the column list
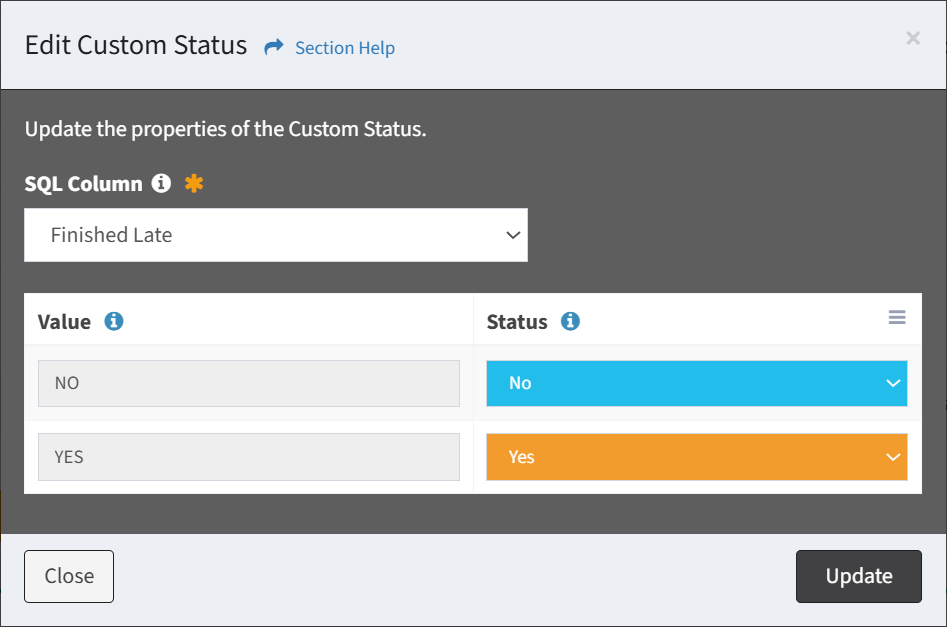
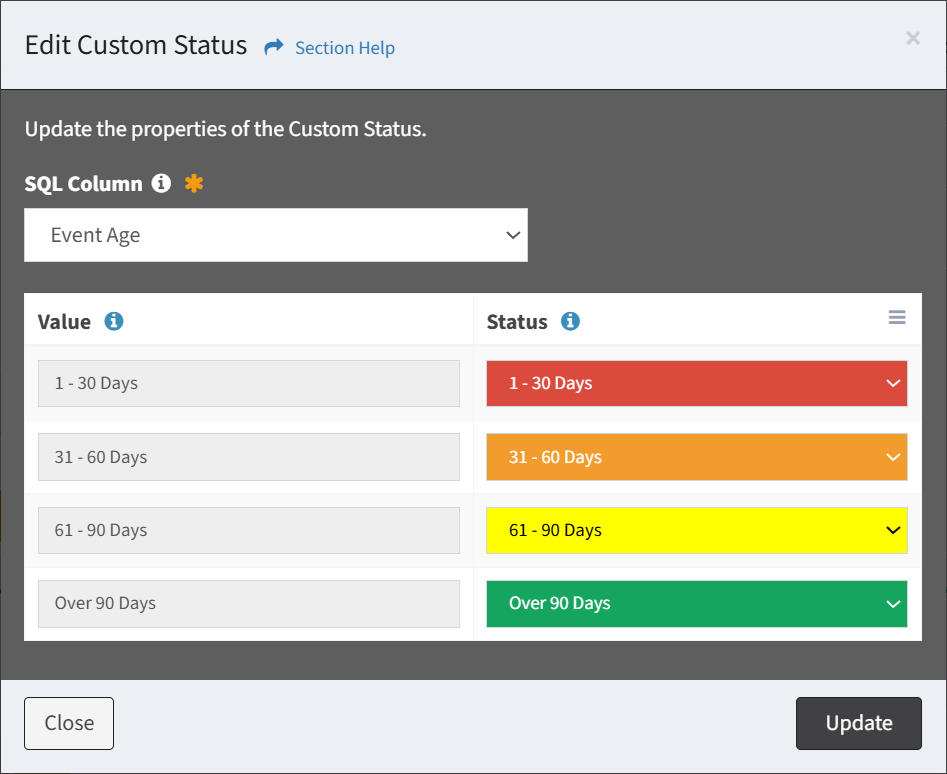
Edit Custom Status
From the Report Builder, you can edit custom status column settings (Data Types only). To edit custom status column settings:
- From the
 menu, select Edit Status to bring up the Edit Custom Status dialog
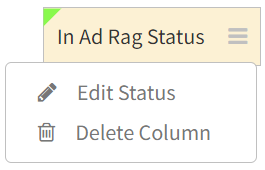
- Edit the properties of the custom status column and then click the Update button. Click the Close button to cancel the operation.
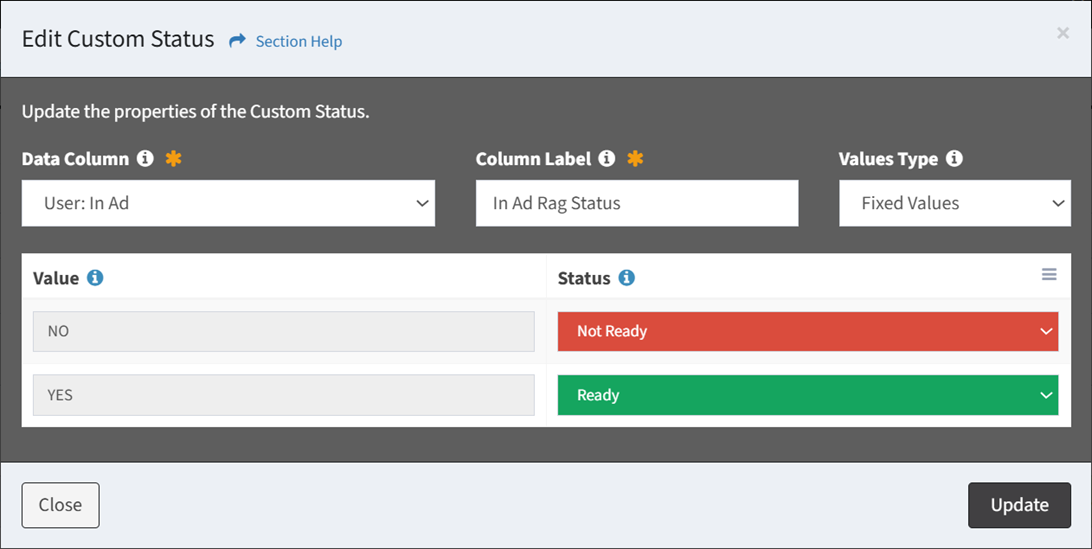
- Column Label – Name of the column (required)
- Values Type – Type of values (Fixed Values, Range Values) (required)
- Value – Values (or value ranges) of the selected data column
- Status – Select RAG status of each value to include in the custom status (at least one status is required)
NOTE: From the RAG Status module, you can manage RAG statuses.
New Overall Status
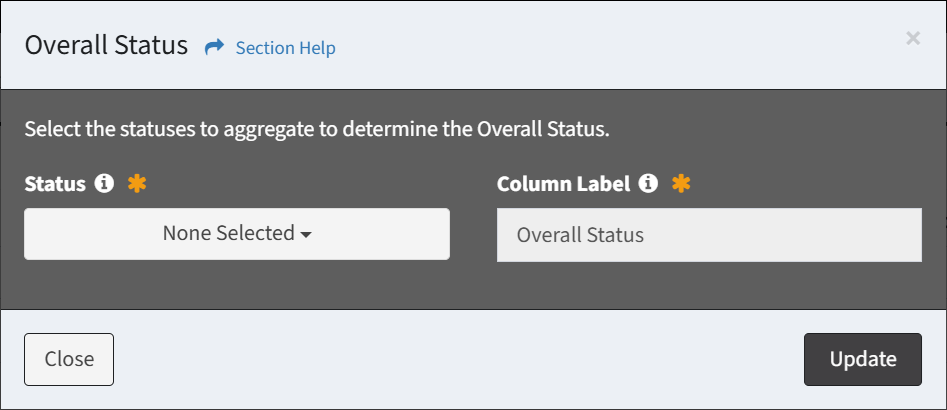
From the Report Builder, you can add an overall status column to a report (Data Types only). To add an overall status column:
- From the Add Column drop down, select Overall Status Column to bring up the Overall Status dialog
- Enter the properties of the overall status column and then click the Update button. Click the Close button to cancel the operation.
- Status – Select custom statuses to aggregate to determine overall status (at least one status is required)
- Column Label – Name of the column (required)
- Added overall status column is displayed in green below the Add Column button at the end of the column list. Custom statuses included in the overall status are dog eared in green.
Edit Overall Status
From the Report Builder, you can edit overall status column settings (Data Types only). To edit overall status column settings:
- From the menu, select Edit Status to bring up the Overall Status dialog
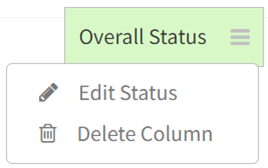
- Edit the properties of the overall status column and then click the Update button. Click the Close button to cancel the operation.

- Status – Select custom statuses to aggregate to determine overall status (at least one status is required)
- Column Label – Name of the column (required)
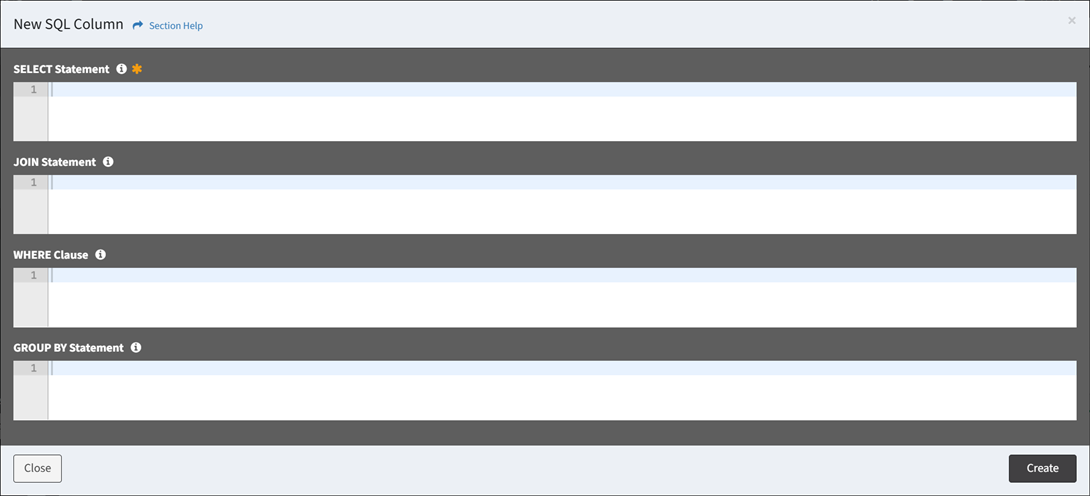
New SQL Column
From the Report Builder, you can add custom SQL columns to a report. To add custom SQL columns:
- Data Types
- From the Add Column drop down, select Custom SQL Column to bring up the New SQL Column dialog
- Enter the SQL query of the custom SQL column and then click the Create button. Click the Close button to cancel the operation.
- SELECT Statement – Enter SELECT statement of the custom SQL query (required)
- JOIN Statement – Enter JOIN statement of the custom SQL query
- WHERE Clause – Enter WHERE clause of the custom SQL query
- GROUP BY Statement – Enter GROUP BY statement of the custom SQL query
- Added custom SQL columns are displayed in blue below the Add Column button at the end of the column list
- Enter the SQL query of the custom SQL column and then click the Create button. Click the Close button to cancel the operation.
- To configure custom status, select Custom Status from the menu to bring up the Edit Custom Status dialog
- Edit the properties of the custom status and then click the Update button. Click the Close button to cancel the operation.
- Value – Values of the selected data column
- Status – Select RAG status of each value to include in the custom status
NOTE: From the RAG Status module, you can manage RAG statuses.
- Edit the properties of the custom status and then click the Update button. Click the Close button to cancel the operation.
- From the Add Column drop down, select Custom SQL Column to bring up the New SQL Column dialog
- Orchestration (Waves)
- From the Add Column drop down, select Custom SQL Column to bring up the New SQL Column dialog
- Enter the SQL query of the custom SQL column and then click the Create button. Click the Close button to cancel the operation.
- SELECT Statement – Enter SELECT statement of the custom SQL query (required)
- JOIN Statement – Enter JOIN statement of the custom SQL query
- WHERE Clause – Enter WHERE clause of the custom SQL query
- GROUP BY Statement – Enter GROUP BY statement of the custom SQL query
- Added custom SQL columns are displayed in blue below the Add Column button at the end of the column list
- Enter the SQL query of the custom SQL column and then click the Create button. Click the Close button to cancel the operation.
- To configure custom status, select Custom Status from the menu to bring up the Edit Custom Status dialog
- Edit the properties of the custom status and then click the Update button. Click the Close button to cancel the operation.
- Value – Values of the selected data column
- Status – Select RAG status of each value to include in the custom status
NOTE: From the RAG Status module, you can manage RAG statuses.
- Edit the properties of the custom status and then click the Update button. Click the Close button to cancel the operation.
- From the Add Column drop down, select Custom SQL Column to bring up the New SQL Column dialog
- Event Logs (System Events)
- From the Add Column drop down, select Custom SQL Column to bring up the New SQL Column dialog
- Enter the SQL query of the custom SQL column and then click the Create button. Click the Close button to cancel the operation.
- SELECT Statement – Enter SELECT statement of the custom SQL query (required)
- JOIN Statement – Enter JOIN statement of the custom SQL query
- WHERE Clause – Enter WHERE clause of the custom SQL query
- GROUP BY Statement – Enter GROUP BY statement of the custom SQL query
- Added custom SQL columns are displayed in blue below the Add Column button at the end of the column list
- Enter the SQL query of the custom SQL column and then click the Create button. Click the Close button to cancel the operation.
- To configure custom status, select Custom Status from the menu to bring up the Edit Custom Status dialog
- Edit the properties of the custom status and then click the Update button. Click the Close button to cancel the operation.
- Value – Values of the selected data column
- Status – Select RAG status of each value to include in the custom status
NOTE: From the RAG Status module, you can manage RAG statuses.
- Edit the properties of the custom status and then click the Update button. Click the Close button to cancel the operation.
- From the Add Column drop down, select Custom SQL Column to bring up the New SQL Column dialog
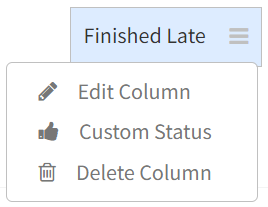
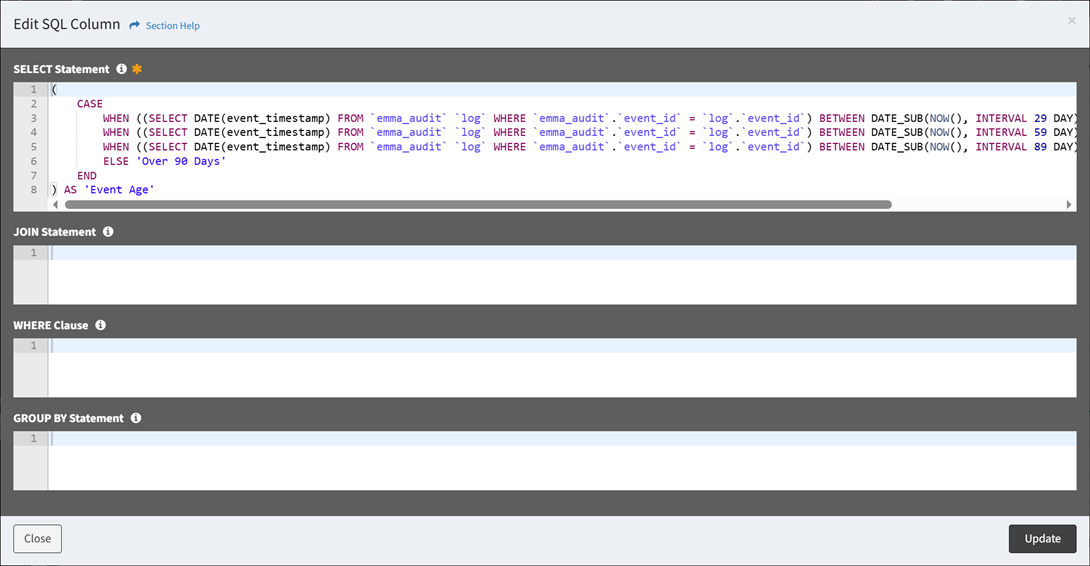
Edit SQL Column
From the Report Builder, you can edit custom SQL column settings. To edit custom SQL column settings:
- Data Types
- From the menu, select Edit Column to bring up the Edit SQL Column dialog
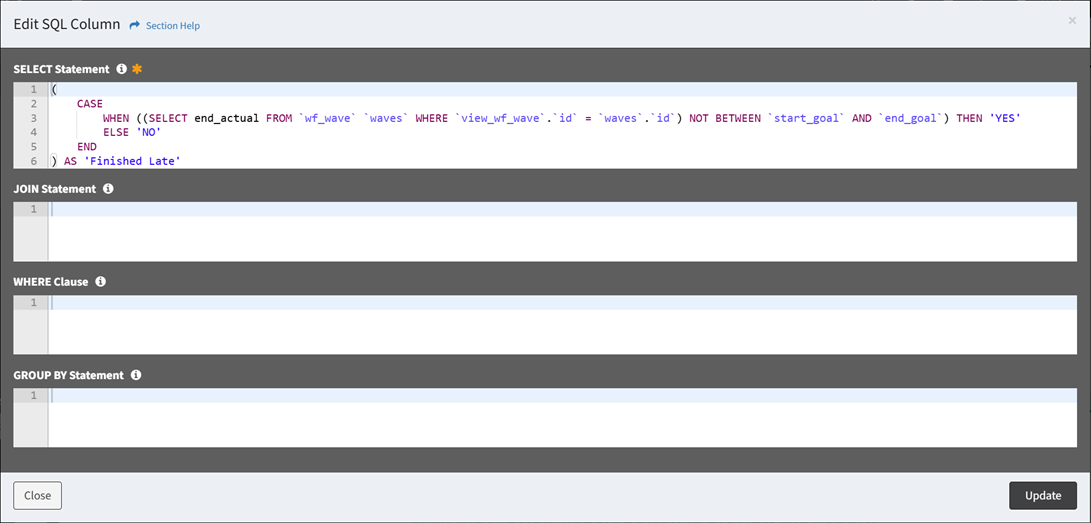
- Edit the SQL query of the custom SQL column and then click the Update button. Click the Close button to cancel the operation.

- SELECT Statement – Enter SELECT statement of the custom SQL query (required)
- JOIN Statement – Enter JOIN statement of the custom SQL query
- WHERE Clause – Enter WHERE clause of the custom SQL query
- GROUP BY Statement – Enter GROUP BY statement of the custom SQL query
- Edit the SQL query of the custom SQL column and then click the Update button. Click the Close button to cancel the operation.
- To configure custom status, select Custom Status from the menu to bring up the Edit Custom Status dialog
- Edit the properties of the custom status and then click the Update button. Click the Close button to cancel the operation.
- Value – Values of the selected data column
- Status – Select RAG status of each value to include in the custom status
NOTE: From the RAG Status module, you can manage RAG statuses.
- Edit the properties of the custom status and then click the Update button. Click the Close button to cancel the operation.
- From the
- Orchestration (Waves)
- From the menu, select Edit Column to bring up the Edit SQL Column dialog
- Edit the SQL query of the custom SQL column and then click the Update button. Click the Close button to cancel the operation.
- SELECT Statement – Enter SELECT statement of the custom SQL query (required)
- JOIN Statement – Enter JOIN statement of the custom SQL query
- WHERE Clause – Enter WHERE clause of the custom SQL query
- GROUP BY Statement – Enter GROUP BY statement of the custom SQL query
- Edit the SQL query of the custom SQL column and then click the Update button. Click the Close button to cancel the operation.
- To configure custom status, select Custom Status from the menu to bring up the Edit Custom Status dialog
- Edit the properties of the custom status and then click the Update button. Click the Close button to cancel the operation.
- Value – Values of the selected data column
- Status – Select RAG status of each value to include in the custom status
NOTE: From the RAG Status module, you can manage RAG statuses.
- Edit the properties of the custom status and then click the Update button. Click the Close button to cancel the operation.
- From the
- Event Logs (System Events)
- From the menu, select Edit Column to bring up the Edit SQL Column dialog
- Edit the SQL query of the custom SQL column and then click the Update button. Click the Close button to cancel the operation.
- SELECT Statement – Enter SELECT statement of the custom SQL query (required)
- JOIN Statement – Enter JOIN statement of the custom SQL query
- WHERE Clause – Enter WHERE clause of the custom SQL query
- GROUP BY Statement – Enter GROUP BY statement of the custom SQL query
- Edit the SQL query of the custom SQL column and then click the Update button. Click the Close button to cancel the operation.
- To configure custom status, select Custom Status from the menu to bring up the Edit Custom Status dialog
- Edit the properties of the custom status and then click the Update button. Click the Close button to cancel the operation.
- Value – Values of the selected data column
- Status – Select RAG status of each value to include in the custom status
NOTE: From the RAG Status module, you can manage RAG statuses.
- Edit the properties of the custom status and then click the Update button. Click the Close button to cancel the operation.
- From the
Edit SQL Custom Status
From the Report Builder, you can configure column settings. To configure column settings:
- Data Types
- From the menu, select Custom Status to bring up the Edit Custom Status dialog
- Edit the properties of the custom status and then click the Update button. Click the Close button to cancel the operation.

- Value – Values of the selected data column
- Status – Select RAG status of each value to include in the custom status
NOTE: From the RAG Status module, you can manage RAG statuses.
- From the
- Orchestration (Waves)
- From the menu, select Custom Status to bring up the Edit Custom Status dialog
- Edit the properties of the custom status and then click the Update button. Click the Close button to cancel the operation.
- Value – Values of the selected data column
- Status – Select RAG status of each value to include in the custom status
NOTE: From the RAG Status module, you can manage RAG statuses.
- From the
- Event Logs (System Events)
- From the menu, select Custom Status to bring up the Edit Custom Status dialog
- Edit the properties of the custom status and then click the Update button. Click the Close button to cancel the operation.
- Value – Values of the selected data column
- Status – Select RAG status of each value to include in the custom status
NOTE: From the RAG Status module, you can manage RAG statuses.
- From the
SQL Settings
From the Report Builder, you can configure the settings. To configure the settings:
- Click the button to bring op the Settings dialog
- Configure the settings and then click the Save button. Click the Close button to cancel the operation.
- Format Column Names – Choose if column names are formatted
- Unformatted – lu__migration_status
- Formatted – Migration Status
- Report UI – Choose the display of the Report UI (One Page, Tabs)
NOTE: Changing the display will result in the loss of any unsaved changes.
- Format Column Names – Choose if column names are formatted
SQL Query
From the Report Builder, you can manage the report queries. To manage the report queries:
- Edit the main query of the new report in the query window. SQL Query reports can access the connected ETL database and the ReadyWorks database.
- Use the editing buttons to format the query
- Undo – Undo the last edit
- Redo – Redo the last edit that was undone
- Block Outdent – Remove an indent from a line or block
- Block Indent – Set a line or block in from the margin
- Comment – Comment out a line or block
- Clear – Clear the query
- Add SQL – Add sample SQL to the query
- Undo – Undo the last edit
- Select the Primary Key of the query
NOTE: Columns with blank values cannot be used as the Primary Key. It is best practice to use the Id, Name, or a column that contains unique values and contains no blank values as the Primary Key. - Click the button to add a helper query. SQL Query reports can access the connected ETL database and the ReadyWorks database.
- Click the name of a query to expand or minimize the query window
- Click the button to run the query and preview the report before saving
- Click the button to bring op the Settings dialog
- Configure the settings and then click the Save button. Click the Close button to cancel the operation.
- Format Column Names – Choose if column names are formatted
- Unformatted – lu__migration_status
- Formatted – Migration Status
- Report UI – Choose the display of the Report UI (One Page, Tabs)
NOTE: Changing the display will result in the loss of any unsaved changes.
- Format Column Names – Choose if column names are formatted
- Configure the settings and then click the Save button. Click the Close button to cancel the operation.
- Click the button to expand the query to full window mode. Click the button to exit full window mode.
- Use the menu to manage queries
- Ignore from Execution – Ignore a query from execution
- Rename Query – Rename a query
- Move Up – Move a query up in the order
- Move Down – Move a query down in the order
- Delete Query – Delete a query
- Click the button to save (Quick Save) the query. A Quick Save does not run the query.
SQL Preview
From the Report Builder, you can view the results of a report query or set of queries. To view the results:
- Click the button to run the query and preview the output before saving
- View the results of the query in the Preview window
NOTE: Encrypted data columns are masked to the end user when previewing the report.
SQL Column Settings
From the Report Builder, you can configure column settings. To configure column settings:
- From the menu, select Settings to bring up the Column Settings dialog
- Configure the column settings and then click the Save button. Click the Close button to cancel the operation.
- Remove from Table – Remove column from the displayed results (column will remain in the query output)
- Visible – Whether the column is visible by default. Use column visibility to view the column on the report.
- Columns with Visible set to No are signified by an icon of an eye with a slash through it
- Columns with Visible set to No are signified by an icon of an eye with a slash through it
- Hyperlink – Display a hyperlink to the data record (Name, Lookup, Lookup Alias, Link, and Linked Name fields only)
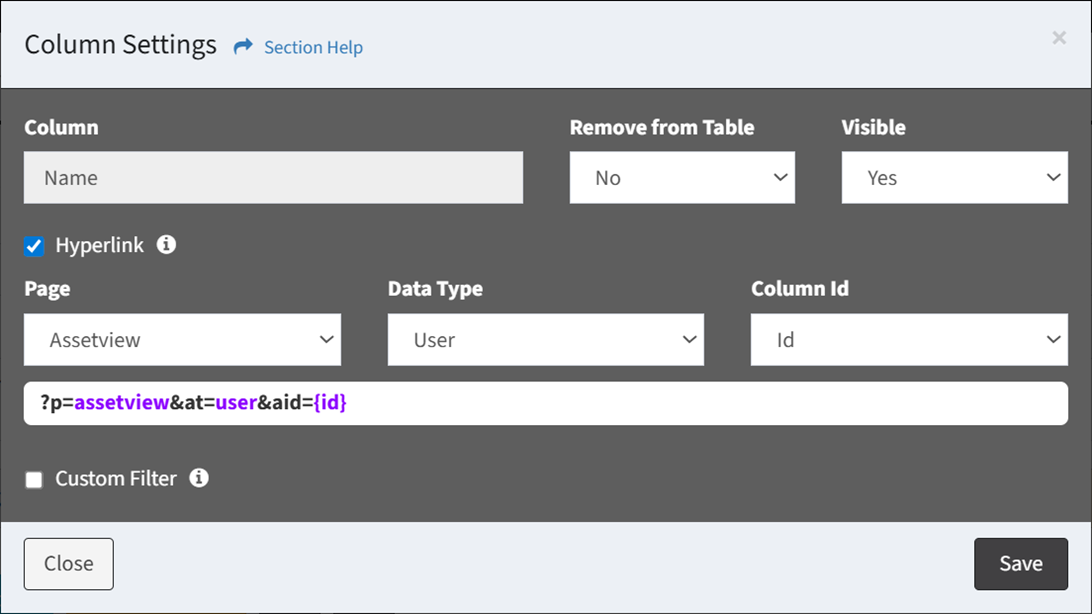
- Select the properties to build the hyperlink
- Page – Page of the hyperlink (Assetview, Waveview, Taskview, Userview)
- Data Type – Data type of the hyperlink (e.g., Computer, User, Department)
- Column Id – Column to use as the Id of the object
- Columns with a hyperlink are signified by a link icon
- Select the properties to build the hyperlink
- Lookup – Mark column as a lookup (lu__, lum__, lua__, and luam__ columns will be checked automatically)
- Custom Status (RAG Status) – Display RAG status for each value
- Enter the properties of the custom status column
- Value – Values of the selected data column
- Status – Select RAG status of each value to include in the custom status
NOTE: From the RAG Status module, you can manage RAG statuses.
- Custom status columns are displayed in yellow
- Enter the properties of the custom status column
- Custom Status using Ranges (RAG Status) – Display RAG status for value ranges
- Enter the properties of the custom status column
- Value – Value range of the selected data column
- Status – Select RAG status of each value range to include in the custom status
NOTE: From the RAG Status module, you can manage RAG statuses. - Click the Add Values button to add a value range to the custom status
- Click the Delete button to delete a value range (row)
- Custom status columns are displayed in yellow
- Enter the properties of the custom status column
- Custom Label Colors – Select custom label colors for each value (Checkbox, Select, and Status fields with less than 20 values only)
- Select a color for each value (Blue, Light Blue, Green, Red, Orange, Gray)
- Top Level Filter – Display column as a top level filter (Lookup and Lookup Alias fields only)
- Columns with a top level filter are signified by a slider icon
- Top level filters are displayed at the top of reports
NOTE: Configure Require Top Level Filter under Report Settings to require selecting a top level filter before a report can be run.
- Columns with a top level filter are signified by a slider icon
- Custom Filter – Create a custom filter for the column
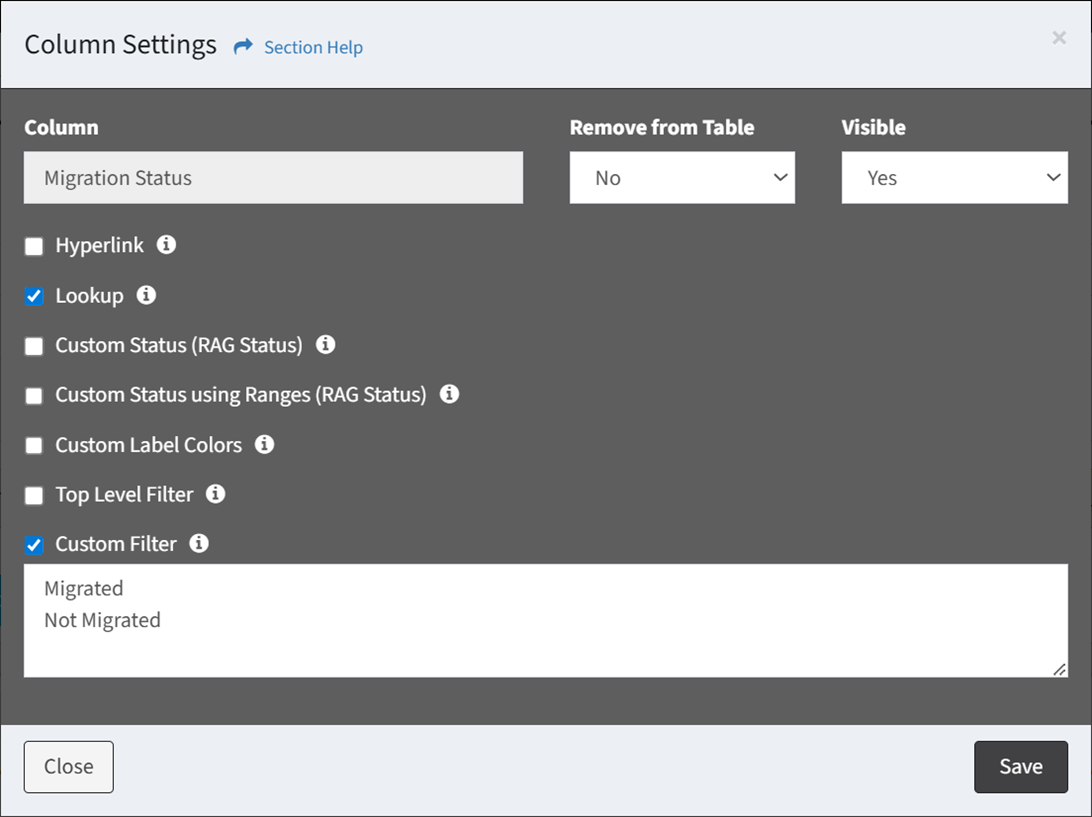
- Enter values for the custom filter (one per row)
- Columns with a custom filter are signified by a filter icon
SQL Report Settings
From the Report Builder, you can configure the report settings. To configure the report settings:
- Click the Report Settings button to bring up the Report Settings dialog
- Configure the settings of the report and then click the Save button. Click the Close button to cancel the operation.
- Pin Left Columns – Select the number of left columns to pin (None, 1, 2, or 3)
- Pin Right Columns – Select the number of right columns to pin (None, 1, 2, or 3)
- Column Sort Order – Configure a column sort order (default sort order is on the Name field ascending)
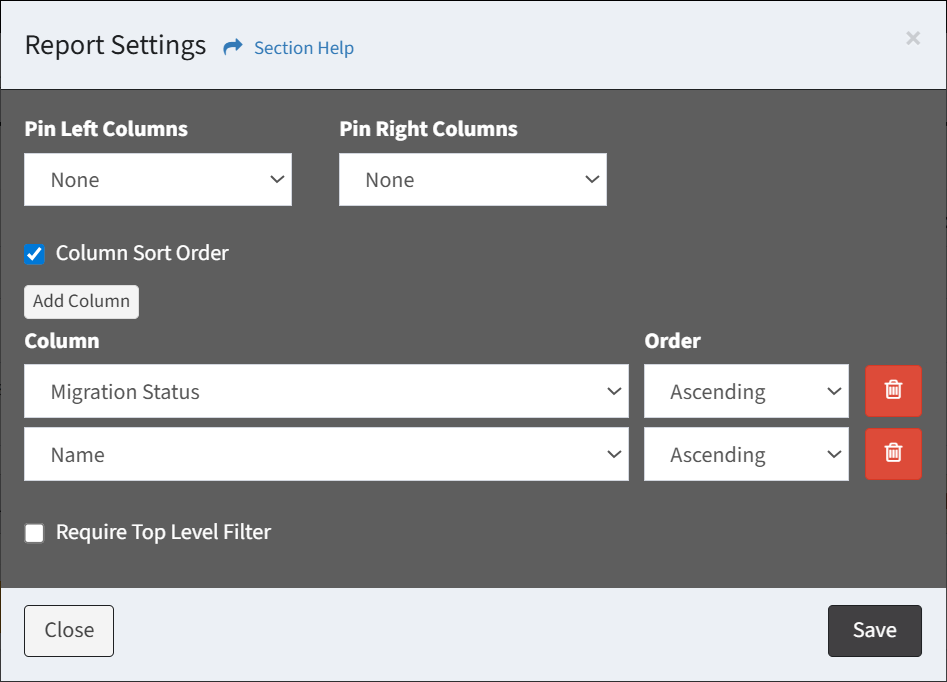
- Add Column – Add new rows (columns) to the sort order
- Column – Name of the data column to sort on
- Order – Sort order of the column (ascending or descending)
- Delete Row – Delete a row from the sort order
- Require Top Level Filter – Choose if selecting a top level filter is required before a report can be run

SQL Overall Status
From the Report Builder, you can configure overall status column settings. To configure overall status column settings:
- From the menu of an overall status column (displayed in green), select Settings to bring up the Overall Status dialog
- Enter the properties of the overall status column and then click the Update button. Click the Close button to cancel the operation.
- Status – Select custom statuses to aggregate to determine overall status (at least one status is required)
- Column Label – Name of the column (from the query)
- Overall status column is displayed in green. Custom statuses included in the overall status are dog eared in green.