
Search Knowledge Base by Keyword
-
Introduction
-
Fundamentals
-
My ReadyWorks
-
Analytics
-
-
-
- Available Reports
- All Data Types
- Application Certification Status
- Application Discovery
- Application Group Analysis
- App Group to SCCM Collection Analysis
- Application Install Count
- Application License Management
- Application Usage
- Data Type Column Mappings
- Record Count by Property
- Data Links Count by Data Type
- Build Sheet
- Computer User Assignment
- Delegate Relationships
- ETL5 Staging Data
- Migration Readiness (Basic)
- Migration Readiness (Complex)
- O365 License Management
- O365 Migration Readiness
- Patch Summary
- SCCM OSD Status
- Scheduled Computers by Wave
- Scheduled Users by Manager
- User Migration Readiness
- VIP Users
- Wave & Task Details
- Wave Group
- Windows 10 Applications
- Show all articles ( 14 ) Collapse Articles
-
-
-
-
Orchestration
-
Data
-
-
- View Primary Data
- Record Properties
- Images
- Notes
- Waves
- Tasks
- Attachments
- History
- Rationalization
- QR Code
- Linked Records
- SCCM Add/Remove Programs
- Altiris Add/Remove Programs
- Related Records
- Advanced Search
- Relationship Chart
- Primary Data Permissions
- Show all articles ( 2 ) Collapse Articles
-
Integration
-
-
-
- View Connection
- Connection Properties
- Make Into Connector
- Delete Connection
- Connection Error Settings
- Inbound Jobs
- Outbound Jobs
- New Inbound Job
- New Outbound Job
- Job Error Settings
- Enable Job
- Disable Job
- Edit Inbound Job
- Edit Outbound Job
- Upload File
- Run Inbound Job
- Run Outbound Job
- Set Runtime to Now
- Reset Job
- Delete Job
- Job Log
- Show all articles ( 6 ) Collapse Articles
-
-
- View Connector
- Connector Properties
- Authentication Methods
- New Authentication Method
- Authentication Method Error Settings
- Edit Authentication Method
- Delete Authentication Method
- Fields
- Edit Field
- Inbound Job Fields
- Edit Inbound Job Field
- Inbound Job Templates
- New Inbound Job Template
- Job Template Error Settings
- Edit Inbound Job Template
- Delete Inbound Job Template
- Outbound Job Fields
- Edit Outbound Job Field
- Outbound Job Templates
- New Outbound Job Template
- Edit Outbound Job Template
- Delete Outbound Job Template
- Show all articles ( 7 ) Collapse Articles
-
-
- ETL5 Connector Info
- Absolute
- Azure Active Directory
- Comma-Separated Values (CSV) File
- Generic Rest JSON API
- Generic Rest XML API
- Ivanti (Landesk)
- JAMF
- JSON Data (JSON) File
- MariaDB
- Microsoft Endpoint Manager: Configuration Manager
- Microsoft SQL
- Microsoft Intune
- Oracle MySQL
- PostgreSQL
- Pure Storage
- ServiceNow
- Tanium
- XML Data (XML) File
- JetPatch
- Lenovo XCLarity
- Nutanix Move
- Nutanix Prism
- Nutanix Prism - Legacy
- RVTools
- Simple Object Access Protocol (SOAP)
- VMware vCenter
- VMware vCenter SOAP
- Show all articles ( 13 ) Collapse Articles
-
-
Admin
-
-
-
- Modules
- Attachments
- Bulk Edit
- Data Generator
- Data Mapping
- Data Quality
- ETL
- Form Builder
- Images
- Multi-Factor Authentication
- Notifications
- Rationalization
- Relationship Chart
- Reports
- Rules
- Single Sign-On
- T-Comm
- User Experience
- Show all articles ( 4 ) Collapse Articles
-
-
API
-
Administration
-
FAQs
-
Solutions
Windows 11 Readiness
< Back
The Windows 11 Readiness report shows Windows Computers and their overall Migration Readiness status.
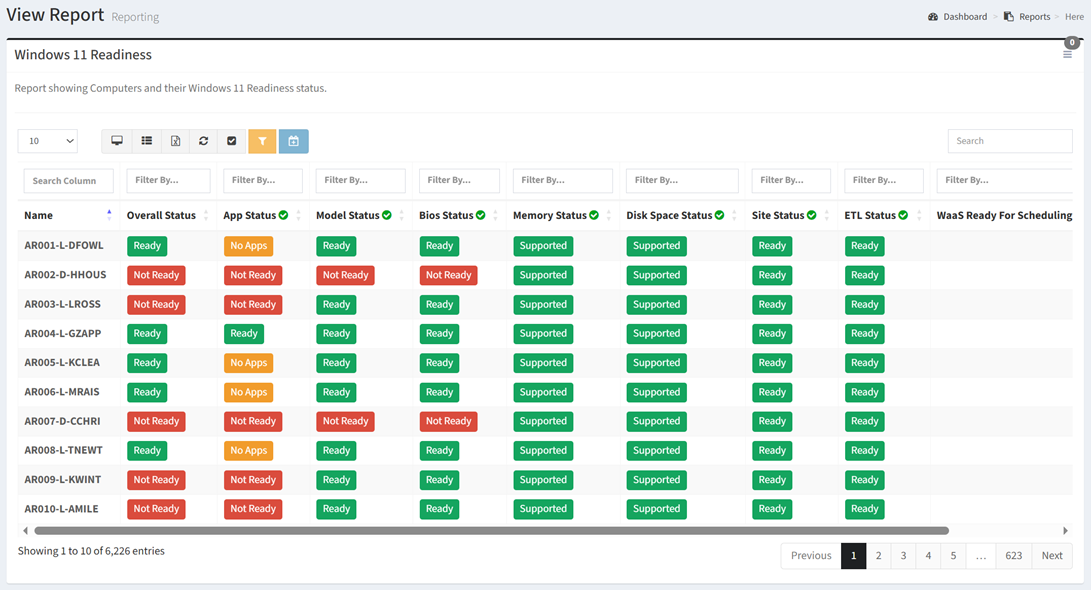
| Data Types | Required Fields |
| Computer | Name, Migration Status, Description, Location, Region, Domain, Computer Type, Operating System, Os Build, Os Version, Disk Size GB, Serial, Business Unit, Department, Computer Model, Bios Version, Memory Gb, Free Disk Space Gb, Site Ready, In Etl, WaaS Ready For Scheduling, Waves, |
| User | Name, Ad Login, Id, Title, Telephone, Email, Manager, Location, Domain, Business Unit, Department, Vip, Legal Hold, In Ad |
| Application | App Status |
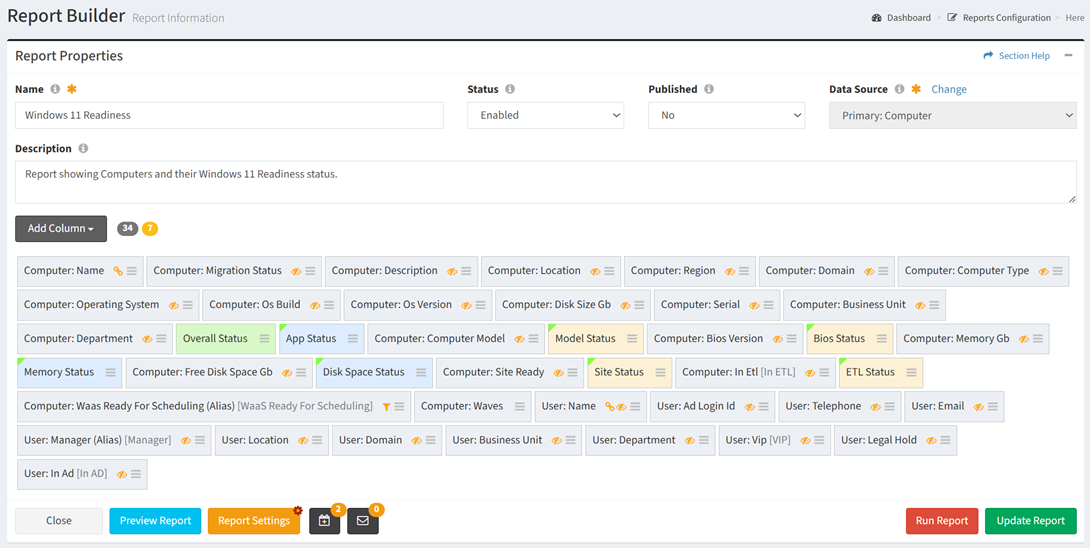
From the Reports tab, you can build the Windows 11 Readiness report. To build the report:
- Click the Report Builder button to bring up the Report Builder wizard
- Enter the properties of the new report
- Name – Windows 11 Readiness
- Status – Enabled
- Published – No
- Data Source – Data Type: Computer
- Description – Report showing Computers and their Windows 11 Readiness status.
- Add data columns to the report
- From the Add Column drop down, select Data Column to bring up the Data Column dialog
- Select the data columns of the new report from the Data Columns drop down and then click the Add button. Click the Close button to cancel the operation.
- Computer: Name
- Computer: Migration Status
- Computer: Description
- Computer: Location
- Computer: Region
- Computer: Domain
- Computer: Computer Type
- Computer: Operating System
- Computer: Os Build
- Computer: Os Version
- Computer: Disk Size Gb
- Computer: Serial
- Computer: Business Unit
- Computer: Department
- Computer: Computer Model
- Computer: Bios Version
- Computer: Memory Gb
- Computer: Free Disk Space Gb
- Computer: Site Ready
- Computer: In Etl
- Computer: WaaS Ready For Scheduling (Alias)
- Computer: Waves
- User: Name
- User: Ad Login Id
- User: Title
- User: Telephone
- User: Email
- User: Manager (Alias)
- User: Location
- User: Domain
- User: Business Unit
- User: Department
- User: Vip
- User: Legal Hold
- User: In Ad
- From the Add Column drop down, select Data Column to bring up the Data Column dialog
- Add custom status columns to the report
- From the Add Column drop down, select Custom Status Column to bring up the New Custom Status dialog
- Select the data column of the new custom status from the Data Column drop down
- Computer: Computer Model
- Computer: Bios Version
- Computer: Site Ready
- Computer: In Etl
- Enter the properties of the custom status column and then click the Create button. Click the Close button to cancel the operation.
- Computer: Computer Model
- Column Label – Model Status
- Value/Status
- For each Computer Model – Ready or Not Ready
- Computer: Bios Version
- Column Label – Bios Status
- Value/Status
- For each Bios Version – Ready or Not Ready
- Computer: Site Ready
- Column Label – Site Status
- Value/Status
- No – Not Ready
- Yes – Ready
- Computer: In Etl
- Column Label – ETL Status
- Value/Status
- No – Not Ready
- Yes – Ready
- Computer: Computer Model
- Add custom SQL columns to the report
- From the Add Column drop down, select Custom SQL Column to bring up the New SQL Column dialog
- Enter the SQL query of the custom SQL column and then click the Create button. Click the Close button to cancel the operation.
- App Status
(
CASE
WHEN ((SELECT COUNT(0) FROM `view_computer_application_links` WHERE (`view_computer_application_links`.`computer_id` = `at_computer`.`id`)) = 0) THEN ‘No Apps’
WHEN (( SELECT COUNT(0) FROM `view_computer_application_links` WHERE (`view_computer_application_links`.`computer_id` = `at_computer`.`id`)) =
(SELECT COUNT(0) FROM (`view_computer_application_links` LEFT JOIN `at_application` `a` ON((`a`.`id` = `view_computer_application_links`.`app_id`)))
WHERE ((`view_computer_application_links`.`computer_id` = `at_computer`.`id`) AND
(`a`.`lu__app_status` LIKE ‘7 – Application Ready’)
)
)
)
THEN ‘Ready’
ELSE ‘Not Ready’
END
) AS app_status - Memory Status
(
CASE
WHEN ((SELECT lu__memory_gb FROM `at_computer` cpu where `at_computer`.id = cpu.id) BETWEEN 0 AND 4.0) THEN ‘Not Supported’
ELSE ‘Supported’
END
) AS memory_status - Disk Space Status
(
CASE
WHEN ((SELECT free_disk_space_gb FROM `at_computer` cpu where `at_computer`.id = cpu.id) BETWEEN 0 AND 25) THEN ‘Not Supported’
ELSE ‘Supported’
END
) AS disk_space_status
- App Status
- To configure custom status, select Custom Status from the
 menu to bring up the Edit Custom Status dialog
- Edit the properties of the custom status and then click the Update button. Click the Close button to cancel the operation.
- App Status
- Value/Status
- No Apps – Ready
- Not Ready – Not Ready
- Ready – Ready
- Value/Status
- Memory Status
- Value/Status
- Not Supported – Not Ready
- Supported – Ready
- Value/Status
- Disk Space Status
- Value/Status
- Not Supported – Not Ready
- Supported – Ready
- Value/Status
- App Status
- Edit the properties of the custom status and then click the Update button. Click the Close button to cancel the operation.
- Add an overall status column to the report
- From the Add Column drop down, select Overall Status Column to bring up the Overall Status dialog
Enter the properties of the overall status column and then click the Update button. Click the Close button to cancel the operation.- Status – Select all available statuses
- Column Label – Overall Status
- From the Add Column drop down, select Overall Status Column to bring up the Overall Status dialog
- Drag and drop to reorder columns
- To configure column settings, select Settings from the menu to bring up the Column Settings dialog
- Configure the column settings and then click the Save button. Click the Close button to cancel the operation.
- Computer: Name
- Hyperlink – Checked
- Computer: Migration Status
- Visible – No
- Custom Label Color
- Value/Color
- Not Migrated – Red
- Migrated – Green
- Value/Color
- Computer: Description
- Visible – No
- Computer: Location
- Visible – No
- Computer: Region
- Visible – No
- Computer: Domain
- Visible – No
- Computer: Computer Type
- Visible – No
- Computer: Operating System
- Visible – No
- Computer: Os Build
- Visible – No
- Computer: Os Version
- Visible – No
- Computer: Disk Size Gb
- Visible – No
- Computer: Serial
- Visible – No
- Computer: Business Unit
- Visible – No
- Computer: Department
- Visible – No
- Computer: Computer Model
- Visible – No
- Computer: Bios Version
- Visible – No
- Computer: Memory Gb
- Visible – No
- Computer: Free Disk Space Gb
- Visible – No
- Computer: Site Ready
- Visible – No
- Custom Label Color
- Value/Color
- No – Red
- Yes – Green
- Value/Color
- Computer: In Etl
- Column Label – In ETL
- Visible – No
- Custom Label Color
- Value/Color
- No – Red
- Yes – Green
- Value/Color
- Computer: WaaS Ready For Scheduling (Alias)
- Column Label – WaaS Ready For Scheduling
- Custom Filter – 22H2 – PreReadiness (name of SCCM pre-readiness collection)
- Computer: Waves
- User: Name
- Visible – No
- Hyperlink – Checked
- User: Ad Login Id
- Visible – No
- User: Title
- Visible – No
- User: Telephone
- Visible – No
- User: Email
- Visible – No
- User: Manager (Alias)
- Column Label – Manager
- Visible – No
- User: Location
- Visible – No
- User: Domain
- Visible – No
- User: Business Unit
- Visible – No
- User: Department
- Visible – No
- User: Vip
- Column Label – VIP
- Visible – No
- Custom Label Color
- Value/Color
- No – Gray
- Yes – Orange
- Value/Color
- User: Legal Hold
- Visible – No
- Custom Label Color
- Value/Color
- No – Gray
- Yes – Red
- Value/Color
- User: In Ad
- Column Label – In AD
- Visible – No
- Custom Label Color
- Value/Color
- No – Red
- Yes – Green
- Value/Color
- Computer: Name
- Configure the column settings and then click the Save button. Click the Close button to cancel the operation.
- Configure the settings of the report
- Click the Report Settings button to bring up the Report Settings dialog
- Configure the settings of the report and then click the Save button. Click the Close button to cancel the operation.
- Pin Left Columns – 1
- Apply Global Where Clause
- Computer: Operating System In Windows 7, Windows 10, Windows 11
- Computer: Os Version Not In 22H2
- Assign action buttons to the report
- Click the
 button to bring up the Assign Buttons to Report dialog
 - To assign a button, select a type from the Type drop down, select an action or form button from the Button drop down, and then click the Assign button. Click the Close button to cancel the operation.
- Select All
- Assign Computers to Wave
- Click the
- Click the Preview Report button to preview the report before saving
- Click the Create Report button when finished to create the report. You will be redirected back to the Reports tab. Click the Cancel button to cancel the operation.